Showing posts with label couture techniques. Show all posts

November 13, 2014

the coat that stubbornness built

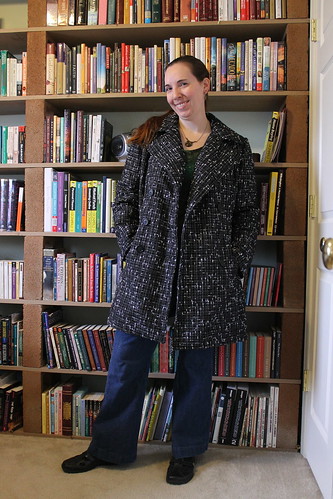
peacoatThe coat is finally done! It took a lot longer than I'd planned, mostly due to my sewing mojo being the lowest it's been since I was in grad school and trying to juggle that, my TA duties, getting a teaching career going outside of the university's music school, and actually seeing my friends on occasion. But I did the last bit of hand-stitching and sewed on the buttons last night, finishing it just in time for the cold to come. Literally. Yesterday it was in the 60s, and today we might scrape the upper end of the 40s if we're lucky. Brr.

Since I've used this pattern before, there isn't really a ton to say about it. I did do several things differently this time, mostly involving hand-stitching all of the internal seams down because they weren't pressing flat enough, and underlining. I used up that silk organza I'd mentioned in a previous post to underline almost everything (I didn't have quite enough for the sleeves, so I left it out of there), and I also underlined (interlined?) the lining with Thinsulate. Which was way less time-consuming in the long run than my last coat, where I quilted two layers of quilt batting into the lining. This coat is still heavy, though! I think it's mostly due to the outer fabric, which is pretty thick and heavy compared to the suedecloth I used for the last coat. Oh, and I had to draft the pattern piece for the collar stand, because apparently I also failed to return that to the envelope the last time, along with the first page of directions. Organization fail. Maybe next time I need a coat, I should just get a new pattern!
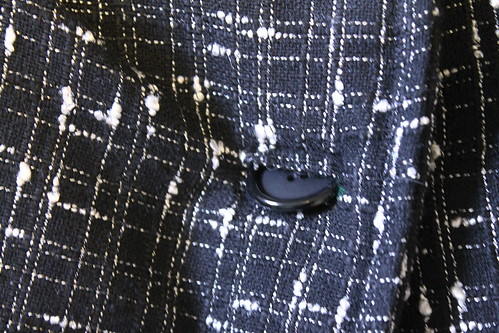
bound buttonholeOh, and I did bound buttonholes! This was my first attempt at doing it, and they are a little wonky in spots (also probably due to the thickness), but they blend in well enough with the fabric that it isn't blatantly obvious unless you're looking up close. I did cheat a little bit--the original coat pattern calls for an additional buttonhole on the part that goes underneath the main buttoned-up part, to attach to a button on the lining. But honestly, I rarely, if ever, buttoned it there when I was wearing the other coat. So I figured I'd save myself some time and skip it! I also stole the buttons from the old coat, since they were still perfectly good.
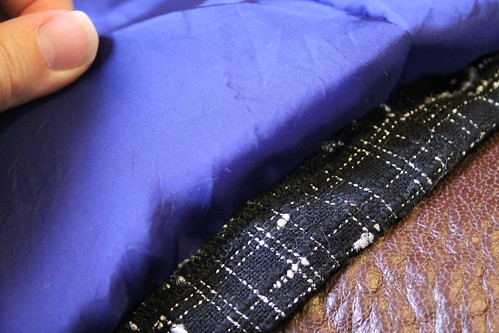
hemI cheated on the lining a bit, and just shoved the raw edge of the lining underneath the serged edge of the coat and hemmed it on machine. At that point, I just wanted it DONE. But honestly, I think it will hold better in the long run than hand-stitching on this particular fabric, and since the lining pleats over top of the hem, you can't even really see that serged edge.

This project may have taken forever, and it was honestly sheer stubbornness combined with my fear of cold that pushed me to finish it. But it was great for stashbusting! All together, I completely used up 3 yards of that tweedy stuff on the outside, 2 yards of Bemberg lining, and about 3 1/3 yards of the organza--it wasn't full width everywhere since it was leftover from a previous project, so I had to do some creative pattern work. I do have a decent-sized piece of leftover Thinsulate, so I'll need to figure out what to do with that at some point.
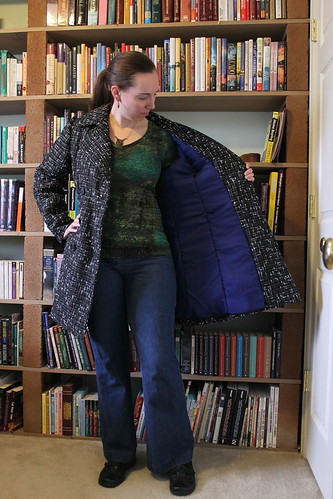
peacoat liningSo, one project of my FESA plan down, finally.  I'm hoping I can still squeeze in my SewDisney project before the end of November, but I'm starting off with a Renfrew hack, so this should theoretically go much faster! And at least I'll manage to stay warm in the meantime. I hope. Since this is me we're talking about, after all.

January 25, 2013

puzzle solving


IMG_0454After the great lace disaster of last week, I've managed to get to the point where the front is basically done, and am now applying lace to the back! Which, surprisingly, has turned out to be more complicated than princess seams. Between trying to somewhat match up the motifs that are going over the seamlines and trying to keep it flat and intact over the organza part--I'd like to avoid having to stitch that down so it looks nice on the inside--trying to do this one side of the back has become like trying to solve this complicated puzzle where I'm carefully trimming around bits of sunflowers and overlapping other bits to try and make a fabric that still looks nice but stays flat. All this while trimming and stitching as I go. I tried putting the bodice on Donna and trimming out a piece of lace to put on this piece yesterday, and it didn't work, so I had to resort to basically having the entire piece of lace hanging off of this thing at some point and stitching as I go. I had to make some overlap, but I did have a couple of flowers touching on the front as I tried to work around the princess seams, so it will have to do. There's not many other options for a lace with a lot of netting in between flowers. Most people probably won't be looking that closely, right?

IMG_0458At least those other cut pieces won't entirely go to waste, as I can recycle the sunflowers as skirt embellishments. I'm having my leg model here so they really pop! There's about 6 fully trimmed out so far, and others in various stages of cutting netting away. I've been working a little of this in between things so I can break up the mountain of hand-sewing on occasion.

UntitledThe other major thing I've gotten done this week was sewing twill tape around the top of the bodice to help shape and stabilize the neckline, and turning and stitching those pieces down. It took some re-reading of Bridal Couture and a shoutout for some clarification on Twitter to figure out exactly how best to go about it, but I think the results turned out well. I grabbed this pic on my phone in-progress...


IMG_0455And here's the result! It did make a rather nicely-shaped neckline, I think--maybe a little pointier than I would have wanted on the right side, but we'll see if I redo it. I did do this part with some negative ease, so it should help the thing curve in and fit me better, too.

IMG_0457


In continuing the tradition of showing the guts of the dress, here's what it looks like inside, with the photo seriously filtered to really let it show. For some reason, this side was way more ripply than the other side, and I may end up re-doing this particular section to attempt to get it to lie flatter. (I think this is the pointier side, come to think of it...maybe that explains it.)


One last order of business before I get back to work-- I was recently given the Premio award by the lovely Hana. It's to thank the last 9 people who have commented here, and I'm all in favor of more commenting (and have been making an effort to leave comments more often myself this year!) So I'd like to send a shoutout to Hana (still the most recent commenter!), Donna, Murieann, Helen T, Gwen, soisewedthis, Allison, Christina, and Carolyn.

I apologize to those of you whose blogs I didn't link-- I discovered as I was doing this that apparently Disqus won't link me to the blog for the commenter like the default settings do. I also learned from Hana that apparently the comments don't work on Internet Explorer! Has this been an issue for anyone else? Would it be better if I try to undo the Disqus and just go back to the default commenting?

January 10, 2013

so, who wants to see some dress guts?

I guess I can cross something else off of the list of "things I never thought I'd actually make but did", because I just spent the last two days making, of all things, an organza corset. Sort of.

IMG_0353I'd figured that the most sensible place to start in actually sewing this thing together would be the underlayer with the boning, which I cut separately from the double-underlined bodice pieces just to simplify actually adding the boning. Thanks to the transparent nature of the organza, it took me maybe an hour to get to this...

(And yes, those seams are right side out for a reason, I wanted to keep the more finished side towards the inside of the dress for this one!)


IMG_0355
Of course, then it took me four more hours to get to this! My catch-stitching definitely improved on this one, but I think it actually looks kind of cool on the organza since you can really see all of the stitch. Maybe I should always practice my hand-sewing on see-through fabric! It probably wasn't entirely necessary to go back to each place where I cut the curved seam allowances so they'd lie flat in pressing, but I really wanted to make sure this wouldn't get all frayed and weakened in the process. And, actually, the hand-sewing was surprisingly relaxing! I'm not sure what this change says about me, because I used to HATE hand-sewing when I was making my clothes as a teenager, and would do all I could to avoid it. Maybe I'm maturing?

IMG_0356
I'd made the boning channels a little too snug before, but I wanted to keep the muslin channels to make the dark boning less likely to show through. So I just cut strips of the scrap organza and stitched that on top instead to give it a little extra width and slightly more camoflage.

(Also, I waaaaay overestimated how much organza I'd need, and I've probably got a solid two yards of this left! Oh well, at least silk organza is supposed to be infinitely useful for sewing things.)

So then I ended up with this vaguely corsetish-looking thing....wait a sec, what's up with that side?

Of course, the first thing I did was check to make sure I didn't do anything dumb like sew the piece on upside down. I didn't. It was a perfect mirror image of the other side, which was pretty straight. I think what this is telling me is that I need to tweak the sizing on Donna...
IMG_0361...because this is what it looks like on me. At least, as close to fitted as I could get it considering that it was over top of my shirt and cami, but this would definitely NOT be internet-safe otherwise!I think that one of my first post-wedding projects should probably be to try and make a cover for Donna so that I can really pad her out to my real measurements. Though I'm not really sure how best to do that-- I've seen tutorials, of course, but trying to get the bust area shaped right for fitting v-necks and such will be....interesting.

Anyway, not bad for two days' work, and it's SO good to actually have visual progress going here! The next step will probably be a bit slower, as I need to sew together the actual bodice, and I think I'm going to have to hand-baste this together for accuracy purposes first. After all, it's not nearly so easy to see the thread-tracing on that as it was on this!

January 9, 2013

And there was much rejoicing.

It's not that I'm done hand-sewing on this thing by any stretch of the imagination....but I'm FINALLY at the point where I can start using an actual sewing machine again! YEEEEEEEAAAAAAAAAAH!

The spare bedroom has been (mostly) set up as Wedding Dress Central, and if all goes well with the shopping trip with my mom today (mother of the bride shopping time), I just might be able to get this thing rolling with actual visual progress! Stay tuned....

In other news, the wedding is 150 days from today, 5 months from yesterday. I've still got plenty of time to finish this, right?

January 4, 2013

still underlining

But I'm getting closer. I've been working on the skirt pieces today. My new favorite tool for working on the dress?

Lightbox!


A light box! The waxed marks on the underlining were frustratingly invisible, so I had the thought to try this. Fortunately, my mom still had her old light box. I'm pretty sure this thing is from the 80s, I remember her using it at her work-at-home job when I was a kid, so it's this big bulky thing. I've also found that I can only thread-trace one piece at a time, which is about a 45-minute process, because the box gets pretty hot on the bottom and so I like to turn it off and give it (and my legs) a break. It's probably better for my carpal-tunnelly wrist that way, anyway.

For the record, and since this is an excuse to quote The Princess Bride, I am not left-handed. I just needed my right hand to hold the camera. Also, my fabric is obviously not green, but after playing with a few different settings and the lights always turning the white a different color regardless, I decided it looked cool this way! 

I've been leaving the muslin pinned on while doing this in order to keep the pieces from shifting as much as possible, and catching that bottom layer hasn't been much of an issue at all. I think this will actually save me some time, because I can totally see the machine-stitched thread-traced lines through the two layers of white, and so I'm not seeing much point in bothering to do the waxed paper tracing if I can just follow those lines.