I'm compiling as many fitting resources for pants as I can find into this link. I'm no expert on fitting adjustments myself, but hopefully you'll find these helpful. (I'll keep updating this post as I find more.)
General fitting:
Pants-fitting basics, via The Coletterie.
A link list for several pants-fitting issues, from Sewaholic.
This one is more for jeans, but some of the principles could apply to regular trousers as well. From Threads Magazine.
Baggy seat fix, also from Threads Magazine.
Adding a wedge for if you need more coverage in back, from Sewingplums.
Another trousers sewalong at A Fashionable Stitch. (Thanks, Joanne and Alessa!)
An in-progress "Fit-n-Sew Along" at Maria Denmark. (Thanks to Maria and Not Sew Simple for keeping me in the loop on the Twitter discussion they were having about this while I was at work!)
Pattern-specific:
Lauren at Lladybird hosted a Thurlow sew-along last year, which I would have been all over if I hadn't been somewhat distracted by muslining a wedding dress. The posts for that start here. She also has a bunch of helpful links in this post to various other blog posts about fitting!
There's also a series of posts at The Coletterie for sewing the Clover pants.
I haven't found anything specific on the Juniper pants yet, but feel free to comment if there's something I missed!
Stepping it up:
Adding a "French Fly" with a waist stay, from Handmade by Carolyn.
Sewing a blind hem, from The Coletterie.
Also from Twitter- a video series on drafting and sewing trousers, from Joost. (This one is more for men's trousers, so the fit would obviously be different, but I'm sure that the ladies can learn something from menswear construction, too!)
Do you have any other favorite fitting tips or pattern alterations? Feel free to share in the comments, and I'll add it to the list.
As for my own progress, I haven't actually started sewing yet! Between an open-to-close work shift over the weekend, church and music activities on Sunday, and going to Philadelphia to see Muse on Monday night, I've barely had time to even sleep, let alone sew. But I did get the pattern traced out, and my (hopefully) wearable muslin mostly cut out yesterday. I still need to do interfacing and lining pieces, so I'm going to try to get that taken care of this afternoon. And maybe even start constructing, if time allows.

Showing posts with label alterations. Show all posts
Showing posts with label alterations. Show all posts
September 11, 2013

August 26, 2013
another wedding shower gift
The shower was over the weekend, so I can finally show the related sewing projects!
As I said before, these were for my friend Nicole--she's the one real life friend I have who occasionally sews, so I knew she'd appreciate it! Though we probably won't be sewing together again, since she moved to Boston to be closer to her fiance and will be staying there after her wedding. I'll miss her, but I am happy for her!
 I like to run with a small theme for wedding gifts, even when I'm buying straight off the registry, and this one was no exception. She'd asked for Julia Child's Mastering the Art of French Cooking, and the cover was so pretty, I couldn't resist! And I already knew I wanted to make her an apron, since one of our last fun sewing adventures together was making Anthropologie-inspired aprons. The apron she made for that was actually a wedding gift for one of her friends, and I thought she should have one herself. So I went with the same apron inspiration she'd chosen, the Tea & Crumpets apron. (Since this one's on sale, I doubt I saved any money--but I've always felt that white is very impractical for an apron that one wears while actually cooking, unless you're a professional chef who isn't as sloppy with the tomato sauce! Plus I was guessing at what colors she might actually have in her kitchen, based on her registry and Pinterest boards.) This cute bee fabric jumped out at me immediately, but it was really hard to find something that matches it! I'm really grateful that my quilter mom went along to help me out.
 I drafted most of the pattern myself, based on an apron that I'd been given at my own shower. But I did borrow the pocket from the Cake Pavlova skirt, because it looked like a perfect match! And since I have one or two of these skirts in mind for some stashbusting, it was good to have a chance to practice the pattern a bit.
 The other thing I made was this set of placemats. To continue the French theme, we found this fabric with French lettering on it. But the one I really fell in love with was the bicycle fabric, because it just seemed so perfect for her. And it really did end up being perfect, because her grand entrance to her shower, which we held outside, was riding in on her bicycle! I will admit that my mom did help me finish these up, since I was running out of time and needed to do one side of the binding by hand. I will also admit that the corners are not nearly as nice as the ones that my mom usually makes, because I completely forgot her instructions for them. I guess I'll have to consult with her on that later, because I'm sure I'll be making some more placemats at some point, if only so we have another set. (Mom made me some for my own bridal shower.)
She was really excited about it, as were most of the people at the shower--I got a lot of compliments on my sewing skills! (Especially once someone asked me if I'd made the dress I was wearing, too.) I'm not quite done sewing for her yet, as this week's project is altering her wedding dress! Which, thankfully, will be a relatively easy job. The dress fits her perfectly in the bodice, so all I have to do is hem it. Of course, it's also 3 layers, the inner lining is silk charmeuse, and the outer layer is silk chiffon! My plan is to just do a narrow machine hem on the charmeuse and the outer lining. I may hand-stitch the chiffon, though, since it's a little crinkly and I don't want it to go all lettuce-y on me.
I'm also pretty close to finishing my Sewcial Bee dress. I'd like to reinforce the midriff, since the serged stitches were pulling a bit when I put it on Donna to let the hem hang. I also need to figure out exactly how I want to hem it--I don't want to just leave it raw, because it's a pretty thin jersey and I suspect it might develop some runs if I do that. But if all goes well, I'll have both of these dresses done in time for Pantsapalooza!
As I said before, these were for my friend Nicole--she's the one real life friend I have who occasionally sews, so I knew she'd appreciate it! Though we probably won't be sewing together again, since she moved to Boston to be closer to her fiance and will be staying there after her wedding. I'll miss her, but I am happy for her!
I like to run with a small theme for wedding gifts, even when I'm buying straight off the registry, and this one was no exception. She'd asked for Julia Child's Mastering the Art of French Cooking, and the cover was so pretty, I couldn't resist! And I already knew I wanted to make her an apron, since one of our last fun sewing adventures together was making Anthropologie-inspired aprons. The apron she made for that was actually a wedding gift for one of her friends, and I thought she should have one herself. So I went with the same apron inspiration she'd chosen, the Tea & Crumpets apron. (Since this one's on sale, I doubt I saved any money--but I've always felt that white is very impractical for an apron that one wears while actually cooking, unless you're a professional chef who isn't as sloppy with the tomato sauce! Plus I was guessing at what colors she might actually have in her kitchen, based on her registry and Pinterest boards.) This cute bee fabric jumped out at me immediately, but it was really hard to find something that matches it! I'm really grateful that my quilter mom went along to help me out.I drafted most of the pattern myself, based on an apron that I'd been given at my own shower. But I did borrow the pocket from the Cake Pavlova skirt, because it looked like a perfect match! And since I have one or two of these skirts in mind for some stashbusting, it was good to have a chance to practice the pattern a bit. The other thing I made was this set of placemats. To continue the French theme, we found this fabric with French lettering on it. But the one I really fell in love with was the bicycle fabric, because it just seemed so perfect for her. And it really did end up being perfect, because her grand entrance to her shower, which we held outside, was riding in on her bicycle! I will admit that my mom did help me finish these up, since I was running out of time and needed to do one side of the binding by hand. I will also admit that the corners are not nearly as nice as the ones that my mom usually makes, because I completely forgot her instructions for them. I guess I'll have to consult with her on that later, because I'm sure I'll be making some more placemats at some point, if only so we have another set. (Mom made me some for my own bridal shower.)She was really excited about it, as were most of the people at the shower--I got a lot of compliments on my sewing skills! (Especially once someone asked me if I'd made the dress I was wearing, too.) I'm not quite done sewing for her yet, as this week's project is altering her wedding dress! Which, thankfully, will be a relatively easy job. The dress fits her perfectly in the bodice, so all I have to do is hem it. Of course, it's also 3 layers, the inner lining is silk charmeuse, and the outer layer is silk chiffon! My plan is to just do a narrow machine hem on the charmeuse and the outer lining. I may hand-stitch the chiffon, though, since it's a little crinkly and I don't want it to go all lettuce-y on me.
I'm also pretty close to finishing my Sewcial Bee dress. I'd like to reinforce the midriff, since the serged stitches were pulling a bit when I put it on Donna to let the hem hang. I also need to figure out exactly how I want to hem it--I don't want to just leave it raw, because it's a pretty thin jersey and I suspect it might develop some runs if I do that. But if all goes well, I'll have both of these dresses done in time for Pantsapalooza!
September 19, 2011
Never thought I'd have to make THAT adjustment...
When I started this dress, I'd figured I'd just adjust as I go since knits are more forgiving than wovens. I was debating between sizes 12 and 14, and finally decided to go with the 14 because it looked pretty fitted--I didn't want it to be too tight up top.
 So instead, when I pinned in the zipper and tried it on, the bust part was super-saggy. Like 80-year-old-woman saggy! So I had to wing something I never thought I'd have to do-- a small(er) bust adjustment! (And here I haven't even mastered the FBA that I usually have to go for...)
 I didn't want to take the sides apart since it was already topstitched and stay-taped and everything. So I ended up taking a pretty huge chunk out of the front seams--well over an inch--and tapering it towards the side and center twist. I also took about an inch off of each side in the center back.
 I think it fits much better now! Still a bit slouchy across the front, but it's supposed to look gathered, so it's ok.
 And the back, which still needs adjusting for the back shoulder bit, but I'll do that later after the skirt's on and I have a bit of a better idea of how much that's going to weigh things down.
Moral of the story: Next time I make something out of a two-way stretch knit, I should probably go with the smaller size, huh?
p.s. I'm drawing the giveaway winner tomorrow--you've still got a few more hours if you want to enter!


Moral of the story: Next time I make something out of a two-way stretch knit, I should probably go with the smaller size, huh?
p.s. I'm drawing the giveaway winner tomorrow--you've still got a few more hours if you want to enter!
May 22, 2011
Testing, testing...
Warning: The following post contains pictures of me attempting to fit pants. Or pants-like things.
I've gotten the test version of the pants basted together, and spent some time this afternoon tweaking the fit. Here's how the process has gone so far:

Step 1: Added all of the markings that didn't happen in the original Frankenpattern. Which turned out to be way more of a trial and error than it should have, at least for the first piece, because I hadn't finished my first cup of tea for the day at the time and forgot that my seam allowances are currently 1" and not 5/8".
 Step 2: Discovered my first pattern tweak-- apparently I mis-traced one of the waistband pieces (out of the magazine, and so much has been said about Burda's new pattern sheet layouts that I don't think I need to go into more explanation there) and one ended up longer on a side than the other.
 But that was an easy enough fix. I trimmed them to the same width on that edge and marked the difference for later. (Slightly harder to fix will be my discovery right after that I'd only cut 1 facing piece for each waistband instead of 2. I guess I'll have to dig in the remnant bin again and see what else I have, since I'm pretty sure I don't have enough left of the piece I used to cut those and the pocket pieces. If I have enough at all.)
Then came the fun part: basting the whole thing together (sans pockets and facings and zipper fly bits) to see what the situation would be.
 Actually, it was pretty close on the original pattern. (The top row is the "before" pics for the pattern sewed together on all given seam allowances, and the bottom row is the "after" pics after I tried a few of the tweaks I learned from the jeans class. Fronts and backs are diagonal to each other, because I messed up on the Picasa collage layout before saving and couldn't edit it.)
The main problem initially was, of course, the crotch. Lots of pulling and sagging and whatnot. I also had to take in a little bit on each side and at the top of the back to fix some gapping issues. It's still not perfect, but I think it's about as good as it'll get, at least with this fabric. It's a kind of stiff twill, so it just doesn't have much in the way of drape to hang well in the back. As for the front, there's still some creases, but I'm becoming convinced that pretty much any pair of fitted-at-the-top women's pants is going to do that, since it seems like, in my cursory glance over the internet just now, even skinny models with no hips have those wrinkles when they wear pants. (At least, in the initial Google image search, and on Anthropologie. On a side note, these pants aren't there anymore. So this has to work!)
 I've got my pattern pieces basically prepped for alterations now, except for trimming-- the orange line is the new seam allowance, and the purple is the new cutting line. This piece (the back) was the most dramatic change. Most of the rest of it just involved taking in the tops of seams about 1/8" or so. I'll need to add just a little bit to the center front, too, since I had to flatten out the curve there and it seems like it took away from the seam allowance somehow.
Next step: I need to take these shorts apart again, since they're only basted together (though I think I'll trim the seam allowances down a bit first.) Then it'll be sewing them together for real, mainly to give myself a bit of practice on the two techniques that concern me in here: the welt pockets and the fly-front zipper!
I've gotten the test version of the pants basted together, and spent some time this afternoon tweaking the fit. Here's how the process has gone so far:

Step 1: Added all of the markings that didn't happen in the original Frankenpattern. Which turned out to be way more of a trial and error than it should have, at least for the first piece, because I hadn't finished my first cup of tea for the day at the time and forgot that my seam allowances are currently 1" and not 5/8".


Then came the fun part: basting the whole thing together (sans pockets and facings and zipper fly bits) to see what the situation would be.

The main problem initially was, of course, the crotch. Lots of pulling and sagging and whatnot. I also had to take in a little bit on each side and at the top of the back to fix some gapping issues. It's still not perfect, but I think it's about as good as it'll get, at least with this fabric. It's a kind of stiff twill, so it just doesn't have much in the way of drape to hang well in the back. As for the front, there's still some creases, but I'm becoming convinced that pretty much any pair of fitted-at-the-top women's pants is going to do that, since it seems like, in my cursory glance over the internet just now, even skinny models with no hips have those wrinkles when they wear pants. (At least, in the initial Google image search, and on Anthropologie. On a side note, these pants aren't there anymore. So this has to work!)

Next step: I need to take these shorts apart again, since they're only basted together (though I think I'll trim the seam allowances down a bit first.) Then it'll be sewing them together for real, mainly to give myself a bit of practice on the two techniques that concern me in here: the welt pockets and the fly-front zipper!
March 13, 2010
the calm before the storm
That's what this weekend is feeling like, anyway. Due to a fluke in my scheduling (I only have one student each on both Mondays and Fridays, and both of those girls canceled this past week and for this coming Monday as well) and a lack of social plans, I'm having basically 3 days completely off. (Being yesterday, today and Monday. Between church and flute orchestra practice, Sundays don't feel like a free day at all!) I'm trying to take advantage of it as much as possible, because between going back to work at the garden center next week, upcoming music things with Saturday rehearsals, and other miscellaneous stuff, my free time is going to be seriously cut back again.
 Yesterday was my sewing day, I guess...I spent most of the day making a muslin for the Burda knit top I want to make for this spring. I wasn't going to originally, but spontaneously decided to yesterday. I'm glad I did...true to my normal thing, I had to take it in some at the waist, and that would have been a pain in the butt to try and fix once it was all serged together. Plus I raised the neckline some, which I think is going to work ok (I didn't check it with the facing, so hopefully it will be!) And this way I got to test it with the pleats left open and stitched down, which is also a good thing, because stitching them down looks way better on me! (Since I don't have a picture of the moment where I had it half stitched and half not, let's just say it was very, very unflattering up top. And I kind of like the sleeker pintuck look of it stitched down better anyway.) The bonus is that this means I'm basically going to get two shirts out of this--since the cheapest knit I was able to get at Joann's was a regular interlock with a 50% off coupon, and the basic cutting out and construction really didn't take very long at all, I'm just going to unbaste this one and then sew it together for real. Let's just ignore the fact that I'll have the same shirt in two different shades of green, ok? My kelly green t-shirt needed replacing anyway because it's too tight up top and more low-cut than I'm really comfortable with for teaching. And I can chalk it up to expanding on my knit class, to see if there's any real difference between this interlock and the jersey knit I was originally planning on using. Yes, I know what the difference is between interlock and jersey now.
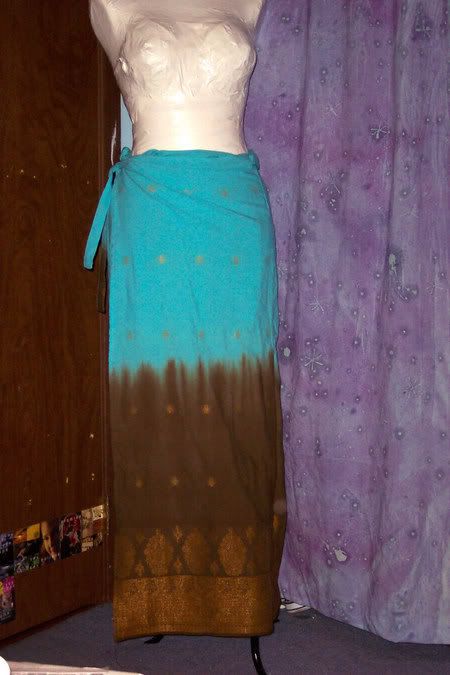
Since my plan of making a wearable muslin meant I had to wait for the knit to go through the washer and dryer with the rest of the laundry, I also had time to more-or-less successfully alter a skirt! I made this one (original pic) back in 2006, from a wrap skirt pattern I drafted myself. It wasn't completely awful...I was successful in getting a skirt that didn't gape open horribly when I walked, and used the too-good-to-pass-up Indian border print to full advantage. My fitting up top was pretty bad, though. I'll admit it. You can't see it too closely in this before pic, but the fabric bunched up really badly above the wrap ties. Kind of the effect of one of those paper-bag skirts, but a lot worse-looking. (Not that I think that style would look very good on me anyway.) Plus I kind of overestimated the width of the inside front panel, and part of the skirt also had to pull through the buttonhole for the wrap tie to make it fit.
 Now, normally I'd just either chop a project like this into something completely new, or consider it a lost cause and give it to Goodwill. But in going through my stuff for my wardrobe project, I discovered that I do have a bunch of things that, with a little bit of alteration, can still be good for me to wear. Usually I'd rather just sew something entirely new than make alterations, but I still really like this fabric. So I took off enough of the facing to get to the back (couldn't do it entirely due to the buttonhole), added a couple of darts, changed the angle of the front underwrap so I could move the tie over, and then made a new seam in the back facing to get rid of the excess fabric and sewed it back on. It looks like it's going to fit soooooo much better now! So I guess all in all, it was worth the couple of hours.
Today, I was originally going to cut out and sew together the for-real version of the Burda top. But I reluctantly came to the conclusion that my sewing area needed some serious tidying up intead. You know, seeing as how I can't get to anything, all my bobbins are tangled together, and every time I reach for a spool of thread I start an avalanche of patterns and Burda mags. So I'm doing a good bit of reorganization today. So far, I've managed to move the contents of my scrap bin to a less-readily-accessible bin (to free it up for things I'll need to get to sooner), and I sorted through the other bins there so I could put the fabrics and patterns that I have definite plans for in the next couple of months together in an easy-to-get-to place. I'm also probably going to put the ones that I'm very strongly considering for fall/winter clothes this year in a slightly less but still easy to get to place. And I've got all of the orphaned pattern pieces in an envelope to sort into their proper places later, which is better than having them randomly shoved onto shelves in crumpled wads. And I also managed to clear out a bin to put the pattern envelopes in....just need to figure out what to do with the Burda mags and the couple of sewing books I have. I'm also getting rid of a significant chunk of my to-be-refashioned pile--either clothes that were mine or my mom's or things I got thrifting with no specific plan for that have been sitting here for awhile. (Well, ok, not everything I don't have specific plans for....but I really do need to use or lose a good bit of this before I can thrift more!) The big mess is going to come once I go back downstairs, because that's when I have to deal with the piles on the floor and the sewing table and the ginormous mess that is my box of bobbins/trims/miscellaneous doohickeys.
I probably also need to deal with my room some too. I'm just getting tired of being surrounded by piles and clutter, especially in my room since it's never gotten entirely put away since I moved into it. But I also hate cleaning--I'd much rather be making some kind of creative mess than cleaning it up! Oh well....I'll just keep telling myself that this will be worth it once I have all of this mess straightened up and then I can spend my time sewing instead of hunting for bobbins or shuffling piles around! Maybe I can sew on Monday...

Since my plan of making a wearable muslin meant I had to wait for the knit to go through the washer and dryer with the rest of the laundry, I also had time to more-or-less successfully alter a skirt! I made this one (original pic) back in 2006, from a wrap skirt pattern I drafted myself. It wasn't completely awful...I was successful in getting a skirt that didn't gape open horribly when I walked, and used the too-good-to-pass-up Indian border print to full advantage. My fitting up top was pretty bad, though. I'll admit it. You can't see it too closely in this before pic, but the fabric bunched up really badly above the wrap ties. Kind of the effect of one of those paper-bag skirts, but a lot worse-looking. (Not that I think that style would look very good on me anyway.) Plus I kind of overestimated the width of the inside front panel, and part of the skirt also had to pull through the buttonhole for the wrap tie to make it fit.

Today, I was originally going to cut out and sew together the for-real version of the Burda top. But I reluctantly came to the conclusion that my sewing area needed some serious tidying up intead. You know, seeing as how I can't get to anything, all my bobbins are tangled together, and every time I reach for a spool of thread I start an avalanche of patterns and Burda mags. So I'm doing a good bit of reorganization today. So far, I've managed to move the contents of my scrap bin to a less-readily-accessible bin (to free it up for things I'll need to get to sooner), and I sorted through the other bins there so I could put the fabrics and patterns that I have definite plans for in the next couple of months together in an easy-to-get-to place. I'm also probably going to put the ones that I'm very strongly considering for fall/winter clothes this year in a slightly less but still easy to get to place. And I've got all of the orphaned pattern pieces in an envelope to sort into their proper places later, which is better than having them randomly shoved onto shelves in crumpled wads. And I also managed to clear out a bin to put the pattern envelopes in....just need to figure out what to do with the Burda mags and the couple of sewing books I have. I'm also getting rid of a significant chunk of my to-be-refashioned pile--either clothes that were mine or my mom's or things I got thrifting with no specific plan for that have been sitting here for awhile. (Well, ok, not everything I don't have specific plans for....but I really do need to use or lose a good bit of this before I can thrift more!) The big mess is going to come once I go back downstairs, because that's when I have to deal with the piles on the floor and the sewing table and the ginormous mess that is my box of bobbins/trims/miscellaneous doohickeys.
I probably also need to deal with my room some too. I'm just getting tired of being surrounded by piles and clutter, especially in my room since it's never gotten entirely put away since I moved into it. But I also hate cleaning--I'd much rather be making some kind of creative mess than cleaning it up! Oh well....I'll just keep telling myself that this will be worth it once I have all of this mess straightened up and then I can spend my time sewing instead of hunting for bobbins or shuffling piles around! Maybe I can sew on Monday...
January 13, 2010
I almost forgot....last project of 2009!
 Since she sometimes stalks this blog, I couldn't show what I made for my best friend for Christmas until after I gave it to her. Back around her birthday, she asked if I could make some beaded earrings for her--of course, at that point I didn't have time because of work, and I'd already ordered her a gift off of Etsy. So I decided to do that for Christmas instead.
There's six pairs altogether. I think my favorite ones are the second from the left-- I had a couple of beads left over from the tan necklace I made for my mom a couple of Christmases ago, and she's an avid crocheter, so I couldn't resist the opportunity to give her crocheted earrings!
 I was also pretty proud of my packaging. Earlier in December I had a mad rush to get everything possible out of my old room and into the new, because we had to get it ready for some relatives to stay in there. While I was in the process of doing that, I found my iPod box. Figured I don't need that anymore, because the only reason I'm going to get rid of this iPod is because I'm either going to wear it out, or completely run out of room. (It gets a LOT of use, and does occasionally glitch on me. Surprisingly, I haven't managed to fill all 80 gigs yet. But given my addiction to finding new music, I'm sure the day will come.) Anyway, I cut a piece of cardboard, covered it with scrap wrapping paper, stuck that in the box, punched some holes in it with a bigger needle, and stuck the earrings in. Makes for a nice presentation, I think!
Aside from that, I've been hemming a bridesmaid dress for the same friend (we have a mutual friend who's getting married next weekend, and C's in the wedding), and altering my own dress for it, which was a little too big at the waist. I'm also hoping to get some good time in this weekend to do some prepwork for a baby gift I need to make, and then after that, it's back on the room decorating.
I'm also in kind of a scrapbookish mood- new year, renewed feeling that I'm WAY behind on my albums and need to do some work on them! I actually got out my supplies the other night to make some embellishments that I could just have on hand to use for pages...and discovered that in order to feel inspired to actually make page decorations, I need to have a page to make them for. So then it switched to more of an organizational thing--sorting through some paper scraps to get rid of the unusably tiny ones (ok, so "getting rid of" means "putting them in a box so I can make some paper out of them later") and going through my stack of photos that I've pulled papers out for in order to figure out layouts and what I might want to do to decorate them. I think that'll help some. So you may actually see some progress on those in the quasi-near future.
July 11, 2009
A 2-for-1 special: The "Sea Flowers" top and dress
I finally got around to taking the pics this afternoon, so I now present parts 3 and 4 of my summer wardrobe: the printed top, and the dress that was supposed to be maxi but wasn't.
 1. The top- McCall's 5662
Pattern Description: Knit empire-waist top with bodice and sleeve variations. I made C, which is a kind of kimono-esque one.
Pattern Sizing:X-small- Med.
Did it look like the photo/drawing on the pattern envelope once you were done sewing with it? Mostly-- I eliminated that ropey belt thing.
Were the instructions easy to follow? I didn't have a problem with it, but it does skip back and forth a bit between views so a more beginner sewer might have problems knowing where to go next.
What did you particularly like or dislike about the pattern? I like the style of it-- it came together easily, and it's very comfortable to wear. I had more dislikes than likes, unfortunately. #1: This top is basically unwearable without a camisole underneath. For one thing, the back is way too low, with the V ending a good 2"+ below my bra. The other thing is that the neckline doesn't stay in place very well-- I've worn this top once so far, and it has a tendency to slide off of my shoulders. So there's a lot of potential for wardrobe malfunctions. #2: At least for this particular view, the sizing is huge. I made it a full size smaller than my usual, and still had to take it in some. #3: A more petty complaint, but the talking cartoon heads of the two girls who created the pattern that pop up in the instructions with tips annoy me. ("Sew an applique onto your top! Put beaded trim around the neck!") I know that I'm probably a little older than their target market, but it just seems a bit over the top.
Fabric Used: I used a rayon lycra jersey from Lucy's Fabrics.
Pattern Alterations or any design changes you made: As mentioned, I made it a size smaller and eliminated the ropey belt thing. If I was making this again, I think I would have added in some kind of knit interfacing or clear elastic to fix the neckline issues.
Would you sew it again? Would you recommend it to others? I won't be making this top again. It might be good for a teenage sewer, as long as they know not to wear it out without a camisole for extra insurance against flashing people.
Conclusion: I think it looks pretty good on me, but it's just not as functional as I wanted it to be. Too bad, since I had high hopes for this one.
(A final note: One of the saddest things about this top for me is that it really doesn't work with the bamboo skirt. So from a mini-wardrobe perspective, a fail of sorts.)
 2. The un-maxi dress- Simplicity 3678
Pattern Description: "Misses' knit dresses with bodice and sleeve variations" is the description given on the back. Also has waistband and gathering and the front and back center of the skirt. I made view A
Pattern Sizing: 8-16
Did it look like the photo/drawing on the pattern envelope once you were done sewing with it? From the waistband up, yes. From the bottom down, no.
Were the instructions easy to follow? I found them very easy to follow, though I did make some construction modifications to allow for using my serger.
 What did you particularly like or dislike about the pattern? I like the bodice-- the stitched-down pleats add a nice detail, and while it's low-cut enough that I'll be wearing it over a camisole just for my own comfort, it's not ridiculously so. I didn't like the skirt--the gathering made it look like I was about five months pregnant, especially when looking at it from the side!
Fabric Used: A rayon-lycra jersey from Lucy's Fabrics (the same one I used for the McCall's 5662-- these were both made as part of a summer mini-wardrobe.)
Pattern Alterations or any design changes you made: I did have to take it in some at the waist, which is perfectly normal for me. I ended up having to take all of the gathering out of the skirt and sewing it in as a flat seam. I'm not entirely satisfied with the silhouette of the skirt-- the fabric's a little too clingy for it to work really well with such a fitted silhouette-- but it's still a lot better than where it started. I did add a seam in the back bodice, but only because I didn't have enough yardage left to cut it on the fold. I also added a strip of fusible knit interfacing to the neckline facing and hand-stitched it down for extra insurance against stretching and gapping, after what happened with the McCall's pattern. It seemed to work pretty well, though the stitching is showing up a bit more than I wanted it to.
Would you sew it again? Would you recommend it to others? I think I might revisit it if I ever do end up pregnant (edit: though I'd have to see some improvement in my husband-finding skills first, seeing as how I haven't even had a boyfriend in a very long time!), because based on how it originally looked on me, it would probably make a really cute maternity dress! However, if the gathered waist is a flattering thing on you, I would recommend it.
Conclusion: It's a nice pattern, but just doesn't look nice on me without a lot of help.
(So it doesn't really look very hippie-ish at all in the styling-- there's just no way I would have been able to make the originally planned maxi-dress, because I wasn't counting on having to cut out almost every piece between these two on the fold. But it is still a cute dress. Now that it's not maternity-looking, that is.)
I have a new pattern in the queue as well... one of my friends is getting married in January, and so I need something to wear to the wedding. I've found it's hard to find long-sleeved dresses that don't look frumpy (and with my complete inability to get my internal thermostat turned on in the winter, 3/4 sleeves is NOT an option!) So I found this one-- I know there's a slit in the sleeves, but I do like those drapey, Rennaisance/fantasy heroine-type sleeves . (And the slit actually makes them more practical, because then there's no danger of me getting my sleeves in my food at the reception! Now I just need to find some fabric-- I'd love to find something in a subtle teal/brown print, because then I can also get some more use out of the wrap I'll be wearing at my brother's wedding in October. (Which, if all goes well with the dyeing, is going to be chocolate brown silk velvet. YUM.)
 1. The top- McCall's 5662
Pattern Description: Knit empire-waist top with bodice and sleeve variations. I made C, which is a kind of kimono-esque one.
Pattern Sizing:X-small- Med.
Did it look like the photo/drawing on the pattern envelope once you were done sewing with it? Mostly-- I eliminated that ropey belt thing.
Were the instructions easy to follow? I didn't have a problem with it, but it does skip back and forth a bit between views so a more beginner sewer might have problems knowing where to go next.
What did you particularly like or dislike about the pattern? I like the style of it-- it came together easily, and it's very comfortable to wear. I had more dislikes than likes, unfortunately. #1: This top is basically unwearable without a camisole underneath. For one thing, the back is way too low, with the V ending a good 2"+ below my bra. The other thing is that the neckline doesn't stay in place very well-- I've worn this top once so far, and it has a tendency to slide off of my shoulders. So there's a lot of potential for wardrobe malfunctions.
 #2: At least for this particular view, the sizing is huge. I made it a full size smaller than my usual, and still had to take it in some. #3: A more petty complaint, but the talking cartoon heads of the two girls who created the pattern that pop up in the instructions with tips annoy me. ("Sew an applique onto your top! Put beaded trim around the neck!") I know that I'm probably a little older than their target market, but it just seems a bit over the top.
Fabric Used: I used a rayon lycra jersey from Lucy's Fabrics.
Pattern Alterations or any design changes you made: As mentioned, I made it a size smaller and eliminated the ropey belt thing. If I was making this again, I think I would have added in some kind of knit interfacing or clear elastic to fix the neckline issues.
Would you sew it again? Would you recommend it to others? I won't be making this top again. It might be good for a teenage sewer, as long as they know not to wear it out without a camisole for extra insurance against flashing people.
Conclusion: I think it looks pretty good on me, but it's just not as functional as I wanted it to be. Too bad, since I had high hopes for this one.
(A final note: One of the saddest things about this top for me is that it really doesn't work with the bamboo skirt. So from a mini-wardrobe perspective, a fail of sorts.)
 2. The un-maxi dress- Simplicity 3678
Pattern Description: "Misses' knit dresses with bodice and sleeve variations" is the description given on the back. Also has waistband and gathering and the front and back center of the skirt. I made view A
Pattern Sizing: 8-16
Did it look like the photo/drawing on the pattern envelope once you were done sewing with it? From the waistband up, yes. From the bottom down, no.
Were the instructions easy to follow? I found them very easy to follow, though I did make some construction modifications to allow for using my serger.
 What did you particularly like or dislike about the pattern? I like the bodice-- the stitched-down pleats add a nice detail, and while it's low-cut enough that I'll be wearing it over a camisole just for my own comfort, it's not ridiculously so. I didn't like the skirt--the gathering made it look like I was about five months pregnant, especially when looking at it from the side!
Fabric Used: A rayon-lycra jersey from Lucy's Fabrics (the same one I used for the McCall's 5662-- these were both made as part of a summer mini-wardrobe.)
Pattern Alterations or any design changes you made: I did have to take it in some at the waist, which is perfectly normal for me. I ended up having to take all of the gathering out of the skirt and sewing it in as a flat seam. I'm not entirely satisfied with the silhouette of the skirt-- the fabric's a little too clingy for it to work really well with such a fitted silhouette-- but it's still a lot better than where it started. I did add a seam in the back bodice, but only because I didn't have enough yardage left to cut it on the fold. I also added a strip of fusible knit interfacing to the neckline facing and hand-stitched it down for extra insurance against stretching and gapping, after what happened with the McCall's pattern. It seemed to work pretty well, though the stitching is showing up a bit more than I wanted it to.
Would you sew it again? Would you recommend it to others? I think I might revisit it if I ever do end up pregnant (edit: though I'd have to see some improvement in my husband-finding skills first, seeing as how I haven't even had a boyfriend in a very long time!), because based on how it originally looked on me, it would probably make a really cute maternity dress! However, if the gathered waist is a flattering thing on you, I would recommend it.
Conclusion: It's a nice pattern, but just doesn't look nice on me without a lot of help.
(So it doesn't really look very hippie-ish at all in the styling-- there's just no way I would have been able to make the originally planned maxi-dress, because I wasn't counting on having to cut out almost every piece between these two on the fold. But it is still a cute dress. Now that it's not maternity-looking, that is.)
I have a new pattern in the queue as well... one of my friends is getting married in January, and so I need something to wear to the wedding. I've found it's hard to find long-sleeved dresses that don't look frumpy (and with my complete inability to get my internal thermostat turned on in the winter, 3/4 sleeves is NOT an option!) So I found this one-- I know there's a slit in the sleeves, but I do like those drapey, Rennaisance/fantasy heroine-type sleeves . (And the slit actually makes them more practical, because then there's no danger of me getting my sleeves in my food at the reception! Now I just need to find some fabric-- I'd love to find something in a subtle teal/brown print, because then I can also get some more use out of the wrap I'll be wearing at my brother's wedding in October. (Which, if all goes well with the dyeing, is going to be chocolate brown silk velvet. YUM.)
November 23, 2008
Taming the Pants Monster, part 5
They FIT!!
It took me all day yesterday, and they're not completely done yet-- I still have to sew on some hooks and eyes, and I'm letting them hang up for now just in case they stretch out a bit on the legs before I hem them, and I have to clean up all the stray threads from the waistband and the markings. But I have pants that fit.
Admittedly, they're a little more snug than I would have wished. They still fit, but if I ever gain weight, they won't. The problem is, the interfacing eliminated every bit of give that the fabric had for the yoke. I couldn't get the yoke onto the pants without a lot of puckering, even though I clipped the seams a lot to try and get it to stretch more. (Thus the stray threads at the waistband.) So I ended up having to take the seams in a bit near the top of the pants, to try and work out some of that excess cloth. Thankfully, I can still get them on (though I have to do the hip shimmy thing to make it work!)
Had a little bit of trouble with the fly front, namely because I ended up sewing it shut when doing the external stitching. I wish I could say it was an accident, but I think it was just a case of not knowing how to construct it. Once I went to put the yoke on, I realized my mistake and (with the help of a pair of RTW pants so I could see what it was supposed to look like) fixed it. But it's not bad for my first fly front since I was a teenager! (Probably better than that one was, actually.) So that gets me one step closer to what is currently my sewing Holy Grail (since I'm in no position to get to make myself a wedding dress) --jeans that fit!
I'm really glad I have a serger now. I know I've had it since February, but since it was a combined birthday/Christmas gift for this year, I'll say it again. Having that was the best thing that could have happened to these pants, because the fabric got so easily frayed and without it, I probably would have had to double-stitch a bunch of seams to try and keep the fabric from pulling apart within a couple wearings. Or French-seam all the straight ones. And then it would have taken twice as long. The pattern instructions actually did call for French-seaming the outer curved edge of the pockets, but I just regular stitched it and then serged the edges instead. Probably not quite the couture thing that the Vogue pattern was going for, but I'm glad I did it, because I'm certain that the pocket seam would have showed through the front of the legs with that excess bulk. It's just that kind of fabric. I'm also thinking that it's a good thing I decided to skip the back welt pockets, because I probably would have rectangles showing through on my backside--not a good thing, when I'm going to be wearing this to conduct a band at their Christmas program and that's what all their parents are going to be seeing!)
No pictures yet, because I don't want to take them before I sew on the hooks and eyes. And, well, I would like to get the hemming done first so they're actually done. Maybe I'll get that done later today. We'll see, because Joy and I are going to be spending the afternoon blueifying Susannah's wedding dress again. And dyeing her shoes. I've never dyed shoes before, so this should be an interesting experience!!
Edit, 11:24 AM: Trying out a new color scheme, because I'm feeling festive. I really wish I was better at this HTML editing... I can't figure out how to change the tag boxes at the bottom of the posts from that clashy blue-grey! And I can't pick a new template, because I can't remember how I got my scrolling sidebars on here. Meh.
It took me all day yesterday, and they're not completely done yet-- I still have to sew on some hooks and eyes, and I'm letting them hang up for now just in case they stretch out a bit on the legs before I hem them, and I have to clean up all the stray threads from the waistband and the markings. But I have pants that fit.
Admittedly, they're a little more snug than I would have wished. They still fit, but if I ever gain weight, they won't. The problem is, the interfacing eliminated every bit of give that the fabric had for the yoke. I couldn't get the yoke onto the pants without a lot of puckering, even though I clipped the seams a lot to try and get it to stretch more. (Thus the stray threads at the waistband.) So I ended up having to take the seams in a bit near the top of the pants, to try and work out some of that excess cloth. Thankfully, I can still get them on (though I have to do the hip shimmy thing to make it work!)
Had a little bit of trouble with the fly front, namely because I ended up sewing it shut when doing the external stitching. I wish I could say it was an accident, but I think it was just a case of not knowing how to construct it. Once I went to put the yoke on, I realized my mistake and (with the help of a pair of RTW pants so I could see what it was supposed to look like) fixed it. But it's not bad for my first fly front since I was a teenager! (Probably better than that one was, actually.) So that gets me one step closer to what is currently my sewing Holy Grail (since I'm in no position to get to make myself a wedding dress) --jeans that fit!
I'm really glad I have a serger now. I know I've had it since February, but since it was a combined birthday/Christmas gift for this year, I'll say it again. Having that was the best thing that could have happened to these pants, because the fabric got so easily frayed and without it, I probably would have had to double-stitch a bunch of seams to try and keep the fabric from pulling apart within a couple wearings. Or French-seam all the straight ones. And then it would have taken twice as long. The pattern instructions actually did call for French-seaming the outer curved edge of the pockets, but I just regular stitched it and then serged the edges instead. Probably not quite the couture thing that the Vogue pattern was going for, but I'm glad I did it, because I'm certain that the pocket seam would have showed through the front of the legs with that excess bulk. It's just that kind of fabric. I'm also thinking that it's a good thing I decided to skip the back welt pockets, because I probably would have rectangles showing through on my backside--not a good thing, when I'm going to be wearing this to conduct a band at their Christmas program and that's what all their parents are going to be seeing!)
No pictures yet, because I don't want to take them before I sew on the hooks and eyes. And, well, I would like to get the hemming done first so they're actually done. Maybe I'll get that done later today. We'll see, because Joy and I are going to be spending the afternoon blueifying Susannah's wedding dress again. And dyeing her shoes. I've never dyed shoes before, so this should be an interesting experience!!
Edit, 11:24 AM: Trying out a new color scheme, because I'm feeling festive. I really wish I was better at this HTML editing... I can't figure out how to change the tag boxes at the bottom of the posts from that clashy blue-grey! And I can't pick a new template, because I can't remember how I got my scrolling sidebars on here. Meh.
November 15, 2008
HotPatterns: 2. Me: 0.
Well, it's official-- both of my HotPatterns are a flop. At least for the purpose I had in mind.
 I took a break from the pants fitting, and spent a good chunk of today cutting out and basting together the muslin-- didn't even bother putting in the second sleeve, because it was quickly apparent that there's some major problems with this.
 Problem #1: It needs to be taken in. A LOT. And it's not so much a pattern sizing issue this time (I triple-checked my measurements against the chart, and since it had everything from size 6 to 26 on the same pattern, it's not like I could have bought the wrong size!) No, this is my usual fitting-at-the-waist issues. But highly accentuated by the gathering. But yeah, several inches have to go.
 Problem #2 (the more difficult one): The armhole is ginormous. To the point where this is where it stops--almost level with the empire waist. Since I'm planning on wearing this to conduct a band concert, arm movement is kind of a priority. And with both sleeves and buttoned up, don't think that's going to be happening-- at least not without some major tugging across the back at this point!
 Another view-- hard to see since the picture's kind of dark (and I haven't gotten Photoshop back on my computer yet to play with it), but the hugeness of the armhole shows up better against my darker shirt.
Problem #3: I should have seen this one coming. But the sleeves are too short. It's practically a 3/4 sleeve on me, and I think they were supposed to be long. At least, that's how it looked on the envelope sketch. Curse my monkey arms!
So it looks like I'm going to be hitting the stash for the jacket pattern, too. I have a Simplicity one that might work out nicely. I'm just so annoyed--for one thing, I've been wanting to try a HotPatterns outfit for years, and it really doesn't make me feel any better that the patterns are way pricier than my usual strategy of stocking up on the $0.99 pattern sales at Joanns' or getting stuff free off of BurdaStyle!!
I'm not saying I'm never going to come back to these two patterns-- if only for the reason of trying to get my money's worth, I kind of feel like I have to at least try to tweak them into something wearable. But with only a month to get this pantsuit done, I just don't have the time to try and fix such major issues right now.
On a brighter note, I did get C's Christmas present mostly done today as well, and I'm very happy with how that is turning out. Though I'm not posting any hints or pictures yet, since I know she occasionally lurks on here!
 I took a break from the pants fitting, and spent a good chunk of today cutting out and basting together the muslin-- didn't even bother putting in the second sleeve, because it was quickly apparent that there's some major problems with this.
 Problem #1: It needs to be taken in. A LOT. And it's not so much a pattern sizing issue this time (I triple-checked my measurements against the chart, and since it had everything from size 6 to 26 on the same pattern, it's not like I could have bought the wrong size!) No, this is my usual fitting-at-the-waist issues. But highly accentuated by the gathering. But yeah, several inches have to go.
 Problem #2 (the more difficult one): The armhole is ginormous. To the point where this is where it stops--almost level with the empire waist. Since I'm planning on wearing this to conduct a band concert, arm movement is kind of a priority. And with both sleeves and buttoned up, don't think that's going to be happening-- at least not without some major tugging across the back at this point!
 Another view-- hard to see since the picture's kind of dark (and I haven't gotten Photoshop back on my computer yet to play with it), but the hugeness of the armhole shows up better against my darker shirt.
Problem #3: I should have seen this one coming. But the sleeves are too short. It's practically a 3/4 sleeve on me, and I think they were supposed to be long. At least, that's how it looked on the envelope sketch. Curse my monkey arms!
So it looks like I'm going to be hitting the stash for the jacket pattern, too. I have a Simplicity one that might work out nicely. I'm just so annoyed--for one thing, I've been wanting to try a HotPatterns outfit for years, and it really doesn't make me feel any better that the patterns are way pricier than my usual strategy of stocking up on the $0.99 pattern sales at Joanns' or getting stuff free off of BurdaStyle!!
I'm not saying I'm never going to come back to these two patterns-- if only for the reason of trying to get my money's worth, I kind of feel like I have to at least try to tweak them into something wearable. But with only a month to get this pantsuit done, I just don't have the time to try and fix such major issues right now.
On a brighter note, I did get C's Christmas present mostly done today as well, and I'm very happy with how that is turning out. Though I'm not posting any hints or pictures yet, since I know she occasionally lurks on here!
November 14, 2008
Taming the Pants Monster, part 4a (plus some)
 A visual aid to the last pants post--the trimmed-down pieces overlaid with the original pattern.
Had to trim down the outer side seams...

...change the angle and depth of the back crotch...
 ...and the most dramatic one-- look how much I have to take out of the yoke!!
I also got the pattern pieces cut out for my jacket. I'm glad I cut them out first, because I was going cross-eyed with some of the smaller pieces, the lines were so close together! I can't imagine trying to trim them at the same time that I was cutting the fabric!!
In other ne
 ws, I've joined the Sew Craft Blog-- Sharon told us about it, and the concept is pretty neat. It groups 15 crafters together to form a mini-blog community of sorts. I've been placed in the still-forming group #3. Adding the links to the list of blogs I'm following as I get them, and will post on the sidebar once the group is fully made. I'm excited to see how this turns out!
November 12, 2008
Taming the Pants Monster, part 4
Or, several notes to myself in tweaking the pants pattern. This post is pretty much just for myself so I can find it quickly. If I write it down on paper, I'll be sure to lose it in my messy living space.
Pants side seams: 1"
Yoke side seams: widening from 3/4" where it joins the pants, to 1 1/4" at top.
Yoke back seam: widening from 5/8" where it joins the pants, to 1 3/8" at top.
Crotch seam: tapering from 1 3/4" in back to 5/8"-- end of tapering approx. 1 1/4" from center, in front.
New pocket join point: ~1" from notch (pants side), away from center front.
Pants side and yoke side front notch: 7/8" apart. (Same for back double notches, actually.)
Next trick: How to actually transfer all of this to the pattern, so I'll be ready to cut out the black version.
Next next trick: Jacket muslin. Finishing the striped pants will have to wait, seeing as how I have only 32 days to actually get the pantsuit ready to wear! More like 20, if you count all the days (i.e. Mondays and Tuesdays) where I get done work/dinner/all that too late to have presence of mind to sew/the days I'm working on S's wedding dress!
Pants side seams: 1"
Yoke side seams: widening from 3/4" where it joins the pants, to 1 1/4" at top.
Yoke back seam: widening from 5/8" where it joins the pants, to 1 3/8" at top.
Crotch seam: tapering from 1 3/4" in back to 5/8"-- end of tapering approx. 1 1/4" from center, in front.
New pocket join point: ~1" from notch (pants side), away from center front.
Pants side and yoke side front notch: 7/8" apart. (Same for back double notches, actually.)
Next trick: How to actually transfer all of this to the pattern, so I'll be ready to cut out the black version.
Next next trick: Jacket muslin. Finishing the striped pants will have to wait, seeing as how I have only 32 days to actually get the pantsuit ready to wear! More like 20, if you count all the days (i.e. Mondays and Tuesdays) where I get done work/dinner/all that too late to have presence of mind to sew/the days I'm working on S's wedding dress!
November 6, 2008
Taming the Pants Monster, Part 3
Making progress! No pictures though, at least not tonight. Remember those computer issues that I was having about a week and a half ago? Well, after several days of working just fine, my computer started crashing again on Tuesday night. (Right around the time the election results were finalized...I'm really not making that up!) So it's looking like it's going to have to be entirely reformatted, with reloading Windows and everything else. All of my photos and documents were backed up last night, and my tech-savvy brother (who built the computer in the first place) is going to work on it for me tomorrow. In the meantime, I'm on my dad's borrowed laptop with nowhere to upload my photos. But I am still documenting.
Anyway, back to the pants. Since the HotPatterns attempt was a flop, I dug through my stash and pulled this one out. Along with the fabric I'd originally bought for it--since I was planning on finally getting to that this winter anyway (it's been in the stash for about 2 years now), figured I'd save myself some time and use that as my muslin too. Cut it out today, and basted it together tonight, and I think this one's going to work much better! Though it does need some adjustments. I made it the size to accomodate my hips, so of course it doesn't fit at the waist. I ended up chopping the yoke up, a la the other view, and then taking it in several inches around the three seams that the yoke now has. (Still basted together, so I can get the exact measurements later. I still need to tweak it a bit in the side seams anyway.) I think once I get the fit figured out, I'll go ahead and sew them together anyway so I can work out all the pattern kinks. It's been years since I attempted fly-front pants.
Anyway, back to the pants. Since the HotPatterns attempt was a flop, I dug through my stash and pulled this one out. Along with the fabric I'd originally bought for it--since I was planning on finally getting to that this winter anyway (it's been in the stash for about 2 years now), figured I'd save myself some time and use that as my muslin too. Cut it out today, and basted it together tonight, and I think this one's going to work much better! Though it does need some adjustments. I made it the size to accomodate my hips, so of course it doesn't fit at the waist. I ended up chopping the yoke up, a la the other view, and then taking it in several inches around the three seams that the yoke now has. (Still basted together, so I can get the exact measurements later. I still need to tweak it a bit in the side seams anyway.) I think once I get the fit figured out, I'll go ahead and sew them together anyway so I can work out all the pattern kinks. It's been years since I attempted fly-front pants.
November 4, 2008
Taming the Pants Monster, Part 1

Or, Why It's A Darn Good Thing I'm Making A Muslin, or, Mental Note To Self: I Am Not A Glamour Girl.
So here's the scoop: I really need to learn to make pants that fit me. And I have to stop procrastinating now, because I need to get this pantsuit done within the next month and a half. I'm using the Classic Nouveaux pants from HotPatterns (my first time using this brand). And I cut the muslin out tonight.
In the process of doing so, I learned that I had apparently ordered the wrong size. I know I read the webpage, I don't know how I missed this. But I went by my bra size, which led me to "Glamour Girl"...and somehow, based on my measurements (and not counting my bra size), I should really be in the second-largest size of "Slinky Girl."
Mental note to self: Never order patterns based on bra size again. Unless I actually decide to make a bra or something related to such.
So what it comes to is, I'm making a size too big. So this muslin will be interesting to fit.
And wrapping it up there, because I have microwave chocolate cake calling my name in the kitchen!
Subscribe to:
Posts (Atom)