I just wanted to give a shoutout to my flute students-- as I was reminded today, they're such a wonderfully creative group of kids! And not just with music...

This isn't actually from today-- it was part of a Christmas gift that one of my long-time students gave me this past year. I'm not sure if she or her mom did this one, because they're both kind of crafty, but I love this thing. It's basically just a little cardstock sleeve for a pack of post-its, held closed by a little teeny piece of velcro. I love the play on words with the music stamp, of course. And I'm trying to protect it in my bag as much as possible, because I seriously want to keep using this thing once the post-its are gone!

This is what made me think to blog about them-- I teach once a week after school at a private school in the area, and they've been on spring break for the last two weeks. One of my girls went to Flordia over her break, and she came in today and announced she had a present for me. So I opened it up to find this-- a handmade necklace of a seashell on braided embroidery floss. She immediately said I didn't have to keep it as a necklace if I just wanted the shell, but as I told her, I love seashell necklaces so this is perfect. (Tried it on and it's a good length, too, so I'm definitely keeping this as is!)

I figured while I'm at it, I'll also share one of my favorite soup recipes. I love this because it's easy and rich and has a bunch of vegetables in a way that I don't mind eating them (I do try to eat healthy, but seriously lack a natural inclination to eat veggies!) I adapted this from a recipe in a make-ahead-and-freeze cookbook that my mom brought home for me once (I'm chronically in need of things I can just make and stick in the freezer for when I get home from teaching and I'm starving and/or have limited time to eat before teaching again.) So without further ado...
Beef Barley Vegetable Soup 2 tbsp. olive oil
1 1/2 lb beef stew meat, cut into bite-sized cubes (and I cut off as much fat as I can too)
1 bell pepper, chopped (I like the red ones, but you can do whatever color you like best)
1 c. carrots, chopped (or you could probably use the pre-chopped frozen ones)
1 tsp. dried thyme
1 bay leaf
4 beef boullion cubes (I actually use this beef boullion paste stuff in a jar instead-- sooooo much better than the powder stuff!)
1 14.5 oz. can diced tomatoes in juice
2/3 c. uncooked barley
1 c. frozen green beans
1 c. frozen corn
In a medium soup pot, heat oil. Brown the beef stew meat over high heat and remove with a slotted spoon. Turn heat down to medium, then saute the bell peppers and carrots in the soup pot just until tender. Return meat to soup pot. Add 5 1/2 c. water, thyme, bay leaf and beef boullion; simmer for 45 minutes to an hour. Add tomatoes (with juice), barley, green beans and corn, then simmer for another 25 minutes. Remove bay leaf.
The original recipe called for chopped onion too, but I'm not a fan of onion so I replaced that with the carrots. You could add them though, just saute them with the pepper. I also cut back on the original amount of tomatoes and had to add more water than it called for. Seriously, you could probably add whatever veggies you want. It's a very thick, hearty soup, and freezes great, and is perfect for a quick meal (once it defrosts) on a yucky, cold, wet day like this that makes me think that weather that's warm enough to allow me to wear my recent sewing projects is never going to get here!
Speaking of sewing, I started sewing on my adaptation of BurdaStyle's
Azalea dress yesterday afternoon. I'm making mine as a tunic top, so I eliminated the underdress (the drapey top stuff is thick enough to not be see-through, and if I'm going to be wearing this as a summer top I don't want an extra layer that close to my skin! Not with Mid-Atlantic humidity!) and shortened it a good bit. It's been a pretty easy sew so far-- the thing that took me the longest was the zipper, and that's because I'm trying a new technique to do lapped zippers instead of a center one in the side seam. (Not definite yet, but there's a chance I might be teaching a friend's daughter how to sew with patterns-- the mom can sew, and the girl has her own machine and can make simple things like quilts and pillows, but she really wants to learn how to make clothes. So my friend said she doesn't know how to use patterns very well, and I offered to help out. If that's the case, I want to see if this type of zipper is easier than the centered ones, because I remember when I was a kid, zippers were the most frustrating thing to sew
ever. Sometimes they still are. And the lapped ones look nicer anyway. Not that I'm going to let her start with zippers, mind you, but you know it's only a matter of time before she wants something that involves one.)
Anyway, I'm nearly done with the tunic already-- still have to finish the yoke (ran out of time and bobbin thread around the same time) and then hem it. And then I have to make a belt, because it looks like a serious maternity top without it. I saw one in
Threads that looked interesting-- a bias-cut tied one that hugs curves very well, which might be perfect to cinch it. But I need to see how much fabric I have to deal with, because I decided that I wanted to make a shrug out of the yoke/belt fabric as well (since I'm an ice queen and get ridiculously cold in over-air conditioned spaces. Which, around here, is pretty much any building that's not my house. Plus then I can wear it sooner, because that will make it good for spring as well.) I don't have a pattern for the shrug-- my plan for now is to stick the Azalea on my dummy and drape something with kimono-like sleeves and see if I like it. And if I don't, it's off to dig through the pattern stash.
But first, off to actually sew!
Edit, 9:57 PM: Oh, this could be
bad. I sewed the wrong straps together, so the armholes are in the front and back instead of the sides. And I did some major trimming/corner chopping. Oh, I hope this is fixable without redoing the entire yoke....

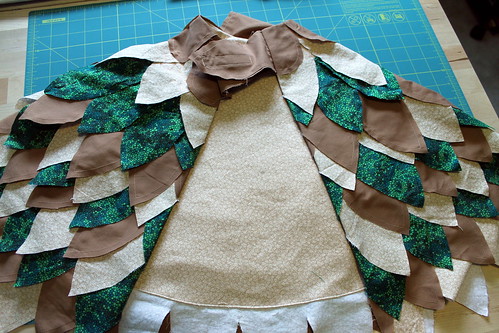 And this is what I came up with. I made this one a little differently than the others, mostly in that it involved a half-circle rather than a rectangle. The bottom-most level of feathers is the cut edge of the cape, but all of the others were cut and sewn on. I was also able to use all stash fabrics! The boy's favorite color is green, so I was glad to find a piece of cotton that didn't have a girly-looking print on it.
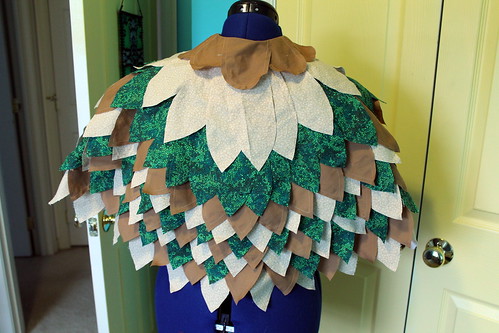 And here's a view of the back, as best as Donna could model it. I'm sure her shoulders are wider than a little boy's! I left all the edges of the feathers raw, because it would have taken forever to make this otherwise, though I stitched the edges about 1/4" away from the edge to prevent too much fraying as it gets washed and worn. I figured a little fraying would actually be ok for this one, to soften the feather edges! The rows of feathers are just zigzagged on, so I did add the lining that you can see above in order to hide that. The rows got pretty crooked in some spots! I know there's this huge span of tan at the top, but honestly, I ran out of the green so I had to improvise!
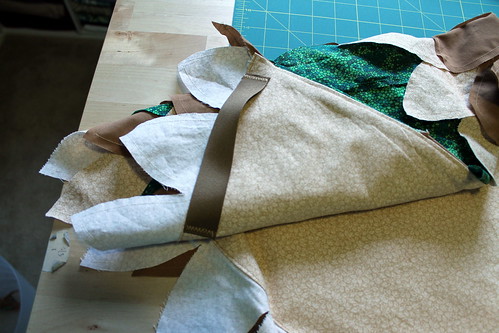 One more detail my friend requested was some "handles" so he could use that to spread his wings. I made them pretty wide in order to accommodate growth, but it's just two pieces of ribbon stitched on so that the feathers above it were left free (minus the hem feathers, of course.)


