Showing posts with label accessory. Show all posts

September 17, 2015

it's that time of year again!


Woohoo! I just wanted to take a few minutes and talk about my FESA plans for this year. Due to my current time constraints, I'm keeping it simple this year, and only committing to a handful of projects-- after all, I also have a little Halloween costume that I've been mentally planning since, oh, last Christmas. So here's what I'm hoping to accomplish...

Fashionable Foundations for Frosty Weather 
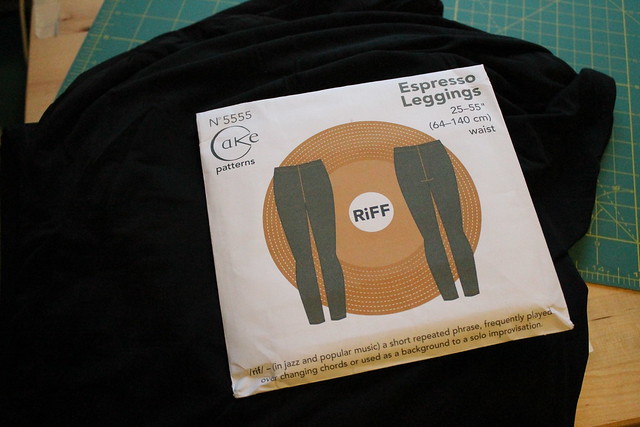
IMG_2813I have fabric that I think will work to finally try out the Cake Espresso leggings in two different colors, though after the disaster that was my last attempt at sewing leggings, I'm definitely double checking the stretch first this time! Assuming all is well, I plan to sew the black pair, because that will go with nearly all of the skirts I own that currently fit.  I'm most likely to wear them as tights with boots. (Honestly, based on my initial fiddling to check the stretch, I think this fabric will be too see-through to use them as anything else!)

Fabulous Frocks
IMG_2811For the third year in a row, I am putting the Megan Nielsen Darling Ranges dress, in this very fall-appropriate rayon challis print, on my list. And I am determined that this is the year I'll actually make it, dangit!!! After all, it looks like the perfect style for postpartum and nursing. I have managed to get the pattern traced, the fabric cut out, and the darts sewn so far. So third time is the charm, right?


Baby It's Cold Outside
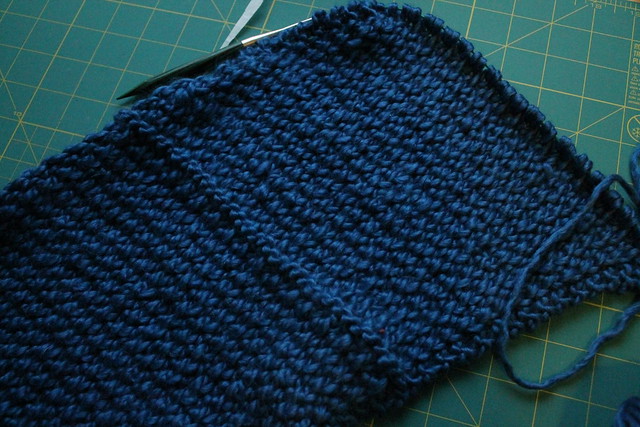
IMG_2812This may be cheating, since I've been working on this particular project for over a month already. But I've been knitting a cowl (the Wine Country Cowl) out of some bulky yarn that I originally bought as the top part of a sweater that I've since abandoned the plan to knit. I could not figure out the very first steps of the pattern at all, and decided I didn't like how the two yarns coordinated after all. "I can't wear wool" substitution problems strike again. Anyway, I'm over halfway done this cowl, I think--it's been one of my methods for coping with Hobbit's penchant for napping best when on my lap and leaving me chair-bound for long stretches of time. Sadly, I think that my plan to use up the entire stash of this yarn isn't going to work out, given its current length. Any suggestions for what else I can do with one or two balls of this stuff?

The nice thing is that if I finish all three of these projects, I'll have one complete outfit! If I can get those and the costume done and still have time left, I have a fairly substantial mental list of additional projects that I could add in. But since I am unsure at this point what the greatest needs in my wardrobe will be, or what I'll be most motivated to work on (SO important right now), I'll just see how this goes first.

January 15, 2015

pondering knitting

Me and knitting have reached a weird point in our relationship. I have a couple of UFOs that I just don't feel like working on at the moment, about half of the projects in my Ravelry queue are pullover sweaters (which are obviously out for now), and I'm not really sure what to do next.

So I recently swatched for a cardigan that I already bought yarn for, the Rocky Coast from the Coastal Knits book. Amazingly, the gauge actually worked on the first try! But I wonder if the yarn/needle combination makes it look too loose of a knit. The trials of almost always having to substitute the suggested yarn, I suppose. I may go ahead and start this one anyway, because it has enough cotton in the yarn that washing could tighten it up. And knowing me, by the time I finish knitting this, it'll be just in time for fall 2016 and my body will probably be at its new normal anyway.
I also had this random single ball of yarn that I bought at the beach shop a couple of years ago, and I figured a bulky yarn would knit up fast and get out of my stash. I wanted to take advantage of the yarn's ability to change textures--it kind of knits up like a t-shirt yarn, but can open up to more of a lacy mesh. And I haven't been able to find any patterns I liked for the amount that I had, so I attempted to design my own cowl pattern. The pattern itself worked fine--it's a combination between a moss stitch, to show the closed texture, and a drop-stitch to hopefully allow part of the yarn to open up. I think I'd have to block this to make that happen. The problem is, I only had enough yarn to do three repeats of the pattern before I had to bind it off, which makes for a very narrow cowl! So I've had this sitting on my table for something like a week, trying to decide if I should go ahead and block it and see what happens, or to unravel it and try to come up with a different project. Any thoughts?

Either way, I'm feeling kind of mental blocked on anything yarny until I make decisions about what to do about these two projects. So in the meantime, I've been tracing out patterns that I was given for Christmas for geeky baby quiet books instead.

April 30, 2014

The Wardrobe Architect Project, Week 12: Accessories!

First of all, thank you all for the kind comments on my tea dress! I'm a little overwhelmed, in a good way, at how much love it got. This seriously might be one of my most-commented-on projects ever. Including the wedding dress.

Normally, I'd do a monthly roundup here, but to be honest, my crafting has been very slow this month, and the tea dress is my only finished project. I do have two other sewing projects in the works, and am hoping to have a little more to show for them soon. Knitting has ground to a complete halt for now, particularly since I had a whopping 5 rehearsals in the span of a week last week, plus my retail job that is very office work-heavy (read: computer-intensive) for me this time of year, and consciously taking some time off of that was the best thing I could do for my hands. It worked--my carpal tunnel has been surprisingly well-behaved! Though I do hope to get back to that soon as well. In the meantime, since my MMM pledge is built to include handmade accessories, I figured it was high time I dealt with that particular Wardrobe Architect assignment.

Sarai divides them into functional vs. decorative accessories, so I'll do the same.
Functional Accessories:
Shoes: I have to admit, I'm not much of a shoe girl. Mostly by necessity. I've lamented about how hard it is to find shoes in my extra-wide size many times on here before, thanks to a bony protrusion below my big toes that I've had my whole life. And when you're looking at easily spending at least $80-120 a pop just to find functional shoes that fit, it definitely curbs your enthusiasm for buying them! (I get really excited on the rare occasions that I find shoes I like at the thrift store that fit!)

In fact, I can quite easily fit my entire shoe collection into one picture. And that's including my slippers and my wedding/reception shoes!

I tend to gravitate mostly towards sandals in the summer, except for the garden center job (closed-toe shoes are required, so I just wear my sneakers). During the cold weather, I mostly wear either my boots, or if it's not too cold and/or wet, a couple pairs of basic flat casual shoes. As you can see, the majority of my shoes are either black or brown, so they can go with as many things as possible. I also have a tendency to wear them to death. Those brown boots are the newest addition, and that was because the brown boots I've had since partway through college were finally starting to kick the bucket--we're talking multiple tears in the shaft lining and an actual hole through the soles on top of the heel. (It was sobering to realize that the boots were over a decade old, but at least I got my money's worth out of them! Hopefully the new ones will last just as long.)

So in short, my general requirements are neutral, well-made, fairly reasonably priced, and comfortable. (Did I mention my feet are also ridiculously blister-prone?) You have no idea how many times I've been tempted to look into shoe-making as a hobby. At least then I could have some shoes in fun colors.

Bags: I tend to just carry one purse around, usually ones that my mom has made from fun print fabrics. I usually switch it up every 6 months or so, and do brighter colors in the spring/summer and more neutral/earthtone in the fall/winter. She's perfected one particular pattern for me that fits all three of my requirements: cross-body strap, plenty of pockets, and big enough to carry a book or my Kindle. For the retail job, I'll just stuff the entire purse into a tote bag to keep it from getting dirty/give me extra space for my lunch and drinks. My flute bag is also frequently a factor, though it's a backpack style one. (Which is why I like the cross-body straps, because then I don't have to worry about balancing them.) Sometimes I'll downsize to a smaller purse for day trips to reduce the weight, though I still like them to be large enough for my SLR camera.

Hats: I mostly wear these in the winter to keep my head warm, and my only requirement is not wool, due to the allergy issues. I probably should wear hats more in the summer to keep the sun from burning my face, but I honestly think they make me look pretty dorky.

Gloves/handwarmers: Again, mostly a cold-weather thing, and I'm sure I will continue to knit lots of these, since my hands are generally the first thing to get cold.

Scarves: I rarely leave the house without the functional knitted ones when it's cold.

Belts: When I wear them for functional reasons, it's generally to keep my jeans in place.

Sunglasses: I have one pair, which I keep in my purse and mostly use for driving or walking around outside on a sunny summer day.

Decorative Accessories: 
Jewelry: Love me some jewelry. Aside from clothes, this is what I've been DIYing the longest. I've got 4 jewelry displays in this picture, and that's not even all of it! I have another full rack on the other side of the mirror, as well as a box for bracelets and such.

I mostly like chunky or beaded necklaces, dangly earrings, Celtic knot designs, stuff like that. Most of my chain-type necklaces are silver, though I do have a few things in a more matte/antique gold or copper. I also almost always wear simple silver studs in my second ear piercing. I used to wear a lot of rings, like almost every finger, but have slowly gotten away from that in the years since college and now just wear my wedding/engagement rings. I'm also getting more into bracelets, though I'll only wear them on my left arm because I'm right-handed and they're less in the way there.


Even though I obviously have a lot of jewelry, I'm kind of missing making it now. I really should bust into the bead stash and make some new earrings or something. I might need something to help me get through my pledge this month!

Belts: I have a few that I wear more for waist-cinching looser tops, like those wide elastic-type ones. I'd like to get a few more decorative belts in different widths and colors.

Scarves: It's really only been in the last year or so that I've started playing around with the more fashionable ones. My go-to was always necklaces, and I was worried about them getting caught on my flute. Which they sometimes do, tbh. But I'm also starting to like the extra warmth on my neck, and I've learned a way or two to tie them that makes them shorter and less prone to snagging on my instrument. Plus I'm kind of loving that infinity scarf I made from the Plantain leftovers.

Honestly, I'd like to try out some of those little knitted shawl/scarf things, too. The small ones that don't look granny. But I need to finish a few knitting projects first.

So I guess that pretty much sums things up for now! As far as things to add go, I know I could use a few more pairs of earrings in my palette colors--black and the warmer tones in particular--and a few more scarves and decorative belts. I'd also like to dye my wedding shoes, since it's my one shot to have a fun color! Though I wonder if the crystal embellishment bit makes them too fancy regardless...

February 13, 2014

Everybody else was doing it...

In typical fashion, I'm one of the last ones on the bandwagon. Usually it's either that, or I miss it altogether. But, since I'd already mentioned that I needed a mental break from pants, I made a Deer & Doe Plantain tee!

Plantain FrontThis was super-quick to make up, even with me modifying the pattern. I used Heather's tutorial for making a contrast yoke, because the busyness of the print made me think that it could use some more solid to tie in the neck binding and elbow patches better. I'd already printed out and taped the PDF together, but I like re-tracing PDF patterns onto thinner paper to make laying out and cutting easier. I was able to get this traced, cut out, and sewn together in the span of one afternoon! It definitely helped that I did the bulk of the construction on my serger, so I didn't have to worry about seam finishes. But it was still nice to knock a project out so quickly.

I'm pleasantly surprised by this pattern, to be honest. The website describes the fit as "loose but elegant", and I don't usually care for a looser fit in my tops. But I figured I'd give it a shot, because the pattern was free, and I figured that as a worst-case scenario, I could just wear this as a bum around the house shirt. But this doesn't hang off me like a sack, like I half-expected it to--it's actually a lot more flattering than I thought it would be. If the knit wasn't as drapey as it is, I don't think it would have worked as well, so I'll have to keep that in mind for any future versions.
Plantain BackA shot of the back, modeled with the charcoal version of the latest Thurlows. It makes me look really curvy!

Aside from the modifications to make the yoke, including a little extra topstitching to make the pieces lie flatter, I made this a straight-up size 40. The only other sizing modification that I made was to add an inch to the sleeves, in what I call my "monkey arm adjustment". It worked perfectly, and I was able to go ahead and use the 3/4" hem allowance that the pattern called for and still cover my wrists in their entirety. I was also surprised that the elbow patches ended up actually hitting at my elbows without any adjustments.

Plantain closeup


One more shot on Donna, for a closeup of the fabrics!  I love this stylized floral knit--it feels somewhat Asian to me. I've been hoarding both of these for awhile, and had been thinking for a long time about using them together, since the teals are so close in color. My long-term thought had been to make some kind of knit dress out of it, but I've been putting it off for a long time because the print is on the thinner side, and I figured I'd have to try and line it somehow to keep my underwear from showing through. While working through all of the Wardrobe Architect stuff so far, though, I realized that I'd probably get a lot more use out of this as a top. I'm pretty good on summery dresses (even though I do have definite plans to make more), and this fabric is too thin to make a good colder-weather dress. So I guess this process is helping me make smart sewing decisions!


Infinity scarfI still have enough of the solid teal left to make a short-sleeved or sleeveless top, since I really only used a tiny segment to cut all three pieces. As for the print, I had less than 3/4 yard left of the full width. So I basically cut the ragged ends off, sewed it into a tube, sewed the ends together--instant infinity scarf! Which will be great for adding interest to more solid outfits, and nice to wear. This knit is super-soft. And since all I have left is scraps that are maybe just large enough to make undies out of (I really need to learn to do that), I shall consider this piece of stash officially busted.

Pattern: Deer & Doe Plantain tee - third pattern used this year.

Amount of time it took to make: A couple of hours from start to finish, plus about 30 minutes for the scarf

Fabric used: Two pieces of rayon knit (one used up, for a total of 5 pieces so far this year.)

Amount of fabric used: 2.25 yards of the print, plus a tiny bit more of the solid

Stashed since: Print was from Christmas 2010, not entirely sure about the solid except that it's been there longer than that.

Current stash total: Approx. 333.25 yards.


November 7, 2013

Red Velvet, Green Velvet

I'm still plugging away at my first project for the Doctor Who Sewalong, and am hoping to have it finished and ready to show by this weekend. But I took a break on Tuesday to whip this little bag up.
Untitled
It only seems to want to go sideways. Probably what I get for doing a phone photo. But this is the Red Velvet mini-clutch by Cake Patterns, in green velvet! Which kind of makes me laugh.


UntitledThis one's sitting a little better, at least. It's hard to see in there, but the inside is a white brocade. I was able to make this entirely from scraps that I had on hand, aside from needing to purchase a zipper. And aside from the hour or so it took me to figure out how on earth those scissor pleats were supposed to work (I could only mark the dots with thread, because I didn't want to mess up the velvet), it came together very quickly-- I had this cut out and stitched up in one evening.

I'm not keeping this bag. A friend from church is fundraising to adopt a little girl from China with a heart condition, and she put a shoutout on her Instagram recently to ask for donations, so I told her I'd make a little something for her. So this is part of the Christmas-themed bundle she's doing, out of three bundles total. Hopefully the winner will like it! Thanks in particular to Steph, who graciously granted permission for me to make this bag for the giveaway when I asked her about it on Twitter. Now that I know how it works, this won't be the last one I make. I'm already plotting at least one for a Christmas gift!

Speaking of giveaways, there's still plenty of time to enter to win a recent issue of KnitScene. There's already been several entries, so thanks to everyone who's commented so far! It's been fun to see what's caught your eye.

July 1, 2013

The post you've all been waiting for!

I mean, I'm assuming you do want to see that little dress project that took up nearly a year's worth of planning and postings on here, right?

So, at last: the One Dress to Rule Them All. And other handmade wedding goodness. (These aren't the professional pics, so I may come back and edit this post to add some of those later. But these are featuring the shots that I was able to get from my family and friends. I'm also making these larger than usual.)

8700_10151653160197980_718630365_n

Full-length dress shot! This is me with my friend/honorary bridesmaid Nicole. I wasn't able to have her as part of the wedding party, but she did the artwork for my invitations and programs, and also did my hair!


6512_10151653159422980_1480637199_nAnother full-length shot, this time from the first dance. You can see the border sunflowers a little better on this one, I think.


5758_576995039012560_1066541998_n


Ceremony shot- not the best expression on my face, but it's a good closer view of the bodice. And Doug's tie. And my bouquet!

1044156_576995289012535_1476750130_n
This was as we were all leaving the church--and a great shot of the back!
1044856_576995665679164_1044450457_nMe and two of my bridesmaids/long-time best friends, Cassie and Julie. The headbands turned out ok after all!
1014281_576995975679133_1477030337_nProof that the TARDIS/R2-D2 shoes made an appearance! We all changed into them after we were done with the outdoor bridal party pictures.
999257_576996245679106_440699499_n
And I'm just including this shot because I think it's fun, even though I look like I'm posing for one of those old Sure deodorant commercials! The DJ had Doug and I do this game where we each had to sit back to back while holding one of our shoes and one of the other's shoes, and raise the shoe for the person we were answering for. I'm pretty sure this one was "which person has the crazier friends." (I love my crazy friends!)

So there you have it--I hope the post was worth the wait!

(In case you're newer to reading this blog, a few quick project notes: The bodice and waistband are based on Sewaholic's Cambie dress. I modified it to make the upper back and sleeve caps sheer, and changed the darts to princess seams for fitting reasons. The skirt is from Simplicity 2442, modified to lower the waist. I also used a lengthened version of the Sewing Cake Pavlova skirt for the tulle underlayer. And if you want to see all of the construction posts and notes and multiple muslin attempts, you can click here.) 

September 9, 2012

just in time for fall...


As promised, two new things to show today! But first, I just wanted to give a quick follow-up to the last post. To all of you who gave me your feedback, thanks so much! Several of you brought up the time issue when it comes to commenting, which I hadn't mentioned. Truthfully, it hadn't crossed my mind while I was at work, but that's an excellent point--I'm not always the best commenter myself, because it's often hard to just keep up with the blogs I enjoy reading, and commenting often falls by the wayside. So that's something I'd like to do better about myself--there's just so many good sewing blogs out there, most of which I didn't even mention by name, and everyone deserves for their work to be appreciated! And it is good to know that people are reading and enjoying what I make.

And without further ado, on to the good stuff!


Guardian's Tail cowl#1: Near the end of August, I finally finished a knitting project that I'd been picking at on and off for months--not so much for lack of interest, but first I had to focus on the Camille shrug, then spring craziness broke loose, then I got engaged....let's say I got sidetracked. But mostly thanks to some recent hang-out time at my aunt's family beach house with several yarn-crafty cousins, I managed to finish this scarf up. (It was fun....we had my crocheting sister-in-law, a crocheter cousin-in-law who was trying to learn to knit, a knitter cousin who was attempting crochet, and another cousin who'd never tried either but was interested, so I taught her the knit stitch. Also, the five of us girls drove the two guys--my brother and the one male cousin who were there at the time--kind of nuts because we were all sitting there in front of the tv doing crafts!)

Guardian's Tail closeupThe pattern is the Guardian's Tail scarf that I started way back in last October, to use up the leftover yarn from my Counterpoint hat. The pattern was simple enough that I didn't really have any difficulty in following it, except the repeat was long enough that I never did manage to memorize the pattern. I'm sure that setting it aside for several months probably didn't help there. I was kind of surprised that I finished it up at the beach that weekend, actually, because I didn't realize I was that close to finishing up with the skein of yarn! So it ended up being a rather short scarf. The pattern had said it would make a short scarf with the yarn/amount listed, and suggested pinning the scarf. I knew that wasn't going to happen, because I am not going to take the time to pin and unpin a scarf when I can just grab a longer one and wrap it around my neck and go. So, logically, the only thing to do so that I'd actually wear the thing was to make it into a cowl. So that's what I did. Warmth-wise, it would probably be better if it was still even longer so I could double it around my neck without choking myself, but I think it looks pretty good. And hurrah for stashbusting!

#2: I feel like I need a drumroll for this one! Because guess what.... I HAVE JEANS!!!

Jeans 1If you haven't taken it yet, I would very highly recommend Kenneth King's Jean-ius class on Craftsy. It was so amazingly helpful to actually see how he did certain steps, and his method for sewing in the fly zipper alone made the price worth it. (Even though I got it on sale so it really wasn't that expensive. Believe me, it's worth the full price!) I am so unbelievably excited to have jeans that actually fit me! And I love that the class videos never expire, so I can go back and reference those tips again and again.

Jeans 2And here's a side view--pardon the silly poses, Doug was having fun playing photoshoot director and telling me exactly how to stand/what to do with the scarf! I wore these jeans all day today, and I'm very happy with the fit. The gapping is quite minimal, they were comfortable to wear, and they look pretty darn good, if I may say so myself!

For my future reference, since it'll be awhile before I get around to making a second pair, I will need to make several tweaks to the pattern itself:

a) Fortunately, I had the foresight to baste the legs together and try them on to see how it would fit in actual denim vs. the somewhat lighter twill that I'd used as my muslin. As a result, I ended up tapering the seam allowances to 1/2" in the upper inner thigh, and from just below the zipper to about 2/3 of the way up the back crotch seam. (At the risk of TMI, the crotch area had felt a little uncomfortably snug. I don't know if that's because it actually was, or my "strong thighs", as Tasia words it, generally makes it so that I have this unflattering pooch of excess fabric right above my thighs in the front of my RTW jeans, and therefore I'm used to a looser fit.) I also ended up taking in the very top in the back seam more than the 5/8" seam to remove a bit of gapping....rats, I can't remember the number. I'm going to guess a 7/8".

b) Speaking of seam allowances, I learned early in the construction process that if I want to do the flat-felled inner thigh and crotch seams like in "real" jeans, I'm going to need to allow more fabric in those particular seam allowances. I would have only had enough to do a super-skinny, very-awkward-to-sew one. So I serged it and went for the faux look.

c) I need to make the pockets deeper. I can barely get my hand in. Of course, this might also have to do with the curve of the actual pocket cutout itself....or perhaps that I'm not used to my jeans actually fitting in the front, as previously mentioned. So probably a combination of a deeper pocket and a somewhat deeper cutout curvature.

d) Waistband seamed in the back to aid in avoiding the dreaded gaposis = good. But next time, I need to shift that seam over so it lines up with the topstitching, not the actual back seam. I didn't realize until I went to put the belt loops on that lining up the belt loop with the topstitching means that seam is still completely showing. (Good thing I'm not one who usually tucks my shirts in.)

e) A little extra length in the hem could be useful. They were a great length for the flat sandals I wore today. But after serging, pressing, and turning up, I just barely had enough fabric to make that. work with the 1-1.5" (I think) heeled sandals I was wearing at the time. I'll have to check this against my two pairs of boots to make sure this will work. I usually favor lower heels anyway (and Doug isn't a whole lot taller than me, so I'll probably stick to that), but I'm not entirely sure they won't be too short for my favored brown boots that have miraculously held up since my college days.

One more note to myself: I'm happy to report that my serger (which still needs a name) worked like a dream on the denim! Which was a pleasant surprise, because I did something wonky on the Engagement Shirt and parts of it are coming unstitched already from threads breaking because of too-tight tension, Oops. But the denim was flawless. I'm very glad I got it serviced a few months ago. The really smart thing to do would be to write down these particular tension numbers for future reference!

August 16, 2012

Summer scarf (with mini-tutorial!)

My new scarf!
Once upon a time, several years ago, I saw an article in Threads magazine about how to make a patternless skirt out of randomly sewn-together strips of fabric that the sewist would randomly pleat and stitch over to fit. I already had one piece of eligible fabric in my stash, thanks to one of the freebies passed on to me from my mother, who had in turn had this fabric passed on to her. So I went out to the store and got several 1- to 1 1/4-yard cuts so I could make this funky-looking thing for myself.

One thing led to another, and like so many of my planned sewing projects, it got pushed back because of other things that needed to be made sooner. After a few years, I lost interest in the project altogether. The original free cut got sent away in that lot of 30-something yards that I Freecycled last winter, and one of the pieces purchased met its maker (ba-dum ching) and became the lining to my laptop bag. So that left me with 2 or so random pieces of blue fabric where I liked the print, but there wasn't enough yardage to do much. Including this beachy batik-looking chiffon number.

Fast-forward to the end of Me-Made-May this year, and my thought that I should make some warm-weather accessories that, you know, aren't made of beads. The thought came to me to use that chiffon to make a scarf. I haven't traditionally been much of a fashion scarf person, and I do loooooove me some funky beaded jewelry. But I'm also kind of famous among my circle of friends and family for getting cold ridiculously easily. This includes in the summer, when stores and restaurants and my fiance crank their ACs to insane levels and my body goes into thermal shock when stepping into that from the humid, high 80s-plus-degree weather that we've had pretty consistently all summer. Yeah, warm-weather layers are a good investment.

I'm really happy with how this one turned out, and it was pretty easy to make, albeit a little time-consuming. I don't have a ton of pics of the process, but here's how I did it:

Step 1: I trimmed the piece of fabric to a reasonable width, mainly to ditch the printed selvedges, and trimmed the ends to even it up some. It was cut rather crookedly, as you can see.

Step 2: I hand-stitched a narrow hem on both of the longer edges, leaving about 3" unstitched at either end. This is why it took me all summer--when my carpal tunnel flareup that I've been fighting since July was at its worst, I couldn't even do that. This could probably be done by machine or even serger, but I wanted the control. (And with a wedding dress to make, I probably needed the hand-sewing practice!)

Step 3: The most fun step: Those unstitched ends? I unraveled them. The full 3". I'll admit it, I sometimes have a destructive streak, and this was a good tv-watching activity. (My fiance was rather confused about what I was trying to do, which added to the fun!)

Step 4: The most tedious part: I hand-knotted all of that frayed fringey edge into this, to finish the ends and give it a more professional look. The really tedious thing about this is that the polyester chiffon is kind of slippery, and so they kept coming undone. I had to go back at the end and dab some fabric glue into all of the knots to make them permanent. So that's what I spent my time after work doing.

And there you have it! I do wish this scarf was a little longer, because its length kind of limits my styling options. I may have to invest in some kind of scarf slide, like maybe this one. (I like that it doubles as a hair accessory, and I'm afraid a pin would leave some serious holes in this fabric.) So I may have to play around with this idea again sometime!

September 4, 2011

What's on the needles...

I started this one last week, and it's going along fairly quickly! This is the first of a pair of slippers (second pattern down on this page). I'm knitting two yarns together, which is the first time I've tried this--the Lion Brand Recycled Cotton in Seagrass,  and Caron Spa in Green Sheen. I'm  hoping that I'll get the best of both worlds--the cotton seems more durable, but the bamboo is much softer. I like the mottled effect that I'm getting from doing the two together--the cotton was already two-tone, and the bamboo adds a nice brighter shade to the green.

A close-up of the cables. This is my first time doing it, and it's not nearly as scary as I thought it would be! Granted, this is probably a really easy cable, because it's the same pattern repeating over and over on a flat rectangle, and only four stitches affected every six rows. So I'm thinking this was probably an ideal project to try it out on.

Maybe, just maybe, I can finish the first slipper (at least the knitting, not the sewing) by the end of the long weekend....tomorrow's plans are another movie marathon/hangout/yarncrafting day with my best friend, so I'll get quite a bit of time to work on it!

September 1, 2011

Something old, something new, something gifted and something blue

No, this has absolutely nothing to do with weddings. But it fits.

First of all, the something old/gifted. I started these handwarmers (also from the Constellation pattern) waaaaaaaaaay back in April. But I didn't finish them until today, mainly due to the Odyssey tank. I actually got the knitting done on Monday or Tuesday (spent a good chunk of Hurricane Irene working on these, since I didn't want to get involved in sewing in case the power went out), but I had to weave in the ends. I used the same type of yarn (the chunky-weight Deborah Norville Serenity in "Majesty"), though I was more careful about lining up the stripes this time when they're next to each other. I also actually remembered to do the ribbing on smaller needles sometimes, so I think it'll end up fitting better. The thumb holes feel a little tight right now, but I'm hoping I can stretch those out a bit.

I made these for my friend Shantelle, who was threatening to steal mine last winter! (She's from Trinidad, so she has a better excuse to get cold easily in the winter than I do.) So hopefully she'll like them and they'll fit ok.

And for the something new/blue:

My first time doing an exposed zipper. Not what I would normally go for, but I had it on hand, and I figured it would be good to try one out before I do the Vogue dress. It specifically calls for an exposed zipper, and I'd rather do my first attempt on a stretch woven than a jersey knit! So this is the sneak preview of the reconstruction project I'm currently working on, hopefully to be finished tomorrow.

August 11, 2011

A deceptively complicated refashion

Recently over at Refashion Co-Op, the editors decided it would be fun to occasionally have community challenges based on a certain theme. The first one is going on this week, and the theme is lace. Now, I've said it before, but I'll repeat myself: I'm generally not a lace girl. But I did have a top on hand that fit the bill that I've been meaning to work on anyway, so it was a good time to join in on the fun!

Here's the original top, as modeled by Donna. An all-over stretch lace, kind of peasanty top that I picked up at the thrift store one day. My thought was that it would make a nice layering top, being in a rather neutral color. But it had some issues.

Namely being that the thing was rather big on me. I'm wearing it over another top here, and the only thing keeping it from falling off of my shoulders is that I'm holding my arm up to do the mirror shot thing. Which made it annoying to wear even layered over a camisole, since the straps were always showing.

My original thought was to resize and fully line it, so I could eliminate the camisole altogether. Which made this a deceptively complicated thing to refashion, since I had to almost entirely deconstruct it first!  I basically just used the original pieces as a pattern and lined it with some jersey knit. (The leftover remnant pieces from this top, to be precise, though I used the wrong side for the coloring.)

I realized partway through that I had no idea how to reattach the peasanty sleeves for it to still work, so I ended up making this into a camisole. Adding the lining was probably a waste of time due to this, since in order for the bust seam to sit right, I'd have to wear another one underneath (it's loooooow by my standards!) Though it might be ok to wear it a bit higher under another shirt.

I do like how the straps turned out, though. I basically just took a scrap of the jersey and a scrap of the lace and sandwiched it around a piece of regular old elastic, then zig-zagged it while I stretched it.

Since I used one sleeve to make the straps, I had one sleeve left over. So I squared up the ends, serged it into a tube, and sewed the ends onto another piece of elastic...


...to make a headband! The fabric is stretchy enough that I think I'll be able to avoid my usual headband issue. (They tend to squeeze behind my ears and make me end up with a headache.) And it's a neutral enough color that I'll probably get some good use out of it!

So since I did all of this (minus the deconstructing) yesterday, I guess I can say that Wardrobe Refashion Wednesday is back!

On a few random notes:

  • It's good to see Project Runway back! Despite my annoyance last season at Gretchen winning, and my annoyance in the first episode for cutting one of the ladies whose style I liked so far in favor of the one who was putting everyone down right from the start, I've been enjoying it so far. (I'm not-so-secretly rooting for Anya, despite her lack of sewing experience, because I actually know someone who knows her! One of my friends from church grew up in Trinidad and went to school with her!)
  • I think I need this pattern. Seriously. This is the coolest knit dress pattern I've seen in awhile, and I have a piece of fabric in the stash that I think is the perfect amount to make it. Therefore, I need this pattern to bust my stash. So there.
  • Several of you probably know this already, but the BurdaStyle book release date is up! As is a picture of the cover on Amazon. (It's hard to tell from the size of the picture, even when enlarging....but I'm pretty sure the jacket third from the left in the bottom row is mine!) That reminds me, I really need to get my studio page over there updated...

February 10, 2011

We'll make our own constellations...

As of last night, I finished my third knitting project! At least, my third successful one. And haven't thrown in the towel on yarncraft yet--this is definitely a record for me!

This time, it's the Constellation Gloves, which was a free project on the Lion Brand website. I liked that they were long, which means no chance of my wrists getting exposed to the cold, and it looked like the perfect project for my chunky-weight yarn that I snagged as soon as I decided to give knitting another go. A good choice for my hands, since they're nice and thick and warm-- I'm looking forward to wearing these to Bible study tonight, since the basement we meet in was really cold last time! (Also, I know this is a bit of a silly picture, but taking pictures of both of your own arms is hard!)

And here's what the whole thing looks like. I had to learn how to do a lot of new things for this one--first time doing ribbing, first time knitting in the round (on both circular and double-pointed needles), I had to bind off and add on stitches up at the top to make the thumb holes, I had to learn to increase....definitely a good skill-building project! I ended up making several changes to the pattern, which surprised me since I'm new at this. Nothing seriously major--things like, since they were ending up too big, I had to go down a needle size from what I'd come up with in the gauge test. The pattern called for making them about 10" long before starting the increases for the hand, but I ended up opting for about 8" instead. (After measuring my arm after I started, I realized that 10" would result in these shoving up against the bend of my elbow, and would probably be rather uncomfortable. Not to mention annoying to deal with for sleeves.) I also ended up making the top shorter than it called for. It wanted a total of 3" above the thumb hole--about 2" for knitting and then the 1" ribbing. I realized that doing so would take this about to my knuckles, which would make them rather non-functional for actually using my hands while wearing them--and isn't that the point of fingerless glove-type things? So I only did about 1/2" of the knitting post-thumb hole and then the inch of ribbing.

I do wish they were a little more snug around my wrists, but my wrists are also super-skinny  And since the ribbing at the bottom and the hand section fit just about perfectly, I really can't complain.

So now there's just one thing left to do....figure out what I'm going to do with these two orange-sized balls of yarn I have left over, since leaving several inches out of the pattern means that I didn't use nearly as much as I thought I would! I thought about knitting the second from the partially used ball, even started to do so, but was really afraid that I wouldn't have enough to finish it. So I ripped it out and used the second skein instead. I know I don't want a scarf, because I have a lot of those. A hat, maybe? Though I was already planning to make/got yarn for a different hat... I liked this beret that I saw listed under the easy patterns on Ravlery, and generally prefer that style of hat because it's looser around my hair. So I end up with less tangling. (I have the sort of hair that tangles if you do so much as look at it funny.) But I guess I can have more than one hat, right?

(p.s. To give credit where it's due, the title lyrics came from "Constellations" by Jack Johnson. A fitting choice, I thought, considering the name of the pattern.)

December 24, 2010

A little holiday insanity

I went thrift shopping with a friend on Monday night, and found this dress. I just kept going back to it, leaving, going back to it, and finally decided to try it on. I'm surprised I liked it, because I'm not really a lace person, but something about the all-over olive lace just really spoke to me. Plus it fit me perfectly, so I ended up getting it, though I knew it would need a bit of tweaking. (I think Jane thought I was kind of nuts for getting it, though she also said I looked like a dryad, so I'm going to take that as a compliment.)

So I decided yesterday that this dress would actually be great for Christmas Eve--there's a candlelight service at my church that I'm on the music team for every year, so I'd be right up front and needed to dress nicely. So here's what I did....


Donna 2.0 got her debut performance, with a quick-n-dirty padding job. The dress was in two pieces, so the first step was to shorten the underdress. And I have to say, I like New Donna's hem-marking feature, which made it a lot easier to trim it off! (Though I'm guessing I was supposed to put a marking tool in the clamp instead of shoving the fabric in there...)


Once that was all trimmed and hemmed and everything, it was time to tackle the lace overdress. First step: take out the shoulder pads (and those satiny cords which I'm guessing were for hanging, but were broken and in the way.) And then more skirt trimming and hemming.

The sleeves were a bit odd--I think if this had been a different fabric, I might have liked this almost mutton-sleeve-esque detail, but in the lace it just looked kind of frumpy. But that was easy enough to fix-- I just chopped about five inches off of those, then hemmed again.

And so I ended up with this, which was much cuter.

And I had enough fabric left from the part I cut off for the hem to make a little scarf. (Which I didn't wear with the dress, but we'll see if I incorporate it into a later outfit.)

My immediate family's already had our gift exchange (we do it on Christmas Eve) and I did get sewing and other crafty goodies other than Donna, but I'll save that for another time.

Hope you all have a wonderful Christmas!