Showing posts with label top. Show all posts

March 30, 2015

Pattern review: Simplicity 1469

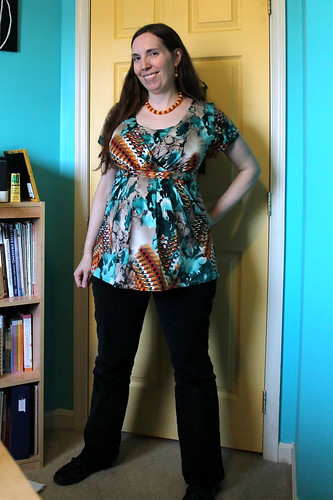
Simplicity 1469AKA, the Megan Nielsen nursing/maternity top. Though I'm linking to the Simplicity version, since that's what was available to me, and therefore what I used. Not quite so stealth maternity from the front as my last two makes for myself, is it? I'd originally planned to draft a pattern for this fabric from this thrifted/refashioned tunic, since I've had that for years and it's been working very well as a maternity top. I think it would work well for nursing, too. And I was hoping that if it worked out, I'd be able to wear this fabric anytime, pregnant or not. Well, I did draft the pattern, but ended up not having enough fabric to try it out--I wouldn't have been able to do any length sleeve on this. So this was plan B.

It's been awhile since I've done a good old-fashioned pattern review, and this is the first thing I've made for myself in awhile that didn't involve some kind of DIY maternity hacking. So here goes! For the record, this is me modeling at 29 weeks, according to my phone app. (Just shy of 11 weeks left--whaaaaaat? Also, I'm still having trouble wrapping my head around the whole week-to-month conversion. But hey, I'm in the third trimester now! Which is why I look tired in every single picture, I guess. I tried.)

Simplicity 1469 side viewPattern: Simplicity 1469

Description: From the website: "Stay comfortable and stylish during your pregnancy in this flattering maternity top and dress. These items are just what you need for discreet nursing once your baby arrives, just pull down v neck to reveal opening."

Pattern sizing: XS-XL. I made a medium, since that was my pre-pregnancy size.

Did it look like the photo/drawing on the pattern envelope once you were done sewing it? Pretty much, yeah. Maybe a little looser in the sleeve area than it looked on the model.

Were the instructions easy to follow? I thought so. Though I somehow completely missed that I was supposed to cut the midriff pieces twice, and didn't realize that until I was halfway through constructing the back. More on that later.

Simplicity 1469 on dummyWhat did you particularly like or dislike about the pattern? 
Like: The styling. Since it involves pleats instead of gathers, it's a sleeker look than a lot of maternity tops tend to be. And hanging on Donna, it actually looks like it could pass for a drapier non-maternity top. Never mind that I fill up the bodice way better than she does right now.

Dislike: Since this originated as an independent pattern, though it's now officially licensed to Simplicity, I was surprised at how big the sizing ended up. Especially up top! I think that it may just be a case of being too big in the back for me, because I tried pinching it in a few inches and it seemed to reduce the front gapping quite a bit. Though I'm not going to do anything to take it in just yet, since this means there should be plenty of room to accommodate whatever happens to my general torso region over the next 2 1/2 months! (I may go back and add a back seam later to reduce the amount of fabric, if it really bugs me.)
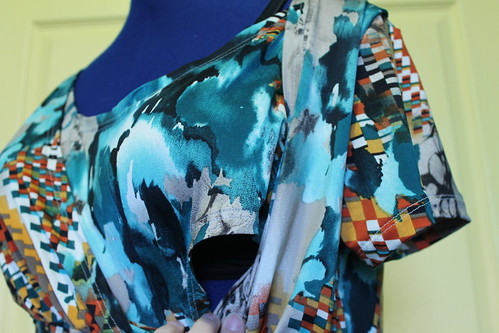
Simplicity 1469 nursing detailI will also admit that I'm concerned about the functionality as a nursing top. They weren't kidding when they said "discreet". Obviously I'm not going to model this part on myself, and Donna's sizing is nowhere close to mine currently. So the openings don't sit as low on me as they do on here, but look how small they are! I don't want to deconstruct the entire front, since serging the 5/8" seam allowance means I undoubtedly lost the little snips I made to mark the pleats. But I am seriously considering going back and cutting those side openings a little bigger, even if I have to hand-stitch the edges. I'll have to see how it works once I'm actually attempting to use it for that.


Fabric used: An ITY jersey that my mom gave me for Christmas. For stashbusting tracking purposes, this used all but an approximately 11" long cut of 2 yards. I should probably just throw out those 11", but it's so hard to let go of prints I like!

Pattern alterations or any design changes you made: Back to that midriff bit--since I failed to notice how many times I was supposed to cut those pieces out and was just skimming ahead on the directions when I started this, I decided to construct the fronts and backs flat to facilitate seam matching. I'm honestly not sorry that I did that, because another layer of jersey plus serged seams would have just made it bulky around the empire waist, and I really don't need purposely added bulk in my clothes right now! Plus, I really do think that made it easier to get the seamlines to line up. Even though it involved multiple rounds of basting and unpicking to do so.

Would you sew it again? Would you recommend it to others? Let's put it this way: I don't think I'd sew it in this particular type of knit again. I'm not happy with the underlay neckline gaping--the polyester wasn't pressing that great, and I had to resort to wonder tape to stick it down long enough to stitch it. So I think that contributed a lot. Of course, my iron is currently either possessed or in the throes of death, and my sewing machine and serger both also weren't very happy to work with this fabric--I was fighting skipped stitches and serger tension issues the entire time, despite jersey needles and walking feet and such. All of this combined resulted in the edge finishings and hems looking a little more homemade-in-the-bad-way than I would prefer. Sigh.

All of this to say, I would like to attempt this pattern again, but in a more natural fiber that might have better stretch and recovery/get along better with my machines. I actually do have some of the patterned knit and a lot more of the solid teal left over from my Plantain top, and I think it would work great as a sleeveless version. But if I do make this again, I think I'm going to make the nursing openings much bigger! And maybe add some elastic in the crossover V-section to help it bounce back better. And probably take some of that width out of the back pieces.

We'll see if I get to it, since the window of opportunity on maternity sewing still having a point is coming to a close. Also, I have plans to make another nursing-friendly maxi-dress that will be taking priority over this pattern. I need something fun to wear to my baby shower, after all! And aside from that, my sewing plans for April are mainly centering around the Small Human Beings Sewalong that Cindy and two other new-to-me bloggers are hosting. Not that everything I've been sewing for months wouldn't qualify anyway, but the timing couldn't be more perfect for me, since it's early enough in this last trimester that I'm not dead exhausted (even if I look it), and I don't actually have to compete with said small human being for sewing time yet. More on those plans to come.

June 26, 2013

A little taste of Pavlova

It took some serious pondering, but I decided to go ahead and post what I could of my ill-fated Pavlova cardi. After all, I did sew it. I did wear it twice before it got destroyed. And it was a stashbusting project, which means it did fit that particular sewalong.
Pavlova cardiAs you can see, this was during the wedding planning stage, since I've got all of those little paper sunflowers there! I took some pics on Donna so that I could capture a few of the details, figuring I could just get a pic of me actually wearing it on the honeymoon when I wasn't so crunched for time. I ended up not actually wearing it at all while I was in Jamaica, because the nights were warm enough that even cold-blooded me didn't need an extra layer! But I did wear it on both the first and last days for the airplane, and was glad for it-- I just didn't get a pic because I was in grungy travel mode (and wearing glasses, and tired).


Pavlova sleeve detail
I was really proud of how nicely the edges of these sleeves were finished! I had to think about it, with the somewhat bias cut to it, and the crinkled, lightweight nature of the fabric. But they were both serged and topstitched a bit so the seam would stay where I wanted it to. This was one of the details that survived, so I guess I did a good job there!


Pavlova hem detail
The hem wasn't so lucky. I serged this to keep it from fraying, and then double-rolled it to enclose the serging and stitched it down. I kid you not when I say that the washing maching managed to entirely undo this hem, back down to the serging!

I would have been able to fix that, though it would have been annoying. The real problem is that it also ripped the neck facing apart, leaving a big, gaping, ragged-edged hole. And the fabric is so lightweight to begin with, that I don't think it will hold up.

It's a shame, really, because I'm still adapting to the temperatures that my new husband likes to keep the house at, and a lightweight layer would really come in handy here! But this really was an experimental top, and I wasn't sure how it would turn out. Also, the fabric was free, so aside from the time investment, it wasn't much of a loss. I guess I can chalk this one up as a muslin. Of course, this means I'm also afraid to wash my new Hummingbird top until I have a chance to photograph it, just in case!

June 17, 2013

I'm baaaaack!

First of all, thanks for the lovely well-wishes for the wedding and honeymoon! The wedding day was great, I wasn't stressed out at all. And we had a very fun, relaxing time on our honeymoon, which we just arrived home from late last night.

Sadly, there can be no finished project post for my Pavlova cardi after all. It was the one casualty of the trip--I didn't get any pics with it on because it was so warm in Jamaica, even at night, that I never wore it except for both airplane flights. I figured I'd get one at home when it was sunny and I wasn't in grungy travel clothes. But then I was trying to get caught up on some laundry today, and threw it in the washer. I'm used to front-loaders. The one at my new house is a top-loader. Not only did all of my careful rolled hems get entirely ripped out, the neck facing pulled away entirely, leaving a gaping, ragged hole that renders the entire thing unsalvageable.

I was going to give you a picture of a TARDIS on a beach instead. But my desktop refuses to turn on, and my laptop keeps flipping the picture upside down. Meh.

So, sewing, right? I'd been planning on jumping in on this particular sewalong anyway, since I've been out of the social sewing loop for months now. I learned recently that the hummingbird is the national bird of Jamaica, so it's quite appropriate to do a sewalong for this pattern, too! So here goes...


SewingCake
That's right, I'm in the pink house. My Hummingbird will not be pink, though....and seeing as how it's 9 pm here, and I have to go back to work tomorrow, I'd better get started!

June 11, 2012

Muslins, muslins everywhere...

....and not a project to show! Seriously, everything is in that completely not safe for work zone. Or safe for public consumption, period. But I actually have made some progress, so I figured you all wouldn't mind if I at least talk about it a little, right?

First off, the Lonsdale dress. Long story short, I have to start over completely on the muslin stage. I thought I was being all smart--after double-checking my measurements, I figured that since it looks like I fit perfectly into a size 10 at the bust and a size 6 at the waist and hips, I could just cut it as a 10 at the top and grade down those two sizes and it would work. WRONG. It was so ridiculously gappy at the top (and surprisingly a little too small at my waist--that pretty much never happens). So then I tried taking it in at the top, and letting it out a little at the waist. The waist was fine, but now the top pretty much doesn't cover enough of anything I want it to cover. Of course, it wasn't until about halfway through this adjusting process that I remembered that Tasia has a post about making an FBA for this particular pattern. Oops. So I'll be starting over with that in a proper fashion once I get some time to do so--probably not today, but maybe tomorrow. I've also gotten the boning, and I decided that I'll make the rest of the support (hopefully) easier for myself....to be explained in a future post. So, over a third of the way through the month and I have zero visible progress for the Summer Spark Sewalong....can I finish this in time? Stay tuned....

So since I didn't have the time to go through that process at the moment, I worked on the jeans muslin some more. And I think I've actually got that pretty close! I still need to test it with a waistband, and perhaps let out a teensy bit more in the thigh area, but I've just about got it to the point where it's not too tight-looking in the back, there isn't a whole lot of wrinkling in the front like the last attempt and I can pretty much sit down in it without feeling like my circulation is being cut off. (I probably should let that extra bit out, just to be safe, since I'm making this is a non-stretch denim.) So then the next complication is figuring out how to transfer the multitude of changes back to the pattern, seeing as how the only pattern tracing paper I can get around here is crap that won't even mark on other paper. That, and seeing if I can still add pockets if I straighten out the side seams like Mr. King says to do. Because wow, if I drew this line right, the wedge that I have to take out of the front is HUGE.

(Incidentally, has anyone reading this ever purchased from Sil Thread? I found this, after reading the recommendations in the question section of the Jean-ius class, but there's no descriptions on anything so I'm not entirely sure this is the right stuff. A shame, because this is waaaaaay cheaper than the other site he recommended. Plus I'm not sure if I could find enough useful stuff on the other site to make the $35 minimum order...)

I can show one thing, at least. This is how far I've gotten on the Strafford Tee. It doesn't look like much other than a block of purple, but you see that little twisty bit towards the right? My self-figured "darts" are working out much more nicely on take 2. I've actually started increasing again, sooner than I'd done the math for, because this is about 6-7" long now and according to the pattern I only need to do 10" before I have to start actually following the instructions again. But I figured that I'll just get it back to the right number of stitches and take it from there--I don't mind if it's a little longer than what it calls for.

September 1, 2011

Fall Essentials Sew-Along!

I was excited to see this announcement over at Rhinestones & Telephones today--I was curious to see what the categories would be this time! Of course I'm participating--even though I didn't quite get through my entire list by the end of August (though I at least started everything by then!), I love the flexibility of getting to choose my own patterns. And this one especially seems rather conducive to allowing for knitting to be part of my wardrobe scheme. So, in almost no particular order, here's what I'm hoping to be up to for the next couple of months. The sew-along information is copied from Sarah's blog, with the rest of it being my own plans. (Lots of pics ahead!)


ABOUT THE SEW-ALONG
Fall is often a very busy season for many of us, filled with activities that often have us running hither and yon. Making your items should be a form of relaxation; a time to slow down and enjoy the creative process.

The goal: Stock your wardrobe with quality pieces that you will wear again and again.

The benefit: A group of creative people who will encourage and inspire you, not to mention talk you off the ledge when you need it!


Well, she's got that right....fall is almost always really busy for me, and it looks like this one will be no exception. Since I'm still having no luck in the job-hunting department, though, I should at least be able to find some time to sew during the weeks, even if it seems like almost every weekend between now and the end of October has something going on!

Fashionable Foundations for Frosty Weather
Trousers, skirts, legwarmers and more! Anything that keeps your lower portion fashionably cozy fits perfectly here! The chilly weather necessitates the donning of bifurcated bottoms and sassy skirts!


I've said it before and I'll say it again-- I'm determined that this will be the fall that I finally conquer The Jeans. So I'll be revisiting my latest muslin from the twice-taken PR Jeans class, which I set aside once the LBD plans started happening, and hopefully using this denim to make a fabulously fitting pair!


There will also be some skirt action happening, though I'm not entirely sure how much. I do have one currently in the works that I started last night in an attempt to participate in the latest Refashion Co-Op weekly challenge. If all goes according to plan, it'll fill a long-standing hole in my wardrobe...but more on that in a later post. I did also pull out these couple of things so I could have some quick projects if needed in the midst of the more complicated plans I have for the fall. (Though I wonder how quick they'd actually be, seeing as how those prints mean that both skirts would be lined...)


Also, on a random note, I love that they used the word "bifurcated".


Chic Chemises for Cool Climates
Blouses, tops, vests, cardigans, and sweaters! These wardrobe essentials can carry you from day to night, not to mention provide necessary layering to keep out the chill. 


Blouse #1, which I mentioned in my last post, is already in action! But again, more on that later. I've also pulled out this knit...

I'm not sure what pattern I'm actually going to use for it yet, but this was one of my fabrics I got from Mood last year. And while this is a bit of a departure fabric for me, I think it would go fabulously with that red skirt if I get to it. I looked through my patterns a bit today, and came up with these four possibilities:
From left to right, I'm thinking either the 3/4 print top, the reddish twist-front top, the white basic top, or that stripey drapey v-neck top. I know you're normally not supposed to break up large prints with patterns that involve a lot of seams, but at the moment I'm leaning towards either the twist-front top or the drapey-front top. Seems to me that smaller pattern pieces in front might make it easier to avoid unfortunate print placement, given all of those circles!


Also, there is that sweater knitalong that's going to be happening very soon. And another refashion idea I've had bouncing around in my head for awhile, which again may be a quicker thing.

Fabulous Frocks
Dresses of all styles; mini, short, or long! Keep yourself warm in your modish designs, layering with tights and boots!


Two words (actually a word and a number): Vogue 1253. Which I will be making out of these: The jersey, which I've had for a couple of years, is on top, and this is the tricot lining and organza I recently picked up to go along with it. (It's ok to buy fabric to help me bust stash fabric, right?)


This will most likely be the next thing after the blouse and the recon skirt--since it's sleeveless, I need to finish it while I still have a shot at being able to wear it.


Underneath It All
When you're spending months covered from the neck down, a glamorous underpinning of your choice adds a secret, luxurious touch that chases the cold away!


No plans for this category currently.

Tender Tootsies
Let's not forget your frosty feet! Socks, slippers and the like are the order of the day. Keep those tootsies warm and dry! 


I did cast on a new knitting project the other day that actually fits this category! Which I'm only 7 or 8 rows into, so it still counts. But again, more on that later.

Those Cozy Nights
Is there anything better than snuggling up in a cozy pair of pajamas with a hot drink and a book whilst Jack Frost works his magic outside? I think not! Sleepwear of all types are the way to go here!


You know, I think I'm actually good on cooler-weather PJs for now! So again, no current plans for this category.

Baby It's Cold Outside
Coats, hats, and mittens donned to keep the cold at bay, especially when out enjoying the spectacular fall colours!


I have hopes of being able to work in a knitted hat, in this (the yarn I got at my inaugural visit to the local yarn store):

And, well, Gorgeous Fabrics lured me in with their current sale....which includes that raincoat fabric I wanted. So I bought 4 yards of that, and it arrived in the mail today. I think it'll be lovely to sew with--more taffeta-like and less vinyl-like than I expected! (And I did flick some water on it to see--it does repel!) Given that I have other things I need to get done sooner, this may not actually be part of the sew-along. I'm just going to say I'd like to have it done by around Decemberish.


But I do also have this pulled out, to make another brown coat. This one more for layering purposes. Isn't the lining fun? And I love the look of this jacket (from the 11/09 Burda magazine)--it reminds me of those 70's jackets of my mom's that I used to wear all the time as a teenager, before they got worn out/too small for me. (I'm a bit taller than she is, so they were always a bit snug across my back and such.)


I realize that this is a lot of stuff, and the chances of me actually getting through all of this are pretty slim. But it'll be fun to try!

August 25, 2011

Hey, I DO have the patience to make clothes out of string!!

Well, here we go...my first knitted piece of clothing! (If you don't count the hats.) I seamed it together and added the buttons this evening while waiting for students and watching the news reports of all of the hurricane fun that's headed my way.  While I'm hoping that the neckline will still straighten out a bit, I'm pleased with the results overall. And glad that I managed to finish it while it's still summer!

So now I need to figure out what to do with the 3/4 or so of a ball of this sparkly blue stuff that I have left. Maybe a pair of simple handwarmers, like these? Or these? Or perhaps a cowl of some sort, if I wanted to change up the look of this top and make it look more like a turtleneck? Not that I need to figure it out right away. I have other things I'd rather make first.

Jumping on the Sorbetto bandwagon

 Ok, so I didn't have time to finish up the knit tank yesterday. But I did have time to finish this. (Yes, Mary, you guessed right.)
So this is my test version of the Sorbetto that's been all over the sewing interwebs this summer. It was a fun little top to sew up--the instructions were good, and I can see how this would be simple enough that it's able to be very easily customized, like the seven-day challenge at The Sew Weekly did.

The thing is, I'm just not convinced that this pattern actually works on me....

It could be partially the fabric. If it looks familiar, that's because this used to be my Azalea top. It's been sitting deconstructed in my refashion bin, because it was just too poofy and I never wore it. And it was just the perfect size to fit the two pattern pieces on. But I'm thinking this silky poly stuff just isn't good for somewhat tailored elements-- see how that center pleat poofs out?

What's got me unconvinced on this one is both the length--a little short for me--and the overall fit. It's not the fit of the pattern itself, more the styling. The bust fits really well, but I always feel like tops that don't have any waist shaping make me look a lot bigger than I am. I did take this one in a smidge at the waist, but it still kind of makes me look box-shaped.

So then I tried tucking it in, since I get the impression that this was what the top was more meant for anyway, given Colette Patterns' somewhat more vintage stylings. It does work a little better this way (hey look, I have a waist again!), but I don't like how it's poofing out. Again, that might be the fabric.

Then I tried adding a belt, and so far this is how I like it the best. Though, given the length of the top, I think it would work much better with a thinner belt. And one that actually matches the colors of the top. I do still have a decent-sized piece of the grey fabric that I used for the binding left--I might have to pick up one of Sunni's belt-making kits.

I hope I can find a way to wear this well. I think this has the potential to look really cute paired with my Eva jacket, and I still love this print, so I'd hate for it to be a double fail in how I've used it! So what do you think?

August 24, 2011

(Almost) the end of my Odyssey

I have a back! (Hopefully the top won't ripple like that when it's all done.)


And after weaving in all of the loose ends, I revisited the front to add the neckline. My first time having to knit perpendicular off of something that I'd already knitted, so this is me picking up the stitches. (I had a good deal of help from YouTube.)

And the finished neckline, sans buttons. I'm a bit concerned about how it's curling in, though I followed the directions. It called for a needle two sizes smaller. And, well, I knit tightly. I'm trying to stretch it back out some, and hopefully seaming it together will help.


So, other than adding buttons, that is the last and final step--sewing the front and back together. Which I need to look up how to do that. But it can't be that hard, right? I mean, it's sewing. With yarn, but it's still sewing! And hey, this means my chances of finishing up before the Newbie and the Knitter sweater knitalong starts up are pretty good. So I'll be working on this some more today, since I'm off work except for a few flute lessons. If things go well, I may have something to show before the end of the week. If things go exceptionally well, I may have a sewing project too!

July 25, 2011

Odyssey tank progress, and a fail tale

First of all, thanks for all of the lovely, encouraging comments on the pants! After reading some of your thoughts, and since I have a little extra time this afternoon, I think I'm going to run over to Joann's before my evening work and see if they have any alternate things in a closer color that I could use to replace those lacings. I only looked in the trims, but maybe I can find something in the jewelry section.

Since knitting was my main craft of last week, figured I should show where things stand now.
This is the front so far-- not entirely finished, since I'll have to add the neckline edging and weave in the ends, but it's very close.

As of yesterday, this is how much I've gotten done on the back. I think I'm something like 30 rows in.

After much deliberation, I went ahead and ordered another ball of yarn from the same place. Since I only got something like 14 rows out of the third ball before I ran out, and after measuring how much I got per ball in the front several times, I decided that it's highly unlikely that I have enough yarn to finish. I just hope the dyelot thing works out-- I asked them for the same one if possible in the special instructions box.

(Of course, since I couldn't justify paying shipping for 1 ball of yarn, I ended up ordering enough for another project. I guess I have a yarn stash now. Darn it!)

And in the interest of full disclosure, I do tend to write about my failures as well as my successes on here. And I've been meaning to share this story for awhile, it just kept getting put off because the pants were way more exciting. So here goes...

Some of you may remember that two summers ago, I attempted to make a mini-wardrobe, with varying degrees of success from project to project. One of the projects ended up being that my mom crocheted me a wrap out of this bamboo-acrylic yarn. Which was really sweet of her, but it ended up not really working out. Which was my fault-- not only did I make the mistake of picking the yarn out before I got the main inspiration fabric in the mail, meaning it was the wrong color, I didn't purchase enough of it to get a wrap with a functional length.

So after I started knitting, I unraveled it. After all, I'd never actually been able to use it, and I don't like wasting things. Only problem is, this yarn was ugly. A color I never would have picked, if I hadn't been trying to match this badly-conceived wardrobe. The picture doesn't really show the color that great. On the website, they call it "Misty Taupe". I call it "dirty concrete sidewalk" or "the color of boredom". I think it also looks more tan on the website than it actually was--it's like this tannish grey.

Or was this tannish grey, to be more precise. Knowing I would never, ever wear anything made out of this blah, uninspiring color, I decided that the obvious thing to do was to dye it. So I picked up a couple of packets of iDye at the store--both similar shades of green, one in the iDye Poly and one in the regular natural fiber, thinking that the combination would make it hit both the bamboo and the acrylic.

I had envisioned this nice, mossy green color. This is what I got instead.
Pretty much the exact shade of the weather-beaten wood on the family's old playhouse deck. That's right, people, I went from taupe to a slightly darker taupe. (And this is what it looked like when wet-- after it dried, it was definitely more grey-looking than this.)

Which left me with the debate--what to do with six skeins of still-icky-colored yarn? After awhile, I figured I should probably at least wind it into balls and put it somewhere, because I'd had it drying on a flipped-over music stand and I needed to use that again. So I grabbed the skeins, the swift and the yarn ball winder, and proceeded to wind the first two with relatively little pain. A few annoyances, to be sure, because despite having tied it in quite a few places around the skein, they kind of fell apart in the dye bath a little. But relatively little pain.

The third skein was an entirely different story. About halfway through winding it up, it got so ridiculously tangled that I had to take the remaining yarn off of the swift, spend the next two hours untangling it from the opposite end (mainly because I'm stubborn and I didn't want to let the yarn win), and wind it back onto the swift.

Then I started winding it again, and it fell off of the yarn ball winder. And of course the middle immediately got all sucked together so I couldn't put it back on. I should have taken a picture, but it was around midnight at this point and I was annoyed.

So then I wound the entire skein back onto the swift, and tried to wind it a third time. At which point one of the pegs fell out of the swift, leaving it in a tangled mess once more. I finally ended up cutting a big chunk off and called it a night.

So the next day, and after bouncing it off of my mom, my crocheter sis-in-law and one of my knitting friends, I did the only thing I could do that would leave my sanity intact:
I still feel a little bad about throwing it out, but ugly and unmanageable was just too killer of a combo. So I guess the moral of the story is either a) use an all-natural fiber yarn to dye with, b) tie it up a heck of a lot more than I did, or c) leave yarn-dyeing to the professionals in yarn shops and on Etsy.

(Incidentally, this seems to be a summer of bad dye jobs, given the pants-- I originally tried to dye some off it with RIT dye that was pretty much the exact same color as my pants on the box, but came out a chocolate brown on the cording, and then the tea dye came out way too light. I have one other dye experiment I wanted to attempt at some point before it gets cold again, again with the iDye poly.... I'm kind of scared to try it now!)

July 20, 2011

Sneak preview

Or at least as much of one as I can give with a crappy phone photo. I haven't been home much this week, because I'm dogsitting for a friend who is currently out of the country. But I have had to go home for part of the day the last couple of days, mostly for flute-teaching related reasons. My hours at my retail job also got cut back (the bad time of year) so I've had a couple of hours to kill.

The lacing's not a perfect match, but I think it's as close as I can get without making it out of the same fabric. (Which will make it too thick for the buttonholes anyway.) The inside seams are all finished (at least as well as I can for some of the more curved ones), the outer waistband is on, and the fly-front zipper is in. A lot more winging it this time, since I was inexplicably unable to make heads or tails of the directions this time, but a lot fewer hot dates with my seam ripper. So I guess that's a success. I also ended up having to go back and topstitch all over the pleat to give it more definition, since it just looked like super-baggy pants when it was on. On the plus side, around my waist/hips/thighs, this is hands-down the best-fitting pair of pants I have ever made so far!

I've been without my sewing machine while I'm here (I've learned from previous times of watching this particular dog that sewing is not a compatible activity, because she will inevitably try to walk on freshly-ironed pieces or drop a drool-covered toy right in the middle of my fabric). So I've been doing a lot of knitting. As of Monday night, the front of the tank I'm making is all done! Other than weaving in ends and doing a neckline bit. I cast on the back yesterday, and am something like 3 rows in. Hopefully this half will go quicker than the first one.

July 11, 2011

Of sewing pleats and sweater(ish) progress

The pants are nearly at a point where I can start constructing them normally. But since several of you have expressed interest in how I'm putting these together, I thought I'd share how I ended up adding the pleat to the front. At this stage, they're looking really good, so I'm excited! (And fervently hoping they still look this good once it's all together.)

As mentioned in the last post, I cut a long, stretched out trapezoid to actually sew the pleat in. So this is the super-extra wide legs with the trapezoid in the middle.

I also stuck a scrap of silk organza into the seams on the inside, to help reinforce/stabilize the eyelet buttonholes I knew I'd need to make.

I understitched the seams, pressing them towards the trapezoid, to give it a nice clean finish later. The pants are box-pleated, so I figured it would be ok to stitch along the inside edge where the pleat insert is.

The buttonholes were the first serious obstacle here. I played around with several different things. The eyelets were too small for the cording I have and I couldn't make them much bigger, the stitched circles seemed too flimsy, and while the metal eyelets would give a cleaner finish, I didn't trust them to not pull out. Especially since they weren't really going in that well in the first place. So I ended up having to actually hand-stitch all 24 of those little round buttonholes! Mostly. I used the circle stitch to give it a nice edge to work from/mark the placement for me. But that took about 3 days of all the sewing time I had.

I think it was worth it in the end, though. Look how clean and pretty they look!

Next step was making the actual pleat. I'd already turned and pressed the seam edges before I did the buttonholes, but I re-pressed those edges to reinforce it. After playing around a bit, I decided that it would work better to just have the edges meet in the middle all the way down the leg, rather than to press the same amount in all the way down and leave a wedge of the inner pleat fabric showing. More Anthropologie and less the effect of ripping a slit up the front of my jeans and sewing fabric in to make instant bell bottoms, like I did for Spirit Week one year in high school. So I carefully folded and pinned the whole thing down, trying to keep it as centered as possible....

...and then I flipped it over and pressed it on the wrong side so I could keep the iron right by the edges. I didn't want to accidentally melt the pins into my nice linen! The other thing I did was to use a trick I found in the linen section of Claire Schaeffer's Fabric Sewing Guide-- apparently pleats set better in linen if you spray it first with a 50/50 mix of water and white vinegar. The pleat came out pretty crisp, so I guess it worked! (I guess the real test will be after the first time I wash them....)

And here's how it looks right now-- a nice pleat going all the way down the leg, which I imagine will show the flare from the inside of the pleat as I walk. Hard to tell with just one floppy piece of fabric hanging near my leg, but that's how I envision it working.

The other slow project is the tank top I've been knitting. But I'm almost done the front! At least, until I have to deal with neck edging. I have the second half of the top front to knit up, but the good thing is that taking the stitches off the holder and getting the knitting going with a new ball of yarn there seems to have worked pretty well. I obviously haven't been working on this a whole lot in the last several days, namely due to buttonholes and a concert I was playing in that had rehearsals every day of the weekend. But the one half knit up pretty quickly, so I might be able to get this part done if I just sit down for a night and do it.

And here's a closeup. It's supposed to be wavy ribs like that. I kind of wish I'd gotten this done earlier this month, because this would have been a perfect shirt to wear for Independence Day, with the rich blue color and the reddish/blueish metallic stripe that runs through the yarn! Oh well, maybe next year.... I should have it done before THAT, right?

October 7, 2010

A little catching up: the dress that wasn't

You've seen this top before, as day 30 of Self-Stitched September. But it's time to give the shirt its full dues.

Stylewise, it did end up pretty close to the original dress. Though the waist isn't nearly as gathered. And it's (obviously) a good bit shorter. But I think overall these were good changes--after all, I will get more use out of a top than a dress. My motivation to wear skirts plummets as the weather starts getting colder.

Here's a closeup of the belt that I did-- I decided to wing it somewhat, and I like how the texture turns out. It's hand-tacked onto the waistband to help hold it in place. Plus you can see the print and colors better now. (I'm a big fan of this print-- I like the angel wing-looking things.)

I'm also a fan of these sleeves, and the fun angle of the hem. (Hmmmm....now I'm thinking of this song by The Decemberists that I like called "Of Angels And Angles".... that would be a good name for this top!)

I've got some oddish scraps of this print left--even though it would be the "purl" side of the knit, I'm strongly considering trying to make myself a tank top out of the rest with the wrong side out, just to change the look of the fabric.

Next on the agenda: post the jewelry I made last week to go with this top, and start work on the muslin for my Burda jacket that I want to make. But the muslin may need to wait, as I'm also working on a birthday gift for my best friend. (Which I am extremely excited about! I started it tonight, and am quite pleased with how it's turning out so far!)


July 29, 2010

Fall preview!


I spent some time digging through my stash the other night, and I think I've got something resembling a plan for my upcoming projects. I figure there's about 10 garments I want to sew before the end of the year--now that it's almost August, I'm turning my attention more towards fall clothes. It's part of my ongoing attempt to be smart and sew things before the end of the season I want to wear them in. (Plus I need to make a bag for the fall, and if at all possible, something to carry my beach umbrella in before, oh, next weekend. The cheap plastic carrying case that came with it fell apart at last. Though I really can't complain...after all, I got the umbrella for free!) So here's what's coming...

This one is in progress, actually. I made the muslin the other day, and came up with several fitting tweaks. But I'm thinking that, if I can pull it off ok with the plaid, this shirt is going to be really fun! Even if it's not my usual color scheme. (The plaid will be fine, I think....after all, it worked for the Burda magazine people. Of course, since they seem to be making a move towards clown fashion according to the next preview, whether this is a good thing is debatable.)


From sew and so
This one is going to have to be next, I think. I've had this fabric for years--possibly since college! And it hasn't managed to make it into something yet. So I'm going to make the cardigan here, or perhaps a modified (i.e. longer) version. This knit is just so lightweight that if I delay it too long, I won't get any use out of it. But I think it'll make a nice summer-to-fall transitional layer. (Besides, I'd meant all along to finish it this summer.)

From sew and so
The colors on this picture aren't quite right. At least for the solid. It' s a little more teal. I'm going to make a skirt with the teal (mainly to test my skirt sloper and make sure it actually fits all right--based on an incident involving unsuccessfully .using it to alter another skirt pattern recently, I'd like to check that before I cut any other skirts out! (Especially since apparently the skirt sloper is a foundation to making a pants one....and you all know well by now that me and pants-fitting haven't quite learned how to get along yet.) And the print is just so sheer that it has to get made into something before it gets cold.  I have a pattern potentially in mind for that one, but need to figure out if I can add sleeves.

And last but not least, this.


I'm hoping this is the year that I finally turn this into that jacket from the March 2007 Burda mag that I've been eyeing for at least the last year and a half...or whenever I special-ordered that issue.

Edit: I almost forgot...bet you're all wondering what the deal is with that jeans muslin, aren't you?  Well, the truth is, I'm not really sure at the moment. It was at the point where no matter what I did to try and get them to fit better, it didn't work, and I had even the class instructor baffled. So she messaged me to ask if I could send her the actual muslin, which I did probably about a month ago, along with whatever measurements I thought was pertinent. I haven't heard anything back yet, so I'm thinking maybe I should write to her and ask her if she even got it in the first place....otherwise, I have to start from scratch again! Guess it's a good thing I actually do have a couple of pairs that fit decently right now. Thank you, Goodwill.

June 22, 2010

Me vs. the flowery explosion, part 3: I win!

That's right, I didn't let the top defeat me. I'm stubborn like that. And even though this is kind of a departure for me (especially the color scheme), I think it turned out pretty good. Good thing I'm so pale.


And no, Shelly, I hadn't specified which pattern I used yet, but here's a review for you!

Pattern: Simplicity 3750

Pattern Rating: Recommend, with modifications

Pattern Description: A tie-back tunic top with sleeve variations.

Pattern Sizing: 8-16. I cut a 14.

Did it look like the photo/drawing on the pattern envelope once you were done sewing with it? Pretty much, yes. I started out intending to make view C (with the cap sleeves), but it ended up looking too Regency-era so I took them off to end up with view E (the sleeveless one) instead.

Were the instructions easy to follow? The instructions were fine-- I just made things way more complicated for myself by adding a lining.

What did you particularly like or dislike about the pattern? I like the look of the finished product, though there are things I'd change if I make it again (mainly making it cut a little higher.) I also like that it has the wide tieback sash, because I like my empire-waist tops with an option to make my waist look more fitted whenever possible. I didn't really care for the instructions to finish the armholes and back neck with bias binding, or that the elastic in the neckline is just a fold-over casing--I think that could have the potential to flip to the wrong side. But for the most part I didn't follow that part.
 

Fabric Used: A silky print polyester, with a satiny polyester for the sash and lining (I used the wrong side of the fabric for the sash--as you can see here in the lining, it would have been WAY too shiny in contrast otherwise!).

Pattern alterations or any design changes you made: As stated before, I ended up fully lining this top. With the light background of the print, it was just a little too see-through to go without. I also ended up adding about 3/4" in the bustline (and adjusting the lower front, back and front strap accordingly) so it would fit my chest better, and then taking out an additional 1/2" from the seam allowance just below the armholes on each side because it was gapping.

Would you sew it again? Would you recommend it to others? I might sew it again-- I really like the look of the sleeves on view B. But if I do, I'm going to raise the neckline more, and use a little less elastic so it doesn't gap at the neckline. If I'd strictly followed the directions and not had to figure out the lining, I think it would have been a pretty easy top to sew, so in that I would recommend it. But I would also caution to beware of the fabric you use if you go for a print, because it's really easy to make it look too 18th-19th century with a smaller floral!

Conclusion: It's a cute summer top--just maybe not quite as easy as the pattern thought if you want to make it look nice and finished.


I'm glad to have gotten this one knocked out of the queue...now if I could just figure out what to do with the leftovers! Angelia suggested maybe a quilted bag, so I'll consider that. I've been really bad about my fabric estimations this summer, it seems-- I've ended up with significant leftovers for every single project I've made lately!

I don't have much in the way of work today--Tuesdays is my day off from the garden center this summer so I can do a lot of teaching, but every student I would normally have this morning and afternoon is away at a camp that my church throws every summer! So I just have a few later this afternoon and that's it. I'm hoping to get some more work done on tweaking my jeans muslin (which I have to out-stubborn even more than this shirt, because it just refuses to fit me properly), and then I have a dress that I cut out over the weekend that I'm really excited to make. I'd much rather work on that than the muslin, actually, but I feel like I need to work on it while I can still get the instructor's help! It looks like the dress is going to be a more or less straight from the pattern project, so theoretically, this should come together fast. "Theoretically" being the key word here...