Showing posts with label my handmade wedding. Show all posts

July 1, 2013

The post you've all been waiting for!

I mean, I'm assuming you do want to see that little dress project that took up nearly a year's worth of planning and postings on here, right?

So, at last: the One Dress to Rule Them All. And other handmade wedding goodness. (These aren't the professional pics, so I may come back and edit this post to add some of those later. But these are featuring the shots that I was able to get from my family and friends. I'm also making these larger than usual.)

8700_10151653160197980_718630365_n

Full-length dress shot! This is me with my friend/honorary bridesmaid Nicole. I wasn't able to have her as part of the wedding party, but she did the artwork for my invitations and programs, and also did my hair!


6512_10151653159422980_1480637199_nAnother full-length shot, this time from the first dance. You can see the border sunflowers a little better on this one, I think.


5758_576995039012560_1066541998_n


Ceremony shot- not the best expression on my face, but it's a good closer view of the bodice. And Doug's tie. And my bouquet!

1044156_576995289012535_1476750130_n
This was as we were all leaving the church--and a great shot of the back!
1044856_576995665679164_1044450457_nMe and two of my bridesmaids/long-time best friends, Cassie and Julie. The headbands turned out ok after all!
1014281_576995975679133_1477030337_nProof that the TARDIS/R2-D2 shoes made an appearance! We all changed into them after we were done with the outdoor bridal party pictures.
999257_576996245679106_440699499_n
And I'm just including this shot because I think it's fun, even though I look like I'm posing for one of those old Sure deodorant commercials! The DJ had Doug and I do this game where we each had to sit back to back while holding one of our shoes and one of the other's shoes, and raise the shoe for the person we were answering for. I'm pretty sure this one was "which person has the crazier friends." (I love my crazy friends!)

So there you have it--I hope the post was worth the wait!

(In case you're newer to reading this blog, a few quick project notes: The bodice and waistband are based on Sewaholic's Cambie dress. I modified it to make the upper back and sleeve caps sheer, and changed the darts to princess seams for fitting reasons. The skirt is from Simplicity 2442, modified to lower the waist. I also used a lengthened version of the Sewing Cake Pavlova skirt for the tulle underlayer. And if you want to see all of the construction posts and notes and multiple muslin attempts, you can click here.) 

May 30, 2013

Something old, something new...

One last wedding-related craft post! It's probably no secret by now that I'm somewhat of a geek. I definitely lean more towards fantasy than sci-fi, for the most part, and am a little sad that I haven't found a way to incorporate something Lord of the Rings-ish into my wedding. (Though my fiance did comment when we were picking out wedding bands that the one he picked out looked kind of dwarven to him...he was a much bigger fan of the Hobbit movie than LotR.) However, I do very much enjoy Doctor Who on the sci-fi end of things, and am super-excited that Tempest is hosting a Whovian sew-along for the 50th anniversary later this year! But I'm getting a little bit of a head-start...

Two out of my three bridesmaids, as well as my mom, are also fans. I quite successfully managed to get my fiance interested.  And after this scene from a couple of seasons ago, how could I not include something Who in the wedding?

(Not the best quality vid, but it was the only one I could find that would actually play for me and wasn't a fan-made music video. Sorry.)

I was originally just planning on having a little fun with my tiny TARDIS and phone camera at the reception, since it seemed appropriate.(My maid of honor and I have been having fun over the last few months with taking Instagram photos of a little plastic TARDIS in random places, so you bet that's going to be going with me on my upcoming trip!) But when my mom noticed that I'd pinned some painted TARDIS shoes onto my "Crafty Geekery" Pinterest board, she suggested that we get some shoes and paint them for the reception! She originally said for myself, my sis-in-law and her, but I pointed out that my maid of honor would want them, too. So with a little help from Sis and a lot of help from Mom, we ended up painting 4 pairs of these!

(Wow, my carpet looks awful--in my defense, I've been busy packing and planning a wedding!)

TARDIS shoesThis is basically the gist of them--SIL's look a little different because when we told her we were doing this, she really wanted shoes without laces, so she has some slip-on canvas ones. We couldn't find them in any other sizes (especially not mine), so the other 3 pairs are the standard lace-up Keds. The fun shoelaces were our addition, and my mom, my maid of honor, and I all now have different pairs of laces to go with.

As for my non-Whovian bridesmaid...I didn't want her to feel left out. Like I said, she doesn't really watch Doctor Who, but she's been a huge  Star Wars fan for as long as I've known her, which is since we were kids. Her favorite character is Yoda, but I wasn't really sure how to translate that to shoes (I always sucked the most at faces and figures in art class), and we wanted to do something where I could use the same paint we already bought for the TARDIS shoes.

R2-D2 shoesSo she gets R2-D2! Hmm... I wonder how it would look if I used my seam-ripper to get those Keds tags off of the tongues?

May 20, 2013

Another batch of wedding crafts

What I've been up to lately:
IMG_0552#1: That tie I've mentioned a couple of times. I'm going to be honest and say that I'm not 100% happy with the way it turned out--the poly satin didn't press well at all, and the interfacing made it just too stiff overall. If I was going to go back and do it over again with this fabric, I'd just leave the interfacing out entirely! I also had trouble getting the much lighter lining fabric to lie flat in the tie. But after all of that drama involved in finding solid emerald green fabric in the first place, I didn't have too many options. I'm fully expecting he'll never wear it again after the wedding day, but I guess I can chalk this up to a learning experience.

IMG_0551Incidentally, this is also a sneak peek of the shirt I recently finished--I just haven't had a chance to take a decent outfit photo of it yet, but since I'm planning on taking it on the honeymoon, I'll see if I can get a shot or two of it there!

#2: This one's been a few months in the making. These are the table numbers for the reception, with some cheery paper sunflowers glued to one corner of each side. I can't take full credit for this, as I had help from my mom, my maid of honor, and even my fiance! The punches were ridiculously hard to push through the paper, so he punched every single petal of these out for me. I definitely found a keeper!
flower closeup
I zoomed in and lightened it up so you could see a little more detail on these. I was amazed at how realistic they look! And it was a lot of work, but these are so much lighter than silk flowers, so I think the effect is well worth it.

To give credit where it's due, I got the idea from the punch manufacturer--found these while searching for sunflower wedding picture ideas early in the process. I have several of these leftover, and they'll be used to decorate various baskets for bubbles and our guest "book". (Which is actually quilt squares that my mom is going to sew together for us.)

IMG_0553#3: The centerpieces are finally done! My incredibly awesome maid of honor gets serious props for helping me with both steps of this--we painted all of the flowerpots, and she helped me assemble them this past Saturday while we and my fiance watched the season finale for Doctor Who.  We ended up painting several more pots than we needed to, because I didn't know until after we did it that some of the tables at the reception place could seat up to 12--I'd been under the impression that all of the tables would seat up to 8 people, and was planning for about 18 centerpieces. My math must have been off somewhere, though, because if I'd had to make that many, I wouldn't have had enough sunflowers!


IMG_0554


Here's a better view of the pots--we decided partway through that it reminds us of the 1-up mushrooms from all of the Mario Nintendo games, so I can't help thinking of that now! I'm going to recycle a good bit of this after the wedding--I plan to make a wreath for the kitchen with the flowers (also doing sunflowers in there), and I have some herbs to plant in the pots. I just need to figure out what to do with a bunch of white candles!


This isn't the last of it, I still have a few more crafts to do, and less than 3 weeks to finish them in! So I guess I'd better get back to work!

February 8, 2013

T-4 months till W-Day....

I've gotten absolutely nothing accomplished on the dress this morning, because I'm too busy baking. My fiance's birthday is tomorrow, and I've got a little get-together with some girlfriends tonight. Ironically, this was postponed from two weeks ago due to bad winter weather, and now we have a nor'easter rolling through! But it looks like my area is going to get nothing but rain until 9 or later. As much as I hate winter rain because it is the most depressing weather EVER, I'm glad the snow is going to hold off long enough for me to hang out with my friends! And I doubt we'll be staying super-late, since the friend's house we're meeting at is my bridesmaid who had the baby 2 months ago today.

My hands have been busy, and so has my brain, trying to wrap it around all of the things I need to get done in the next 4 months. And several of them have a DIY component, so that justifies me doing a brain dump here, right?


  • The dress, obviously. I am 4 catch-stitched seam allowances away from being ready to sew the skirt onto the bodice, woohoo! Which I'm hoping I can get done today, because between Doug's birthday, church activities and flute choir, it looks like this weekend is going to be a total bust for sewing.
  • Doug's tie and a green sash for my dress. I got the fabric in last week, which I ordered from Gorgeous Fabrics. The color is gorgeous, of course--it was labeled "happy green" and appeared to be a cheery spring green--but unfortunately it's way too close to neon for my comfort in this particular context. So I also got some kelly green dye from Dharma Trading Company to see what I can do. In other words, dyeing experiments are in my near future! (Side note: for emerald being the Pantone color of the year, it is ridiculously hard to find solid silk fabric in a good weight for a tie that's anywhere close to a green that isn't chartreuse or olive!)
  • Jewelry for the bridesmaids, which I may or may not have to end up making myself. It's dependent on whatever color this fabric ends up being (ohpleaseohpleaseohpleaseworkout) and whatever dresses my girls end up getting. I don't particularly care if they wear the same dress, we're just doing knee-length black something or other so I can up the chances that this dress can actually be worn again, but I do need to have an idea about necklines so I can see if necklaces are in or out, you know?
  • Centerpieces for the reception. We were originally planning to incorporate my mom's teapot collection, but we didn't have nearly enough that would work and it was way too expensive to get enough. So we're painting some flowerpots instead and filling them with the artificial flowers. This is also going to depend on what color green this fabric ends up being. On the plus side, I may be able to reuse some of these pots afterwards to grow some herbs or something. But it's still another DIY. 
  • I also need to finish figuring out flowers for the ceremony, but my church got renovated and no one seems to know what the deal is for weddings now that the sanctuary looks very different and so I'm kind of stuck.
  • I need to get back in touch with the baker to confirm coloring for some details on the cake. Again, waiting on that green fabric.
  • Invitations, thankfully, are done and printed. Hopefully having invitations that don't completely fill the envelope won't look tacky, because we had to get larger envelopes to accommodate RSVP cards due to the sizing. I just need to get stamps, stuff 'em and send 'em, but that can wait till next month.
  • I'm making these paper sunflowers to go on the table numbers, which is in progress, but still quite a bit to do.
  • I need to get a garment bag for the dress. 
And that is just all I'm able to think of off the top of my head that is related to things I'm making, and doesn't even factor in things like moving. Do I sound stressed? I'm sorry to say that I'm beginning to feel stressed!

December 26, 2012

Screwing my courage to the sticking point

Merry (slightly belated) Christmas! I hope it was lovely for all of you. I definitely got spoiled this year, with sewing/knitting goodies (which I will post about later) and some things for my fiance's townhouse and DVDs. And the thing I'm most excited about-- a new digital SLR camera!! I'm still in the VERY beginning of learning how to use it stage, so bear with me as I learn to adjust the settings, but this will definitely help with my resolution to get some better photos on here!

And now it comes to it. I have the most expensive pile of fabrics that I've ever worked with in my life hanging here, after four hours of pressing it as flat as I could. (The dupioni wasn't exactly cooperative, so hopefully it will be ok in the end.) And I have a fully-dissected and pressed muslin that is ready to use as a pattern. I've watched a few sessions of my Craftsy class, and ordered a ginormous roll of paper to aid in cutting out the silk, as per this tutorial.

Now it's just a case of getting up the nerve to actually take the scissors and cut.

I know I've showed a fabric shot before, but it wasn't all of it. So I figured I'd do a little highlight post before I start slicing and dicing. I ended up having to source my fabrics from 4 different places, which seems kind of crazy for one dress! (I apologize for the shadow, and the off-tone of the photos--it's very grey and dreary here today, but I don't feel that I can afford to wait for better lighting!)

All the fabrics!
Going left to right: Nude organza, lace, white organza, crepe de chine, dupioni, and habotai.

The lace, which inspired the whole thing, came from a place called Lace Factory. I stumbled across it on Etsy kind of randomly several months before I even got engaged and snatched it up with no particular purpose in mind. I mean, seriously, how often do you find lace that isn't all rose-covered and stuff? I couldn't pass up the sunflowers. Fortunately, they have a website too, because I wasn't entirely sure once I started planning this that the 3-yard piece that it had been sold as would be enough, and ended up buying 2 more yards.

Of course, the lace is super-white, which did make it a little difficult to pair fabrics with it! The printaholic in me is surprised at how hard it is to find plain old solid white fabric--everything seems to come in various shades of ivory. After buying swatches from multiple websites, I settled on the white silk dupioni from Fabric.com for the outside of the dress. It's still slightly more ivory-looking than the lace, but I figure that will help the sunflowers to stand out a little better. Also, if I underestimated how much fabric I'll need, it's something they will definitely keep in stock and so I can order more. It's good to have that safety net.

For the underlinings and lining, I bought various undyed silks from Dharma Trading Company--going with plain dyeable fabric was a pretty cost-effective way to go! My plan as of now is to underline the entire dupioni portion of the dress with crepe de chine, and to add a layer or two of white silk organza to the bodice and waistband for extra structure. I think the most sensible way to do this is to do a separate inner bodice from the organza and stitch the boning to that, but I may end up needing to sandwich the boning between that and some white muslin, depending on if the boning is showing through the rest of the bodice. I figure that I can always recycle the white muslin from the skirt of the test dress, where it's not all marked up with red waxed tracing paper, if needed.

I'm also going to be lining the dress in silk habotai, also from Dharma, and I bought extra of it for dyeing purposes. I'd still like to add a green sash or something to add some color to my dress, and Doug wants me to make him a tie for the wedding. I can't choose the color yet because I don't know for certain what my bridesmaids are wearing, due to maternity issues. The baby is here (and adorable), and my new mama friend will probably be more ok to shop in a couple of months. But for simplicity and greatest chance of actually re-wearing, there's talk of just letting them each pick out whatever little black dress that each girl wants, whether they match or not, and if that's the case, I may need to come up with some green accessories for them as well. I guess whether it's a sash or just jewelry will depend on the styles. Maybe the Pantone color of the year being a green will work in my favor?

Side note--it is SO HARD to find wedding-ish jewelry in green on Etsy that doesn't involve pearls. Which I'd really like to stay away from, because they're really not me. I'll keep looking since I don't feel comfortable buying without knowing what the dresses are anyway, but I might have to resort to making jewelry for me and the bridesmaids after all!

The most recent addition is the nude organza, which was also kind of tough. But although I had no luck with white silk there, Mood finally came through for me on this one (thank you, Mood!) This one ended up going very well with my particular shade of paleness, and this will be underlining the lace for the upper back and the sleeves. Now I just need to figure out how I'm going to finish the edges and seams on those particular sections.

The possible addition that I'm not sure about yet: I may need to add some tulle to give the skirt some body, but I'm not sure yet. I guess I'll have to see how the skirt behaves in the actual fabric.

And there you have it: about 22 1/2 yards of fabric for one dress. Crazy.

November 27, 2012

So, SO close

Does it make me sound like a horribly lazy person that I'm glad I got an unexpected day off of work? I didn't have to go to the shop because the weather is gross and the manager predicted sales would be extremely slow. They're selling Christmas trees now, and who wants to look for those outside when it's rainy and cold? Not me. So I got to work on the dress this morning instead.

It took a little longer than expected, because I had to tweak some seam placements in the skirt again. But I think I am basically there, as far as the muslin goes. Except for one issue. (Pardon the iphone photos--the lighting around here is pretty terrible today due to the rain, and I figured I'd have more luck with mirror shots using the phone than I would my camera. Also, my tripod broke.)

Dress Front 2This is the front of the dress--now with spiral-steel boning! The stitching on that is completely wonky because I was having to stitch the channels on with the boning in it in order to actually get the boning inside. (I had to make these channels myself. I may have done it too tightly. I'm debating whether I'd be better off making new ones out of, say, grosgrain ribbon for the real thing.) For the most part, I think the boning helped, at least on the side and back.What I'm not sure about is all of those diagonal wrinkles right in the center front. I think it's time to post in the Craftsy class again and see what Susan has to say.

One more note about those skirt seams--the black lines are not the seams. Those were the original thread tracings, and those seams were moved to line up with the princess seams.

Dress Front 1One change to the front that I do like is that I retraced the curve of the sweetheart neckline (the white that's slightly showing above the original stitching.) I like this one much better.


Dress Back
And here's the back. Not entirely accurate, since the very top will be tacked closed with a button. But I did add a zipper--partially to check the fit, and partially to play around with a lapped zipper. (It's on my Check The Technique list anyway! Still needs work.) This is obviously not the zipper I'll be using, since it's grey--I didn't have a white one on hand. And I think I'll have to extend the zipped part an inch or so, because it's just a liiiiiiiittle bit hard to pull on over certain curvy bits. (Ahem.) But with the zipper, the fit is actually quite comfortable. Even with all of those extra layers that the seam allowances made around the waist, so I think it'll be just fine with the underlinings and such. Again, I added some boning to this, right over the darts, and I think it does do a nice job of smoothing it out. I will have to shorten the actual bones on both the side and back pieces just a little bit, though. Maybe about 1/4".


Dress Side
Speaking of the side--I do think I am going to have to alter the curve of those pieces some. It does still pull towards the front slightly, though the boning did help that out quite a bit. I think that shaving 1/4" out of the middle of the front and adding it to the back should do it. Again, the thread traced black lines are not the actual current seam lines. But it does look like things are laying pretty smoothly in the front, so I'm pleased with that.


Dress SkirtAnd although it's not the most flattering view of my middle, here's a view of the whole skirt. I tried it on with the shoes this morning to check the hem length, and I'm going to have to add at least 2" plus the hem allowance. I might do 2 1/2" just to be on the safe side, since it's easier to make a wider hem than to skimp on the fabric there. The circumference of the skirt is plenty wide enough, though, and even with my long stride, I can walk comfortably in it. I guess I'll just need to figure out if I need to add something to the hem to poof it out some, whether it's horsehair or some tulle underlayers.


ShoesSpeaking of shoes--if you were curious, here they are! Since I rather dislike shoe shopping (mostly due to that lovely widening bony bulge you can see riiiiight under my big toes), I decided to be cheap and lazy and wear the same shoes I wore as a bridesmaid in a friend's wedding several years ago. (Incidentally, this is the same friend whom I just made the Star Wars bibs for, and she's going to be a bridesmaid in my wedding as well, so the circle is complete.)

Since I don't have too many occasions in which to wear strappy silver sandals--and when I do, I usually wear my gladiator flats instead--they're in good shape. All of the little rhinestones are still there, and I just have a little bit of scuffing on the heels and the very edge of the toes. Nothing a little nail polish can't fix, once I find the right extra-shiny shade.

November 20, 2012

A different test for the One Dress

Lace test- front

Lace test- back

I wanted to work on the dress some tonight, but I didn't want to work in the basement, because I was cold. So I did this instead...
This is the real fabric! I took the swatch for the silk that I got from Fabric.com, and cut one of the lace motifs from the very edge of that fabric. I wanted to make sure that the edges of the flowers would be ok with that treatment, since the lace isn't edged very well. But it looks like it'll be fine.


And since this is the audience that would appreciate this sort of thing--the back. A little messy with the knots, but I'm quite proud of my hand-stitching!

According to the number of songs I got through on iTunes, stitching this one flower took me a little over an hour. Since I was planning on doing this all around the hem of the skirt....yeah, this is going to take awhile. Good thing I'm not doing a train.

Previous dress posts:
Tracing out the pattern
FBA attempt, part 1
FBA attempt, part 2 (with diagonal tuck adjustment)
FBA attempt part 3 (Bodice 2.0)
FBA attempt part 4 (Bodice 3.0)
More fitting 
Fitting with a skirt! 
Bodice speculation
Bodice test 4

November 15, 2012

I love it when a plan comes together!

I do still have some important details to figure out. Mainly the internal support structure. But I did get the new bodice basted together with all of my pattern changes, and if I may say so myself, it worked beautifully.

Final bodice test- frontI think the moral of the story is that when it comes to very fitted bodices, princess seams are going to work for me ten times better than double darts ever will. This made a HUGE difference in the look of the front. I also like the new lowered neckline, though I think I'm going to have to adjust those curves a bit to make it look a bit more sweetheart-y. (That somewhat pointy section on the right side is the result of the clipped piece sticking out. If this was the real thing, obviously I would have pressed it and stitched down the seam allowances and such, since the Bridal Couture book strongly recommends joining the lining to the upper edge of the bodice by hand. But this isn't the real thing.) I also did a rather sloppy version of the cap sleeves, with the side seam allowances on both the lace and the organza just folded in, but it's enough to tell that it will work, provided I can figure out how to conceal the actual seam allowances on the sides and shoulders as much as possible.

It looks like that waist on the front is really crooked, but it's not nearly that bad outside of the picture. For one thing, I think I forgot to tug this into actual approximate placement before I took the picture, so the top will run a bit lower. For another thing, the jeans are not helping that visual.

Final bodice test- sideSee? It's pretty straight from the side. On an unrelated side note, yes, these are the jeans I made, and for the most part, they're washing and wearing beautifully! But I have noticed that the waistband has stretched a bit so that it gaps in the front--though the back is still gapiosis-free!-- so for the next pair, I'm going to need to stabilize and/or alter and/or completely swap out the waistband for something more contoured. On the plus side, I was afraid that it would be too tight in the crotch area, and it's actually quite comfortable!

Ok, back to the dress. There is that one diagonal pull there, but I think once the skirt is on, that will probably straighten out. The boning might help too, once I get that in.

My favorite new detail? The back is exactly how I pictured it to be. Check this out:

Final bodice test- backThe lace is one piece, and underneath there's the "fashion fabric" on the lower part, and organza on the upper part. So the effect when I'm wearing it is just that my upper back is covered in lace. The pattern alteration was soooo easy to do--I took my french curve ruler, started where the front bodice meets the back armhole, and did a very slight curve towards the center back. Then I added seam allowances to both of those pieces. Given my usual lack of success when it comes to flat pattern alteration, it's very gratifying to know that this worked. Again, there is some rippling, but I do think that will straighten out when the skirt/boning is in.

My next adventure is figuring out boning placement--I'm not sure I technically need it, since this isn't strapless, but I think I'll have a little more peace of mind knowing that I'm not putting all of that strain on the organza in the shoulder seams. Especially since I have no idea how much this skirt will weigh when all is said and done, given the length and the layers of lining and underlining and stuff. (Plus I need to figure out if I need to add tulle and such for fullness.)

boning placement- test 1I've never used spiral steel boning in my life, so I've been using this tutorial for cutting it. It was definitely easier than cutting through an entire length of metal, but still hard! My little wire cutters, which I generally use for jewelry-making, were not quite up to the task, so I ended up having to resort to just snipping it over the same area over and over until the metal finally weakened enough that I could break it. I did get all of the lengths that I'm pretty sure I'll need cut (a bit tricky for the front, and some of the pieces are very, very short, since I was using where my bra ended as a guideline. See between those yellow pins and the waistline!). I got the tips on all of them. The website also recommended wrapping the tips in some plumbers' tape to keep the tips from coming off while sliding things in and out of the boning. I don't have any, so I've been at a bit of a standstill ever since. Not that I've had time to sew since Monday anyway.

On an overall plus side, the lace is behaving better in the actual bodice, so maybe I'll only have to hand-stitch the seams and darts (just for motif placement), instead of all over the pieces, after all!

November 11, 2012

that sinking feeling...

...in which you realize that you might have to hand-embroider the lace on the entire bodice of your wedding dress. That's what I'm experiencing right now.
lace test 1I'm currently in the process of testing the pattern changes I wanted to make for the lace--this is the back, with a new top panel of organza with the lace over top. (Thank you, Joann's Casa Collection, for giving me a way to test this in cheap polyester before I mess with the real thing.) Even though this is still the muslin, I hand-basted all of the lace pieces onto all of the muslin pieces, just so they'd line up the way they were supposed to. This is why I've been quiet this week.

I'm a little worried, though--the lace isn't exactly laying flat against the fabric underneath. I guess it's to be expected with polyester organza, since that ripples out the wazoo, but the fact that it's also doing it on the muslin is a bit concerning. So now I'm wondering if stitching all of the sunflowers onto the silk so the lace isn't poofing away from the bodice is going to have to be the way of things.

I'm finally getting my usual November time off of my retail job this week, somewhat, so tomorrow has been designated as a sewing day. So my plan is to sew this entire bodice back together, make sure the new princess-seam pieces are going to work, and see what this lace is doing after that. Oh, and I also need to throw some boning into this thing at some point, if I can figure out how to cut spiral steel boning!  I also want to play with the zipper, since my thought is to only have it go to the top of the solid part, and then finish the edges and just have a button at the very top of the sheer part. I also need to figure out how to best finish the edges of the organza/lace sections, since that will affect the entire armhole section, but that may have to wait for another day. I'm thinking maybe hand-stitched bias binding out of the organza to camouflage the lace in the seam.

So if I do have to hand-stitch all of the lace to the underlayers, I guess I need to figure out if I would just do that through the top layer, the eventual underlining, or both. And also if I might want to just throw beads on the thing while I'm at it. I'm leaning towards not, since that might detract from the sunflowers and would certainly make the seams a total pain. But then, it would give extra sparkle, and I do like sparkly things!

November 4, 2012

pictureless progress

It's been fun to see all of the costumey goodness around the blogosphere over the last few days! Nothing Halloweenish for me this year, alas. I had no parties to go to, and I wouldn't have had time to make a costume anyway. I did go back to my retail job yesterday, which is unfortunately still an outdoor register thing, And Sandy apparently decided to bring winter with her, because it was in the 40s pretty much the whole time I was out. So the closest I got to dressing up for Halloween was as an Eskimo while I was at work, as I was wearing FIVE layers up top, the last one being a winter coat! (Though I'd taken the fleecy liner out, thinking that the thermal top/long-sleeved shirt/required work t-shirt/hoodie sweatshirt would be sufficient. That was obviously a mistake.) Plus a scarf, hat, handwarmers, and gloves. And I was still cold. It's ridiculous. I don't know how you people that live anywhere further north of here do it!

I did go to the mall later on Halloween with my fiance, and I wore my Cadence sweater because it was orange. And I was still cold, despite having been indoors for hours and having hot tea. Blah. Anyway.

So I'm doing what is now my 4th bodice front, as well as an entirely new back. I want to make sure the princess seams are going to work, as well as test the pattern change I've had planned for the back. And I also want to make sure the lace idea is going to work, period. I haven't had a chance to work on it since Tuesday, so I haven't taken pictures yet--between a dj meeting, a weekend of rehearsals for this evening's flute choir concert that I'm playing in, and the usual work stuff, I just haven't had time to sew.

I did also go to a craft afternoon yesterday hosted by a casual friend, and started knitting a scarf to go along with the hat I made for my fiance back around his birthday. He's been asking for one now that it's starting to get cold again, and I need to use up the yarn anyway. So I figured that this can be something I work on while hanging out with him and watching tv for awhile, at least until I get to a point where there might be wedding-related crafts that aren't my dress.It's a simple enough pattern, just a striped ribbed scarf, and so far I've managed to get about 6" done, I think. No pics of that yet either.

We'll see if I get more work done on that bodice this week (I haven't even finished cutting out the new pieces yet). It's a bit iffy, since this week also marks round 2 of the dental surgery, and I know that sewing that day is off the table based on how I felt the last time. (That, and having to work one-handed while holding an ice pack to your face just doesn't work. I tried.)

So hopefully I'll have something to show soon. On an unrelated note, I have been reading the reports of how different bloggers fared in the storm, particularly in the New York area, and I'm glad to hear that you're all safe!

October 29, 2012

Hey, it's starting to look like a dress!

Considering that we're pretty much in Sandy's direct line of fire, as of when I started writing this (around 10:30 on Monday night), I've gotten off pretty easy! It's been very wet and windy here, but no trees down around my house, and the power hasn't even flickered. We were, however, under a state of emergency that required staying home. So I just sewed basically all day, other than a little flute practicing break. I can't say I was sorry that I had a day to do that.

So I got the princess-seam-creating dart sewed in, marked the changes to the straps, lowered the neckline, fiddled with the waistband, and got the skirt basically basted together enough to do this:


Full test front
Basically, this is what my dress will look like! When I cut out the skirt pieces on Saturday, I wasn't sure if the skirt would be full enough that I could comfortably walk in it, but I think it will be fine. I did have to do some tweaking--there was way too much room in the back skirt to match up with the waistband, for sure. And after pinning it all together multiple times, I basically had to shift the top of every seam around so that the skirt seams more or less line up with the darts and seams of the bodice. (Hopefully more.) 

I think I'm going to have to redo the bodice muslin one more time, with the princess seams, to make sure I haven't just stretched and warped the fabric into submission. It's just as well--I also ended up having to move the shoulder seams, and I need to test the pattern changes for the sheer upper back. And, well, the princess seams, which I also need to smooth out anyway. But it's getting to the point where it's closer and closer, and that's rather encouraging.

Full test backI'll give you a back view while I'm at it. For the record, these pics were taken before the hours I spent tweaking the skirt seams for where they'd line up. And I may need to do some work on the back still, since I'm not sure if those wrinkles count as making a swayback adjustment necessary. But I think I'll hold off on that one, since I am still going to need to play with some boning, and that might help to straighten it out.

Anyway, I may work on this bodice some more tomorrow, depending on if we have power and if I need to/am not allowed to report into work because we'll still be under a state of emergency. (I don't know if we will be or not. I guess I'll have to wait and see!)

October 25, 2012

In which our heroine changes the FBA yet again! And other fitting tales

I have to say, Craftsy classes are awesome. I'm currently doing the Couture Dress class, along with reading the Bridal Couture book (both by Susan Khalje). I'm on the Muslin Fitting video section (obviously), and posted a picture of my muslin so far with a question about when in the process I should start dealing with the boning. And I was quite pleasantly surprised that Susan wrote back the very next day with some excellent constructive criticism!So I've been tweaking the muslin as I could over the past two days, as per her suggestions.

As I reminder, this is what I had at the beginning of the week:

Dress Bodice 3.0

And this is what I have now:

Muslin fitting, 10/25
  1. For the back, I took a horizontal tuck across the upper back, I think about a total of 3/4". (The seam was about 3/8" from the foldline.) Goodbye, weird saggy armholes!
  2. Susan pointed out that the side seam was pulling to the front a bit, which I hadn't really noticed before. She suggested taking a bigger dart and letting the side seam out just a bit. I think I'll still have to let it out a bit in the middle--I actually ended up pinning on the side seam again after deepening the dart (about 1/8" out from the original stitching, for a total of 1/4"), but it definitely looks better than before.
  3. I also took a nice big chunk out of the center front, by starting the seam for that about 3/8" out from where it was.
  4. It's just folded for now, and I'll need to play around with it some more, but I did fold the sleeve caps under further so the edges would be on my shoulder instead of hanging off the edge. I like this look much, much better.
  5. Susan also mentioned that the shoulder seams were pulling too far towards the back, so I tried to center them up. Which basically meant shortening the front sleeve section a lot--I just checked the outer edge on the one side, and it's nearly a full 2" shorter than before!
  6. The biggest change: After all of that FBA work, it looks like I'm going to have to turn this into a princess seam bodice after all! I just could not get it to lie right, and it was still gapping in the front, even after I played around with shifting the inner edge of those sleeve cap strap things. And the only way I could get it to lie flat was to pin a dart out, about 3/4" total on each side. You can see this best in the side view picture--I know it's still bubbling a bit funny at the bust, but keep in mind that this is only pinned in for now. I hate to say it because I really wanted to avoid altering the basic design lines too much, but it really does lie much better with the princess seam. So now I just have to figure out how the heck to make it work. I'm hoping that those side dart bits will just function as a flat piece, because I'd really like to avoid the look that I had to resort to on this blouse
I'm definitely going to have to lengthen this bodice some now, because there is absolutely no way that waistband is going to hit anywhere close to the right place now with all of that darting and tucking I've had to do. I'd say that I'd have to patch on some muslin, but in all honesty, I've made so many changes to the darts and all by this point that I might be better off just re-muslining the whole thing, if I can just transfer the changes to the pattern right. (Especially since I need to change the back anyway to split that into two pieces.)

The part I'm not so sure about is that neckline--I think the shape of it is great, and it's good to not have it gapping now! But I feel like it's maybe a little too high now--I'm not looking to flash a bunch of cleavage around in front of all of my relatives and friends, but I think the sweetheart would be a bit more flattering if it were maybe an inch lower.  Plus then I can have more fun with jewelry, because I still want a fun, sparkly (and possibly green) necklace! The only thing is, I'm not sure how to lower it, since letting out those shoulder straps will just shift the shoulder seam backwards again. Do I just need to redraw it a little lower or something?

I actually get nearly an entire day to sew on Saturday, which is super-exciting because this hasn't happened in months! I'd like to get the skirt muslin pieces traced and cut out, finally, but I'd like to do some tweaking work on this bodice as well, if I have time. We'll see, because it's looking likely that Hurricane Sandy Frankenstorm of Halloween Doom is going to hit my tiny little state pretty hard. I'm just hoping that if it does, I don't have to go to my retail job, because I do not want to sit at an outside register in all of that nastiness. And hey, if I lose power, I can baste and thread-trace by hand to my heart's content! As long as it's daylight out so I can actually see what I'm doing...

Previous wedding dress posts::
Tracing out the pattern
FBA attempt, part 1
FBA attempt, part 2 (with diagonal tuck adjustment)
FBA attempt part 3 (Bodice 2.0)
FBA attempt part 4 (Bodice 3.0)


October 20, 2012

Third time's the charm?

I'm starting this on an unrelated note. I guess you can say I've been a little distracted with this whole wedding planning thing...it seems that both my blogoversary (6 years? Whaaaat?) and post #700 have passed me by with no notice. Um, yay me?

Anyway. I (finally!) had some time to sew today--I really wanted to work on this some yesterday, but I was thwarted by a co-worker who didn't bother to show up for her shift, and ended up losing the three hours I otherwise would have had due to a last-minute lesson cancellation. Grr. So I started with some fresh paper and the original Cambie pattern and went back to square one.

Bodice Front 3.0

This is what I ended up with this time. There was a lot of cutting and taping involved--I added the side dart with the FBA, but it was too low, so I had to raise that higher, too. And that scribbled-out side of the vertical dart was my attempt to avoid what happened with the first bodice from over-wide darts.

And the result?


Dress Bodice 3.0
I think, this time, it actually worked! It's still not perfect, obviously--I'm probably going to have to do some kind of swayback adjustment, the neckline gaps a bit, and I may have just a little too much room in the front near my waist. Plus there's still that saggy back armhole thing going on. But, on the whole, this is most definitely a better place to work from than the previous two bodice fronts! I did already make one change from the pattern-- the side ended up being too long to line up with the back side seam, so I increased the new side seam dart until it was the right length (I think about an extra 3/4" from the original line I'd drawn). I'll have to go back and thread-trace that at some point.

3,0 sleeve alteration
I've already made a few small tweaks, at least to one side of the pattern for comparison purposes. As you can see, the front sleeve isn't gathered anymore--I swapped it out with the lining piece, because I figured it would be easier to alter a piece that's supposed to be gathered anyway than it would be to figure out the right width on the flat piece. I've come to the conclusion that I don't want the sleeve to hang off the edge of my shoulder, because I just don't think it will look right in the lace. So I've marked the outer edge about 7/8" further in and tapered it down from there. (I'll have to straighten that one line out.) I also took a small wedge out from the inner edge of the sleeve to try and combat the slight gappiness of the neckline, about 1/4" tapered down to the original stitching line.

Aside from that, I'm going to wait to make further adjustments until I have a better idea of what effect the skirt will have on it. I did manage to get the waistband basted onto the muslin today, but I still have to entirely trace out and thread-trace the skirt pieces before I can go any further with this.


Previous wedding dress posts::
Tracing out the pattern
FBA attempt, part 1
FBA attempt, part 2 (with diagonal tuck adjustment)
FBA attempt part 3 (Bodice 2.0)


October 8, 2012

fun with FBAs, part 2: Getting closer (I think)

Dress muslin 2 
After some fiddling around tonight, including trying the double dart (which just wouldn't lay right, there was just too much fabric), I discovered a solution that just might work. I took a smaller dart in each side of the front, and then took a slightly diagonal tuck all the way up. That seemed to solve the excess fabric problem pretty nicely, and the front looks pretty good now! (See lower left). You know, aside from the completely wonky lower edge. (See upper left.) The center front looks like it's a pretty good placement for the waistband, so I'll have to go with that. I think the best bet will be to cut an entirely new front piece with these changes, because I need to make sure it's ok with the grainline changes that those tucks will make at the side. If that doesn't work, I'm going to attempt the princess seam adjustment.

Aside from evening up the lower edge, I do need to play with the sleeves a bit. (See front sleeve picture.) On the left side of the picture, I folded the outer edge in to make it more narrow, and on the right side, it's as sewn. I'm thinking the left side will probably work better with the lace. The other issue with the front is that the neckline is gapping slightly on the curved edges, and I'm not really sure what to do about that.

I also took a bigger dart on each side in the back, about 7/8". I think I need to slightly loosen that up again, because once I get all the layers and especially the boning in there, I think it might be a bit uncomfortably tight if I don't. I'm a flute player, so I'm a big fan of breathing, you know? Looking at this picture now, I can also see some diagonal pulling towards the center seam, but I guess I'll let those darts back out a bit first and see what that does.

The other thing I need to figure out is the back armhole, because it's gapping pretty badly. But I think that's an adjustment that may need to wait for after I get the waistband and a skirt on this thing, because I know that's going to weigh things down a bit more.

All in all, I think this is pretty good progress for the evening!

Previous wedding dress posts::
Tracing out the pattern
FBA attempt, part 1


October 5, 2012

fun with FBAs

You all know I mean "fun" in a sarcastic way, right? Ok, good.

I've finally managed to start the muslin process for The One Dress over the last two days. (My sis-in-law and maid of honor have taken to calling it the One Dress To Rule Them All, in honor of my ongoing love affair with all things Lord of the Rings related, so that's what I'll be going with here. Anyway.)

Cambie FBA, attempt 1First of all, I have to say that Sunni is my hero for starting to carry that waxed tracing paper, because all of the Craftsy videos and couture books were right. This stuff is amazing for muslin marking!  Secondly, I have to say that this dart is going to cause me some issues. This is what my dart ended up looking like after my attempt to work an FBA on the pattern without compromising the integrity of the design. And when I pin-tested it with the paper, it looked like it could possibly work. In fabric, it's proving far more difficult.
Muslin 1, bust dart 1This is what it looks like after sewing the bust dart right on those slightly curved lines. Waaaaaaay too pointy.

Once I saw that, I decided to try the other side a little differently and compare them to see what direction I need to go in.


Muslin 1, bust dart 2
So this is the second one-- for this one, I straightened out the stitching line overall, and tried to stitch into the point in more of a concave curve. From this angle, it definitely looks better.


Muslin 1, front
From this angle, not so much.  I realize that part of the issue is most likely that the darts just go up too high, and I'll need to end them at least an inch lower. The far more difficult prospect is going to be how to pinch out the ginormous darts and take that big of a chunk out of the fabric without getting those annoying bubbles at the top of the darts.  I may have a bit of trouble in the center front, too, if this picture is any indication. But, to be fair, this test was basically holding it closed behind my back at what felt like the thread-traced lines, mainly to get an initial idea of what I'd need to do with those darts.

Muslin 1, side The side view looks even worse! (And, for the record, this was with me pinning it closed, though I was doing it to myself by feel and only at the very top and bottom. I was also tugging it down to try and simulate the weight of the skirt.)

I took the darts out and played around with some other solutions-- just not taking out as big of a dart period, double darts, etc. So far, no dice. So I think I have two choices here: either I can try a more narrow dart and trying to taper some of the extra difference out of the side seam just in the front, or I can try to alter this into a princess seam cut to make it easier to control the curve. I'd much rather do option 1 if I can, because that keeps the design the same. Not to mention that since I plan on overlaying this entire bodice with a patterned lace, that's one less place I'll have to try to match up floral motifs.

I do know from this initial test that there are a few other things I'll have to address, and a few things I don't quite know about yet. I didn't take a look at back fitting at all, because my first priority is smoothing out those bust darts before I even try to deal with a zipper. I'll also need to actually put in that zipper/check back fitting and all before I can check to see if the neckline is going to gap at all  (and where it's actually going to hit, so I can see if I want to raise or even, dare I say, lower it!) I'm also thinking I might want to make the shoulder bits a little more narrow so it fits more smoothly around my shoulders. But I'll have to check first to see how nicely the inner edge of the neckline lays, along with the back armhole. There may be some gapping there, but it was hard to tell under the circumstances.
Muslin 1, side seamI'll also need to tweak the waist seam a little, since the front ended up a little longer than the back. I'm guessing it's due to my FBA tweaks. (The lengthen-shorten lines aren't lining up either, but I'm not sure how important that actually is.) So I'll need to see if I want to lengthen the back or shorten the front to match.

So, how am I doing so far? Are there any of you ladies that are *ahem* a bit bigger up top that have made the Cambie? If so, I'd love to hear your suggestions for that bust dart!

I'm also going to start doing a link list for these dress posts, for an easy reference to the process.
Tracing out the pattern

September 29, 2012

The Ultimate Frosting Project--here we go!

Bodice pieces 2
That's right, I'm finally starting on my wedding dress! At least, the muslin for it. Ok, so all I've actually done so far is trace out the bodice pattern. Allison suggested that it might help my mental state to break the project down into more manageable chunks, so I'm focusing just on the bodice for now.

My ultimate  plan is actually to muslin it twice--the first time strictly for fit, and the second time to go with the rest of the dress/test out the boning and my idea for the lace in the back. I picked up some cheaper, much-less-cool lace and some polyester nude organza at Joann's awhile back to play with that. The slightly more practical reason for starting with just the bodice is that this way, I can start right away with making sure the seamlines of the skirt will line up with the seamlines and darts of the bodice, once I know the bodice will work. Less tracing that way, and less chance of my running out of paper...in retrospect, I probably should have ordered some along with the waxed tracing paper that I finally managed to acquire, thanks to A Fashionable Stitch! Oh well.... I still need to get some silk thread, and they have a pretty good price on that at Nancy's Notions, so maybe I'll pick up a new roll of paper there while I'm at it.

Bodice pieces 1 As a reminder, I'm using the Sewaholic Cambie pattern for the bodice, down through the waistband. (Which, incidentally, I've decided to leave white and incorporate color with a sash. For one thing, it'll make the back more interesting to look at, and for another thing, that way I won't get held up by waiting to see what we end up doing for bridesmaid dresses. More on that later in the post.) I knew from working on the Lonsdale dress that an FBA was going to be necessary. Since I'm also planning on making some changes to the back of the pattern, I figured my best bet would be to trace the pattern and go from there. I already did the FBA adjustment (took this picture beforehand) and it's....interesting looking. But if initial test of pinning the dart together and holding the pattern up to myself is any indication, this might actually work to give it the extra shaping that I need. And hey, bizarre-looking pattern pieces did the trick for my jeans, right? I did take some pictures throughout the process, so if this ends up working, I just might do a tutorial on an FBA for the Cambie.

According to my couture gown studies, the next step I need to do is to add the stitching lines to the pattern. Maybe I can squeeze that in this morning--I'm going to meet my sis-in-law and another friend for brunch, I need to pick up some paint (for my future sewing room!) and then I'm going down to Doug's to help him paint the kitchen, since we'd already decided to do that first, while waiting for a furniture delivery.

So about those bridesmaid dresses....apparently trying to find actually-wearable-again bridesmaid dress ideas that aren't your typical overpriced dresses made of cheap polyester taffeta is harder than I'd thought. My original thought, which the girls were interested in, was to do those infinity-style wrap dresses. But after narrowing it down to a couple of Etsy shops that seemed to have a good selection of greens and decent pricing, I discovered that one shop was basically shutting down for the fall/winter and not accepting any more orders, and the swatches that I got from the second were basically swimsuit fabric. Since I can't in good conscience make my girls wear shiny spandex (although my best friend/maid of honor and I had a few good laughs about it), it's time to go to plan B. So the current thought is to have them all get whatever black dress they want and add some green accessories. Which may mean sewing a few more sashes for me, as long as they don't pick empire-waist type stuff (not so flattering with a sash), or it may mean jewelry. We'll see what their thoughts are.

I'm kind of torn about jewelry, actually. Part of me wants to make the jewelry for all four of us, but part of me wonders if that's biting off more than I can chew. I do have some earrings that I can use for myself (recently splurged at a friend's party, since the sale running meant I could get these for half off!) but I wonder if I should go with green jewelry to help tie that in a little better. But I guess I shouldn't worry about that quite yet, huh?

September 25, 2012

hitting the books


IMG_0264I'm close enough now to being done with the secret baby gift that I've decided it's way past time that I did something related to that wedding dress thing! So even though I could probably finish said secret gift if I just sat down and did it, here's my plan for the rest of the evening instead: I'm going to finish my cup of tea, I'm going to get a shower, and I'm going to curl up with a Craftsy video or two (and maybe my actual reference books) to mentally prepare myself to start the muslin. Given how stressed out I'm becoming over not having started the dress yet, I think it will be good for me. Besides, Tuesday is my longest workday, so curling up with some books (and a laptop) sounds way more appealing than sitting in front of my sewing machine right now!

(There may be more tea involved, too.)

September 13, 2012

So this means I sort of started the dress, right?

The one perk of having to take off of my retail job to get round one of my dental surgery: Not having to rush around to get ready for work in the morning meant that I had time to deal with the next step of the wedding dress process.
fabricSo here it is....that's 16 yards of various silk fabric, washed and on the line. There's 2 yards of organza for underlining the bodice and particularly the sheer lace bits to give them extra strength (those parts will have to be dyed to more of a skin tone, I think), 4 yards of crepe de chine for the lining, 6 yards of habotai for full dress underlining/Doug's tie/whatever other green bits I have to dye, and 4 yards of dupioni for the outside of the dress. I know those lining/outer yardages don't sound like much, but I was able to get all but the habotai at 60" wide, which is cool because then I didn't have to buy as much. Of course, I also have 5 yards of that sunflower lace, not pictured here, which leaves me with a whopping 21 yards of fabric for one dress! I shudder to think of what I'd end up with if I was actually doing a train!

The awesome thing is, so far, I've been able to keep the cost just under $300, which is pretty good! (And that's including stuff like my Cambie pattern and my copy of Bridal Couture.) I've also gotten some spiral steel boning from Etsy, which hopefully won't be too hard to use. I will still need to get notions like a zipper and the finest gauge sewing machine needles I can find and thread (you'd be surprised how often I don't have white thread). But after all that, unless disaster strikes, I think I can still keep this under $350, for a custom-designed, custom-fitted, all-silk wedding dress. Thank you, Mom, for teaching me how to sew!

(Now I just need to start that muslin... I have one baby gift to make with a mid-October shower deadline, and was hoping to start actually sewing on that today so I can knock it out and get on the dress. But then when I knew I'd have extra hours after the dental work, I wasn't counting on having to keep one hand tied up with keeping an ice pack on my face. Rats.)

September 2, 2012

wedding hair


Since much of my wedding seems to be going the handmade route, I thought it might be fun to occasionally do a post about a detail that isn't my dress. (Which, as of this week, I have most of the fabric for but have yet to start even muslining.) Although, this one does involve the dress just a bit. And I didn't make this, but someone did, and we all love Etsy and supporting handmade artists, right?

Early in the process, I asked my friend Nicole, who is a very talented artist, if she would consider doing some artwork for the invitations. (She'd told me about a year prior to this that she'd designed some wedding invitations for another friend of hers.) Not only did she agree to that, she's good at styling hair (unlike me, who can barely get my hair to stay in a ponytail), and also offered to do my hair for the big day! So a couple of weekends ago, we spent a day fiddling with my hair and having a marathon viewing of Downton Abbey. (And of course all we got up to is right to where I'd stopped in season 2 before... I'd better hurry up and finish it before all of my other favorites start back up for fall! Especially since Doctor Who already started again as of last night! But I digress.)

Because of what I decided to do with the back of the Cambie, an updo is pretty much necessary to even see that detail--my hair, as you know, is long enough to cover that completely if I even leave it half-down! She came up with a neat hairstyle that looked good from all sides, and that we both liked. We'll probably need to practice it again at some point before the wedding, since my hair is rather slippery. But I'm glad we started this process so early, because it helped me make a rather important decision about the accessories: I'm not going to wear a veil. I was kind of having trouble envisioning one on me anyway, and if Nicole is going to all the trouble of styling my hair, I want it to be seen! But I still wanted some kind of special accessory.

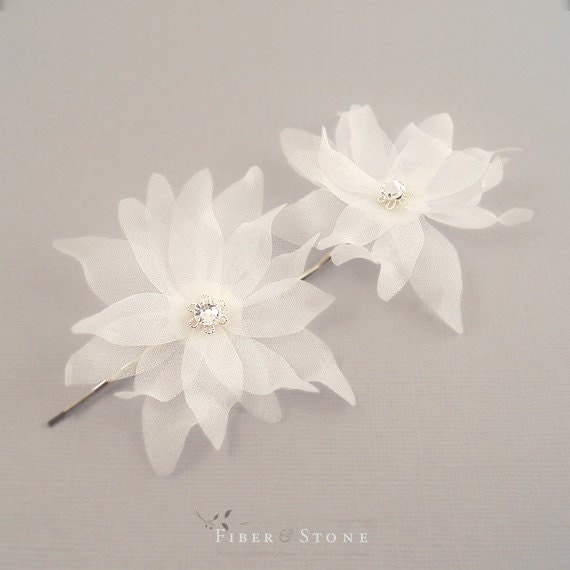
So this is what I ordered instead:
Bridal hair Flowers, Petite bridal hair accessories,  Bridal hair piece, Silk, Bridal hair pins, Set of 2, SWAROVSKI crystals, Summer I found these at Fiber & Stone on Etsy. I instantly loved them, as Nicole and I were scouring Etsy for potential accessories, because they're simple but elegant, and they fit nicely with my sunflowery theme! Her service was really quick, too-- I ordered these on Sunday and they arrived in the mail on Friday. They're just as I envisioned: not too big, but not so small that they'll get lost in my hair, and the edges of the petals seem to be finished very nicely! So I'm rather excited to be able to use them-- I'm also hoping I can come up with some different things to do with them after the wedding, too, since this is hands-down the most expensive hair accessory I've ever bought! (I'm also excited to be able to cross one thing off of my list, and not have to worry about making this particular detail.)

A couple more potential decisions have been made that would involve not-by-me handmade stuff, but I'll save those for later (when final decisions have been made) except for one thing: I actually recently won a giveaway on Madalynne for a voucher to Esty Lingerie. I still need to sit down and scour through the website and decide what to get. So many choices.... but thanks again, Madalynne!

August 21, 2012

Random thoughts

First off--thanks for the kind words about the scarf! That was pretty different for me, but it was fun to make.

Second off--once again, not being able to do a craft compelled me to add to my stash. I spent part of the weekend and yesterday at the beach with my family. And while we were there, my mom/aunts/yarn-crafty cousins decided they wanted to check out this cute little local yarn shop. So this is what I brought home. The greenish one on the left (really more of a green-blue mix) is Chacabuco Multy from Araucania Yarn--it's exciting because it's from Chile, which I've actually been to, and it's hand-dyed, and it's cotton. You have no idea how exciting it is for me to find hand-dyed cotton, since I can actually use it! The brown and blue are Milky Whey by Kollage Yarns, and it's a super-soft soy/milk blend. I'm excited to have some new-to-me wool-free yarns to play with! And I think going to the store was inspiring for others in my family too. One of my cousins decided that she wanted to give knitting a shot, so we got her some cheap needles and yarn and I taught her how to make the knit stitch. She seemed to be getting the hang of that pretty well by the time I had to leave to come home (had to work today, boo), so I'm excited to see if she sticks with it!

I already have projects in mind for both of these yarns. I'm thinking the Whittier Hat from last fall's KnitScene for the Chacabuco, and I specifically bought the Milky Whey to try out the Branching Out fingerless gloves from Coastal Knits. My best friend and I have been making bucket lists lately, and I have several sewing/crafty-related items on mine. One of the things I added was to knit at least one project from every knitting magazine or book that I own. And since I didn't really have stuff for either of these publications yet, that means I'm justified in buying the yarn, right?

As for that background....several yards of dupioni silk that arrived yesterday. Guess I'm committed to that wedding dress thing. Or, as it's gotten dubbed by some of my geekier friends and family, the "One Dress To Rule Them All."  So now I have the lace and the outer fabric taken care of, and I just need to get some underlinings and linings. And bodice support stuff.

Between the beach and some wedding-related stuff, there hasn't been much sewing going on in the last several days! But I did get the basting in the jeans ripped out, at least, so now they're ready to sew together for real.