Showing posts with label t-shirt. Show all posts

July 15, 2014

a simple tee

IMG_1445
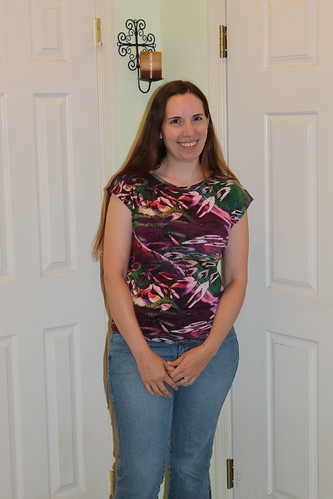
Does this fabric look familiar? It should, since I just used it for my Tiramisu maxi-dress. For once in my life, I got on the stashbusting right away! (I made this in June, but didn't get a chance to post until now.) After I realized that I had a decent yard left over after I cut the dress out, I grabbed this untried top pattern and cut it out, since it was only two pieces. I figured that if it didn't work out, I still had the Tira, but I think it worked out pretty nicely!

This is the Maria Denmark Kirsten Kimono tee, which is a free download! I really do love that so many of the indie companies are generous enough to offer some simple patterns for free. I grew up sewing mostly the Big 4, which you can easily get for $1 on sale at Joann's, so the frugal part of my brain really likes getting to try a company out before spending the average $10-25 dollars that the indie patterns usually cost. (I'm not complaining about the price, because I think they're well worth it! I'm just saying that I have a tendency towards being cheap. It's a necessary survival skill when you went into the arts.)
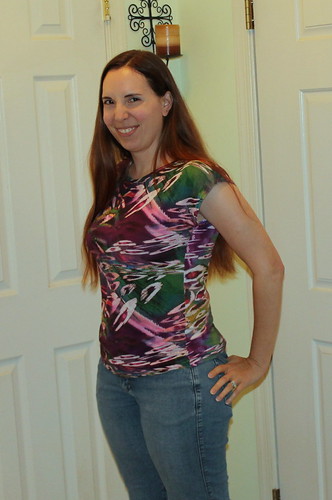

Kirsten Kimono TeeThe top went together quite quickly and easily, since there were only two pieces and a neck binding. The only issue I had with it was that I didn't read the directions before I started, so I didn't realize that seam allowances weren't included! So I just did as narrow a seam as my serger would allow, and then did a narrow hem on the sleeves and shirt bottom as well. It still fits, and actually is quite loose around my waist compared to, say, my Renfrew tops. You can't see it so well in these pictures, since I had to resort to using indoor flash photography in order to get any pictures at all. But the busy print and the drapiness of the knit camouflages it pretty nicely, and keeps it from looking too baggy. Good thing, since it is still quite fitted at my hips. So mental note to self, a thicker knit with less drape probably wouldn't work out so well for me.

Whenever I make this again, I think I'd add some length to the bottom, and especially the sleeves, to make them a little less cap once they're hemmed. But overall, this was a great instant-gratification project!

I'm going to end this post with something I haven't done in awhile, at least for my sewing--an in-progress shot.
IMG_1451 As I've mentioned before, I'm doing the jeans sew-along that Sew Busy Lizzie is hosting. And my progress has been a little slower than I would have liked-- I didn't get much in last week because I had my annual teaching-flute-at-middle-school-day-camp job, and on the night that I'd actually reserved to do some sewing, the power in the entire town went off for the whole evening and didn't come back on until it was too late to start anything! I was home all day on Saturday, so I did make quite a bit of progress then--pretty much everything you see on the front, plus the inseam. But then the power went off again before I could do the topstitching there, so that's where it's stayed. I do have a little extra time off from my retail job this week, so I'm hoping I can finish this up rather quickly now that the hard part (the fly zipper, obviously) is over. At least the sewing part, since I realized I didn't have enough silver rivets on hand and had to place an order.

This is the same denim that I used for my TARDIS skirt back in the fall, and would you believe I still have a yardish of this left? I'm running out of ideas for what to do with shiny metallic stretch denim!

September 1, 2010

Wardrobe Refashion Wednesday!

Or, "How to Save A (T-shirt's) Life". (I figured The Fray would be appropriate for a sewing project.)

So, to ramble about real life for a moment, I've found myself in a bit of an in-flux work situation--my hours at the garden center have been cut (as have everyone else's), and there's a pretty good chance I'm going to have to find another job after this school year is up. Possibly before that. Possibly even along the lines of something full-time and just do what flute teaching I can on the side. And to top it off, things haven't been going well with my once-a-week band teaching job--there's already been a lot of really frustrating stuff that has happened, even before my first day this year (which was today). So I'm going into this year almost certain that it will be my last, regardless of whether I try to find part-time or full-time work. Either way, I'll be more flexible if I have my Wednesdays back. But in the meantime, I'm kind of stuck.

So I had the crazy idea in the shower last night to give myself something to look forward to about this particular day of the week, and since I have only two students in the after-school time, the idea for "Wardrobe Refashion Wednesday" was born. While cutting out is one of my least favorite parts of sewing, and I'm not a fan of seam-ripping my own work, there's something oddly therapeutic about taking implements of sewing destruction to other people's stuff. Plus then I can knock my pile of clothes to reconstruct down a bit. I probably won't do this every week, since I'll occasionally have things like band concerts and such, and I probably won't finish a project in its entirety every week, but it'll be a fun way to get me through the year and take out some stress on the poor, unsuspecting fabrics.

So without further ado, here's tonight's project!
I've had this shirt for awhile, and it was one of my favorites. But it ended up with a pen in the washing machine one day and got ink spots on the white. (Not too many on the front, but the back was pretty bad.) And then the attempts to get rid of the stain resulted in several largeish bleach stains on the black. (Which you can't see too well in this picture, but trust me, they're there.) And of course I couldn't bear to part with it, so I kept it in the refashion pile. So I decided to tackle this one tonight since I already had black thread in the serger, my mom recently handed off some black jersey knit sheets that my brother didn't take with him when he got married, and I had the realization that I was kind of lacking in casual items to wear for Self-Stitched September.

This one was pretty simple to do, though slightly more time-consuming than I anticipated....

After I ripped enough of the shirt apart, I pinned the pieces onto the sheet to use as a pattern. (Bonus-- the hem on the sheet was a decent enough width that I didn't have to actually hem anything--just rip it out enough to do the seams and then close them up!

I've made baseball-style t's before, and they're great. So much easier to construct with all of the straight lines. So I basically joined the pieces at the shoulders as laid out here, then stitched up the side seams and added a bias-ish strip cut from the sheet as a new neckline binding. Easy peasy.

And now I have a self-stitched shirt to bum around in some weekend day this month! (Even though it's pretty much identical to the old shirt, minus the back is now black instead of white.) Perhaps for this Saturday's picnic, since the weather is predicted to drop from its current highs of 90s to down in the 70s by then. After today, that'll feel chilly!

April 11, 2010

Shakespeare on the Green

That's what I've decided to call this top, anyway--getting inspiration from Anthropologie (and now ModCloth as well) always makes me want to give my garments cute names!

Anyway, it's finished as of about five minutes ago--I almost had it hemmed on Friday night, and then discovered that the bobbin thread (which is what was showing on the outside) was too blue of a green and it was showing very obviously. Not only that, but my machine had skipped several stitches. So I ripped it out last night after my killer 10-hour work day, and sewed it this morning since I don't have to get to church early for tech crew or anything.

This is the same Burda 6-09 pattern as the last shirt, so rather than do a whole pattern review, I'll just talk about the changes. I knew I wanted to make this one look rather different, particularly since they were two different shades of the same color. So instead of using the pleated front piece this time, I used the front lining piece that I decided was unnecessary in the original shirt (I had it cut out anyway, since this was the test version.) And then I extended the dart in a pintuck all the way to the shoulder to make a mock princess seam. Since I still had the problem of not having allowed enough for a hem on the sleeve, I extended the sleeve with the box-pleated trim. And then added some center-stitched box-pleated trim around the neck as well. (The edges of the trim are done with a rolled-hem stitch off of my serger.)

To give credit where it's due, the inspiration for the pleated trim came from the "Shakespeare In The Park" top at ModCloth.  So I'd already decided to give it this name before I finished it...the neckline trim ending up a bit more ruffly than I thought ended up being a bit of a happy accident in light of that! It's kind of reminiscent of those Elizabethan ruffs without being so literal. Also, I have to say that I'm really impressed with ModCloth's customer service--after commenting on the usual length of their dresses in a recent post, someone from their business took the time to comment on my post to point me to a page where they'd collected their longer dresses! I don't actually need to buy any dresses at the moment, but I think they just convinced me to go ahead and get this vest that I've been debating about...


And one more shot of the back. So now that this one's done, I'm hoping to maybe get the next sewing project cut out this afternoon--I'll be making this skirt in a solid black. The only hitch in the plan is that I seem to have misplaced my directions for using the skirt sloper pattern that I made in the Pattern Review class last fall to check the fitting of a different skirt pattern! I emailed them to see if I could get another copy of that particular lesson, since the pdfs won't save onto your hard drive-- I'm pretty sure it's not going to happen, but worth a shot, right? I'd better head to church now, though.

April 8, 2010

unexpected.

A detail view of the neckline of the shirt I'm making from my muslin for the seafoam top. This may end up falling under the category of a happy accident...I haven't pressed it yet, so I don't know if it will stay this ripply and poofy (I pleated and pinned the fabric strips directly onto the neckline without ironing), but I kind of like the poofy ruffly-ness. (Which is good, since even with ironing, it could revert to this after washing!)

More pics to come soon...all I have left to do on this is hem it and it'll be done. But I'm going to hold off on that till tomorrow, as we're supposed to go from this gorgeous summery weather we've been having back to regular ol' early April overnight. Which means the potential for massive thunderstorms starting as early as 9, which means if I want to exercise and shower before those hit, I'd better get my butt in gear. Literally!

March 29, 2010

The Elements Jewelry Series, part 2: Earth (and an informal poll)

Let's do the informal poll first, to get it out of the way. I'm still having absolutely no luck with fixing the sidebars, and the creator of the template doesn't seem to be answering my blog comment to ask about it. So I wanted to ask those of you that are kind enough to read this blog in the first place what you think I should do about it. Are the ridiculously long link lists in the sidebars too annoying to deal with? Would this be more reader-friendly if I went back to a regular Blogger-created template and tried to customize it from there? Or, to keep the look, should I put a limit on the number of finished projects links, at least? I still like the look, but the sidebars are kind of bothering me. As is the fact that I have to double-space all paragraphs to get it to read right (at least on my computer.)

Ok, on to the crafty fun stuff. I finished this up last week, but didn't have a chance to take photos until today.


So this is my "Earth" set. I knew I wanted it to be kind of chunky-looking, and to use a lot of stone beads. I mixed in some copper, too (the "earthiest" looking of the metals I could have used, I thought), and some glass beads because it needed a bit more brown.


Isn't this pendant great? It's been in my stash for awhile--I think I was subconsciously saving it for something cooler than the fake suede cord that came with it in the kit. These chip beads were pretty much the perfect color scheme to go with--a mix of tans and browns and greens (hey, plants grow in the earth, it counts, right?) I did buy the copper beads, just because I didn't have any in the stash. And I'm particularly proud of that coiled bit of wire that holds the pendant on--I had to DIY it, because my original plan of stringing the beads on a very thin leather cord so I could knot it through the hold didn't work at all! The chip bead holes were just a little bit too small, and I was having to hand-drill them all out with a reamer to (mostly) get them to fit. And then I discovered that I'd rubbed the reamer smooth (and therefore useless) before getting a third of the way through the necklace! So it was time for a plan B.


I had to cannibalize a pair of earrings to go with. I'd bought these cool stone drops that were the same type of stone as the pendant--I'd thought that since there was a rather large hole in the middle of the teardrop, it would make them light enough. But when I tested one, that wasn't the case. Now I have to figure out what to do with four of those things...rats. Anyway, this was a pair I'd made to go with a necklace that I gave to my mom for Christmas one year. Since then, she's stopped wearing earrings altogether, so she gave her entire earring collection to me. I didn't change much--the beads at the bottom were originally smaller and black. But maybe now I'll actually get some use out of them!


I have been sewing, too. I got a pretty good chunk of the darker green previous test version of the Burda shirt serged together on Saturday. But I wanted to make this one look different somehow, so I wouldn't have two virtually identical shirts in two different shades of green. So this is part of how I'm (hopefully) going to make that happen. A bit tedious, doing all of this hand-pleating, but I'm hoping the results will be worth it!

March 22, 2010

Pattern Review: Burda 6/09 #102

Finished it up on Sunday morning, technically...I had to hand-sew the bindings on, and had one left to go when I got home from a friend's party around 12:45 in the morning. So I finished it up before I went to bed because I already had the outfit planned around it for church in the morning! So here's the pattern review.
Pattern: #102 from the June 2009 issue of Burda.
Pattern Description: A pleated knit shirt with waistband, v-neck, and 2-piece raglan sleeves.

Pattern Sizing: Burda sizes 36-44. Mine is 38.

Did it look like the photo/drawing on the pattern envelope once you were done sewing with it? Mostly. (Judge for yourself.)

Were the instructions easy to follow? Honestly, I kind of disregarded much of the instructions-- I did most of the construction on serger and did things in a different order to make it work with that kind of seaming. And I pretty much ignored the instructions on their pleats entirely, since I stitched them completely down. (On the plus side, this made it easier to follow than Burda instructions usually are!)

What did you particularly like or dislike about the pattern? I like the styling of it, and I think it looks pretty flattering on me. No particular dislikes.

Fabric Used: An organic cotton knit from JoAnn's.

Pattern alterations or any design changes you made: Besides a couple of fitting tweaks: I raised the neckline a bit, I took the magazine's suggestion of topstitching the pleats down (when I tested it without, it looked so balloony and awful on non-flat-chested me). The major one was that I left the front lining off entirely-- I think it was fine without it, and it just would have added extra bulk and thickness that I wouldn't want in the summer months. I also added bindings to the sleeve edges, but that was to cover my own mistake of forgetting to add hem allowance instead of just seam allowance. ;-)

Would you sew it again? Would you recommend it to others? I'll be sewing this at least one more time, since I like the fabric I used for my basted-together test version. But I'll probably modify it somewhat in the front detailing so it's not identical. I would recommend it for an atypical t-shirt pattern.
Conclusion: Overall, I liked this one very much. (And I'm very glad that I took the Pattern Review knits class first! )
 
 
 And since I liked the outfit that I put together yesterday, showing that off too. I was really happy to find out that the new shirt goes very well with my sunflower skirt that I made last summer. I wore that with a pendant that's usually on a chain (but I stuck it on a wire choker for this time since it fit the neckline better), and the denim jacket that I just picked up last week. (Even though yesterday was actually pretty nice, and I was able to wear the shirt without it in the afternoon, my church is always cold!) Also wore it with silver flat shoes. 

So what do you think? Is that wardrobe project research paying off? ;-)

Trying to figure out what to make next...I'm thinking that since it's all cut out and still on my machine, I should probably do the green shirt that I tested this pattern with first. Though I'd like to figure out something a bit different to do with the pleated part so it's not an identical shirt in a different shade of green! I have some ideas in mind, and am probably going to do some research on Anthropologie to get some other possible ideas. I'm thinking perhaps this black skirt will be next on the menu after that, just because it'll go with lots of stuff. And it'll remind me that Butda magazine has some good stuff, since I got the new issue today and so far, frankly, I'm kind of bored.

I also finished a necklace last night, but still need to make the earrings to go with. So expect another post before too long.
 

March 20, 2010

A few updates

      1. Still trying to get used to this layout-- I like the look of it, but I'm not sure if I can keep it. I still haven't figured out how to get the scrolling element back into the sidebar, and I'd like to keep the "Finished Projects" list intact, at least. Of more concern at the moment is that I've discovered (from posting and re-posting this particular post) that a lot of the word-processing doesn't translate well. Like, say, italics. And bullet-point or numbered-lists. Or paragraphs that I don't put multiple line spaces between. Any suggestions from some of you more html-savvy people would be greatly appreciated!! Or should I just go back to a Blogger template? (They're so boring, though....)

      Ok, on to the crafty stuff.
      1.  I've been (slowly) working on the next necklace in the Elements series, for Earth. It's taking awhile because I'm having some trouble with having to enlarge holes in quite a few of the beads as I go. So I've just been working on it a little at a time. I hope the result is worth it!
      2. I haven't had a ton of time to sew this week, but I did get the real fabric for the Burda top cut out. (Of course, I remembered later this week that I completely forgot to adjust the pattern for the fitting adjustments I made to the muslin....need to do that.) I did get the pleats sewn into the front, so since it's not a major fitting adjustment, I'm kind of hoping I can get it sewn together the rest of the way this afternoon. I swapped a good portion of my wardrobe out for warmer-weather clothes this morning, and realized it'll go pretty much perfectly with the sunflower skirt I made last summer! So if I can get it done today, I can wear it to church tomorrow while we still have lovely 70-degree weather. (It's supposed to get cold again next week. Boo.)
      3. Also did some shopping earlier this week, since Kohl's was having a pretty big sale. For the most part, I did a good job of sticking with my list of wardrobe holes...
           --Though I'm mostly making work-friendly short-sleeved shirts, I did splurge on one with a fun-colored print and embellished waistband. (And some jewelry to go with the bracelet I won. I didn't really have anything antique gold. Oh, and I got some free wide belts--one on a pair of pants I got, and one from a pair of pants that my mom got. She doesn't like belts, so she passed it on to me. I'll need to add some extra holes, but I've been wanting to try that belt-over-clothes look anyway!)

            ---For some layering options, I found some shorter-sleeved cropped cardigans in white and chocolate brown. (Also found a nice, non-boring long-sleeved black cardigan for cooler spring days and next winter on the clearance rack. Nothing for spring there, but I have an idea to reconstruct something I already had to cover that.) I've seen a lot of ads lately with denim jackets layered over things (often with rolled-up sleeves), and I do love my jeans, so I did also get one of those. Yeah, I could make one, but the sleeves were actually long enough and it was on sale anyway, so I figured that this time it would be better to focus my sewing attention on other things.

             ---I failed to find a pair of khaki pants that worked on me, but I did find two pairs of black. And I do wear black pants the most, and they were somewhat different silhouettes, so I'm covered there for now. And I did pick up a new pair of chocolate brown capris--my brother and sis-in-law talked me into helping out with the tech crew at my church, and I need to make sure I'll have some options for things to wear that aren't skirts for the weeks I get put on camera--it's on a raised platform, so probably even long skirts wouldn't be a good idea for that! (I already have a nice black pair, too, so hopefully between those two things I'll be covered. I can still wear my skirts to teach in, at least.) Didn't even try looking at jeans or skirts--I'd still like a boyfriend-cut jean, but the more recent Goodwill runs have left me with enough bootcuts that I won't be hurting for things to wear on the weekend. And even though I ditched the patterns that I tried for the last jeans attempt, I haven't given up on the thought of sewing the perfect-fitting pair of jeans. I just need to do a better fitting job with the muslin next time. And maybe use a pair of jeans that don't have wonky things happening with the fly for my basis. As for skirts, those are quick sewing projects...and I need to test my sloper sometime, right?
                ---Though this wasn't on the Kohl's trip, I did find a couple of pairs of sandals on sale at ShoeMall.com--a flat black one (which, so far, is quite comfortable), and a silver gladiator. Yay! Also attempted to get a pair of boots...they were having an email-only sale discount, which was actually my motivation to order them from there. But the curse of the wide feet struck again--the foot actually fit fine on this pair, but the part around my calf was ginormous! So I returned them to try another pair that specifically said on the site that it has a normal-sized shaft. (Unfortunately, that means I have to pay full-price on the boots, which, of course, is about a hundred dollars more than the combined price of the other two sandals. Sigh.)


        So that's what's going on in my corner of the crafty world right now. And I'm pretty much done lunch, so off to sew! Happy first day of spring!

        August 15, 2008

        Friday Favorites, Episode 21

        I know the last few weeks's posts have been rather short, so this week is making up for it with a vengeance! For simplification, I'm going to divide these into categories.


        Finished projects I enjoyed:

        First up is Oonaballoona, who cranked out a bunch of gorgeous clothes that she made with some really great fabric that she got for really cheap. I'm jealous of that. Plus she has a really good story to go along with it. Aimee at Wardrobe Refashion inspired me with a great jeans-to-skirt makeover that is a bit different than the norm. Creative Kismet posted this cute t-shirt that she made for her son-- I'll admit it, I'm a sucker for somewhat off-beat and corny t-shirt slogans (like from one of my favorite t-shirt sites.)


        Recycled craft goodies:

        Round #2 of the Carnival of Green Crafts went up this week. Particularly fun was a bottlecap-decorated photo frame that came with a haiku! Crafting a Green World featured an idea for a skirt made from bandanas and some jewelry made from old flip flops.


        Tutorials that rocked:

        ThreadBanger had an entire post of links to skirt tutorials, because one can never have too many skirts. My personal faves are the 2-layered gold and pink wrap skirt, the "petticoat for the ages", and the Better Homes and Gardens (I know, I know, but the print mix is fun!) skirt. At CraftSanity, there was a tutorial for how to make felt fortune cookies. So cute. I also stumbled across a blog called Sewing Tutorials, which is exactly what it says-- a gathered collection of tutorials on how to do all sorts of clothing-related things, like alter patterns for fitting adjustments, add side pockets to pants and skirts, etc. Finally, since I had some time to look for some new blogs this week, I found this amazing tea wallet over at Krustallos. It folds up into this little pouch, but fits six tea bags. I can already think of at least two friends that it would be a perfect gift for! Definitely want to make one for myself, for when I'm traveling and need to bring tea with me.

        All right, that's all for today. Happy weekend, everyone! I know I'm thrilled that it's finally Friday...

        May 13, 2008

        High School Creativity, or, I wish I'd been blogging back then

        Talk about random post inspiration... I was leaving one of my flute-teaching jobs yesterday afternoon, which is at a local private school, with Nickel Creek's "When In Rome" stuck in my head for no reason, and it brought to mind this school assignment I'd had back in junior high that had to do with Rome. Which led to thinking about all sorts of random memories of creativity connected to my high school life. I actually enjoyed many of my school projects, since my school was pretty good about encouraging creativity in the execution. Since I didn't have a blog back then, please indulge me while I reminisce a bit now. (Even though, sadly, I don't have pictures of the best ones. I wish I did.)


        • The project that started this whole runaway train of thought: the Rome project. When I was in 8th grade, we were doing a unit on ancient Rome in my history class, and each student got assigned a different aspect of life in Rome to research. We were supposed to give an oral report and, I can't remember if it was required or just one of the options, a visual aid. I got assigned weapons and armor. Which I'd thought was pretty lame, at first... I was a good bit girlier back then than I am now, and with the way my movie/literature interests have evolved, I'd probably think that was a pretty sweet assignment now. But I was pretty excited about the project by the end, mostly due to my visual aid: I bought a Ken doll (the only one I ever owned, for the record) and turned him into a Roman centurion. Made a little red tunic for him, and then I made the plate armor out of strips of cardboard covered with aluminum foil. That part looked pretty good. I also remember painting the gladiator lace-up sandals directly onto his legs. The part I had the most trouble with was his helmet-- I ended up making it out of polymer clay (the paintable kind, because this was just when it was starting to come out as a craft supply), and it was way too big because I couldn't bake it directly onto his head. I think I may have made the sword out of clay too. The clay parts of the outfit didn't survive long past the due date, but I really did think that armor was pretty good.

        • This may have also been an 8th grade project--I had the same teacher for 11th grade chemistry, but I'm pretty sure this was the junior high class because I had two lab partners in chem and only one partner for this particular project. The chemistry teacher at my school (private school, and 7th-12th were in the same building, so we had a lot of overlapping teachers between junior and high school) was rather quirky, and we were doing a basic chemistry unit. Our last assignment before Christmas break was to pair up and make her a chemistry-related Christmas T-shirt. So my best friend and I teamed up to make her a snowflake shirt, based on hexagon-shaped chemical formulas. Typical early 90s job in glittery puffy paint, but I still think we had one of the best shirts in the class. Of course, I have no idea how those snowflakes would have reacted to each other had they really been together in a test tube...for all I know, we created a formula to make a minor explosion.
        • Now this one I do actually still have, though it's buried in my bedroom at the moment. For one of my (I'm pretty sure it's history) classes, we had to do a geneaology project about our families, back to our great-grandparents, and include pictures and such. I made mine kind of scrapbook-style (I think this was when I was first starting to get into it, thanks to a scrapbooking kit that one of my crafty aunts gave me for Christmas one year. At any rate, I did have the deckle scissors, and I know I didn't have those until I started doing that.)--had some really flimsy paper that may or may not have been sheets of newsprint, but at any rate it looked old. And so I printed everything onto that, glued my photocopies of the pictures on the same stuff, and did a little bookbinding project (the only one I ever did that turned out-- good thing, since I was getting graded!) with mat board covered with black construction paper and a dark mulberry paper that I drew the title on with a gold pen. It was very typically heritage-looking. Fitting for the subject, but I don't think I'm ever going to do one that style again. I like brighter colors. Anyway, as I said, I do still have that one. I guess I figured it might be good to pass along to my non-existent kids someday. But I can at least take a picture to post on here sometime.
        • One of my favorites was actually for an English class--sophomore year American Lit. We were studying John Steinbeck, and were supposed to do some kind of dramatic summary in groups. I was fortunate to get into a rather creative group (the groups were divided based on who picked what book, and ours was The Moon Is Down, which is the only Steinbeck book I've ever read and actually liked.) So we decided that for our presentation, rather than act it out ourselves, we would do a puppet show. So we spent a couple long afternoons making heads out of paper mache and yarn, my mom was kind enough to help us with the "costumes" since we were on a time crunch, and my one friend rigged up some kind of stage that we could hang across the classroom doorway while we were in the hall. Our theme music was the Imperial March from Star Wars. We made scrolling (sort of) credits to go on top of them. And little sticks of felt dynamite hanging from parachutes, which we tied to miniature Hershey's bars and threw at our classmates during the show (in the book, the people resisting the Nazis air-dropped dynamite tied to chocolate bars so that kids would pick them up and bring them home to their parents). Needless to say, that made our presentation the most popular. ;-) I really wish I could see the video of that again... one of my friends in the group videotaped it, and I saw it at her house once during a sleepover, but this was before digital videocameras and it was some kind of format that couldn't be copied onto VHS with what they had or something. Oh well.
        • Another science-class project, and the only thing I liked about freshman year physical science...we had a "design your own experiment" project that we had to do, and my best friend and I decided that for our scientific experiment, we were going to make cookies and see what effects certain compounds common in baking (i.e. salt, baking powder--see, this is chemistry!) had on the finished products. (I know there was a third ingredient involved, but I can't remember what.) So we made four batches of chocolate chip cookies--a "control" group made normally, and then leaving one of the three test ingredients out of each of the other three batches. And then we ate them and recorded the taste-test results. Note to self: Never leave the baking powder/soda out of your cookies again.
        • The last one I remember doesn't actually relate to a project, but it was craftiness in school. There was this rule during finals week that, even when you finished your test, you had to stay in the classroom until the period was over. We all knew that our 9th-grade civics class was going to be a piece of cake, and there weren't really any rules restricting what we could do afterwards as long as we were quiet enough for those still taking tests, so I brought a small case of beads into the test and worked on a necklace after I was done. It was one of those seed bead daisy chain ones. The reason I remember this, other than making necklaces in school, was because my classmates apparently thought this was rather entertaining. One of the guys (the one that at least half the girls in my class had a crush on at one time or another) even asked if he could try it. So I told him how, and he made one of the daisies on my necklace. (I still have that necklace too, actually.)

        It was kind of fun to think back on those, actually. I may have to do another nostalgia post about those teenage clothes sewing projects that I also wish I had pictures of, if only for me to laugh at.