Showing posts with label works in progress. Show all posts

October 9, 2014

the slowest of sewing

I figure I'll have to do a few more in-progress posts for awhile, since I'm not speedy enough to whip out a winter coat in no time! Also, I've gotten a little sidetracked by a sewing request from a friend that I couldn't pass up. (Because it's costume-related and for a little kid--how could I say no?)


All I've managed to get done on my coat so far is to cut the outside and underline the pieces. My fabric doesn't look like a loose weave on the table, but when you hold it up to the light, it tells a different story!

If that much light gets through, it seems reasonable that winter winds could do the same! I had a large piece of silk organza left over from making this dress, because I seriously overestimated how much I would need to underline it. I also ruined the light color of it back when I made that dress, because I threw all of the fabrics in the wash together and it turned sort of an uneven, hand-dyed-looking grey. So I didn't want to use it as a press cloth, and I couldn't use it for any interfacing-type roles on lighter colored fabrics. However, I did have just enough to squeeze most of the outer pieces of this coat onto it, minus the two front pieces. (They were supposed to be interfaced anyway, and overlap when the coat is buttoned, so I was ok with making an exception there.)

The grain may be wonky on a few pieces here and there, because if you've ever worked with silk organza, you know how it shifts. At first, I tried cutting out the pieces and then basting it onto the main coat pieces, but of course things were shifting like crazy. So since the fabric itself has a bit more grabbing power than the usual things I underline, I tried a different approach: laying the pieces directly on the organza, basting them on, and then cutting them out. The other advantage to this was that I could tweak the layout to fit as many pieces of the coat on as possible, since I was working with leftovers!

The pieces are all cut out and ready to go, including the two interfaced front pieces. I'm hoping to finish my friend's project--an owl cape for her foster son to wear for Halloween/his early November birthday--before the weekend is over, so I can give it to her on Sunday. I do have a little sneak peek of that, aside from what I've been posting on Instagram here and there, because Doug got bored while I was working on this last weekend and started goofing off with my camera. I guess a good side effect of our Paris trip is he's a lot less nervous about using it now!
So many feathers. But the good thing is that I was able to completely bust a few pieces of quilt cotton from my stash!
And a little peek at me in my sewing room. It had been awhile since I had a nice chunk of weekend time to sew, so I was a happy girl!

The feathers didn't go quite as far when I pinned them on for real after edge-finishing, so I cut out what I hope is the last of those last night. The only work I have today is teaching a couple of lessons, so I'm hoping to get those edges done so I can finish up the sewing ASAP!

May 8, 2014

Costume progress

I've been meaning to write this post for ages, but life kept getting in the way. But I have made some actual progress on my Tauriel costume from Shieldmaiden March (ha!), so I thought I'd share how my dyeing experiment in particular went.

The short answer:  the right side is the before, and the left side is the after. Much improved!

The longer answer:I started off with an old green bedsheet set that my mom had passed on to me for muslin purposes. It's a good thing I had both the fitted and the flat sheet, because I ended up needing the fitted sheet to cut the last two pieces of the coat out of. I went ahead and roughly sewed the outside pieces together, too, minus the sleeves, because I wasn't sure how much the dyeing and washing process would make things fray. (Good thing, because it was a LOT. Fortunately, the costume ended up being huge on me anyway, so I was able to take it in enough to compensate.)

This was my first time experimenting with iDye-- as a reminder, I already tried dyeing the bedsheets once with regular RIT dye, and it didn't make much difference due to the partial polyester content of the fabric. So I bought one specifically for poly in green, and also an olive for natural fibers, just so both types would be covered.I bought a huge cheap pot at Walmart, which I normally avoid whenever possible, but for a pot I'd never want to cook food in, I figured it would be ok. And I went to work.

The pot turned out to be a pretty good size for all of the fabric. I realized as I was looking at their website just now that I did mess up the directions a little by cutting open the packets and dumping the dye powder in. Apparently, you just throw the whole packet in and it dissolves. Oops. I let it simmer for about an hour, while stirring it with a big stick and reading a book. Then I threw it right in the washer, as soon as I'd gotten enough cold water into the pot that I could handle the hot fabric.

A few tips for working with the iDye, since I'd never done stovetop dyeing before, and I'm sure I'm not the only one:
  • Wear old clothes. I did end up splashing some dye on myself at one point when the stick slipped, and if Doug hadn't advised me beforehand to change into my painting shirt, I would have ruined a perfectly good band t-shirt. (Thanks, Doug!)
  •  Turn on the stove vent and open a window. The poly stuff in particular smells pretty bad.
  • So far, I've washed this three times, because it still smells, and the fumes are permeating my sewing room! I ended up tweeting Dharma Trading Company (where I bought it from) to ask for some advice, and they suggested washing it in vinegar and warm water, and letting it air dry. Doug was kind enough to do this for me, since we finally had a warm, sunny day and I was at a rehearsal for most of it. It reduced the odor, but it hasn't gone away entirely. (Though thankfully, it is starting to fade-- I only notice it now when I'm bent close to the fabric.) But the edges were getting very, very ragged, and all of the washing actually tore some of the lower seams open, so I think I'm going to wait until this is actually more finished before washing this again.
  •  
    Now that I know how to dye on the stovetop, I think it will come in handy for smaller batches, like one piece of clothing or whatever.   

Here's where I'm at now. (Sorry for the not-great photos. Between extra rehearsals for multiple concerts--yay! and 6-day workweeks at the garden center again--boo! I've barely been home for a couple of weeks now. And when I am, it's usually dark.)
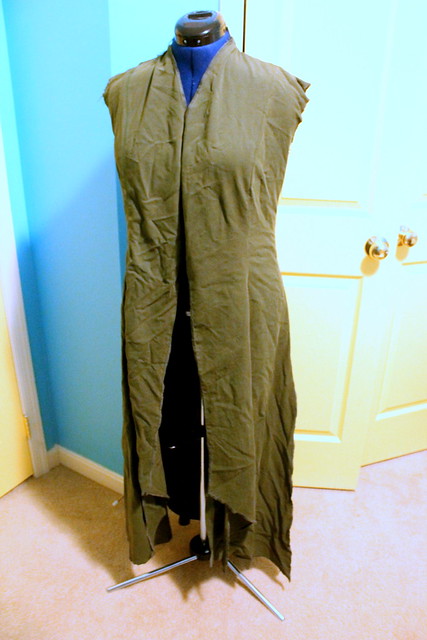
IMG_1322Here's the front, sans sleeves. Obviously I need to give this a good pressing--it's more to show the length of the front angles and all. I may need to shorten these a bit. I'm also still trying to figure out how to handle the collar. After all of that frankenpatterning, I watched the movie again, and the collar was stitched on as a separate piece. It wasn't really working anyway, so I chopped it off and will tweak it and the facing to lay a little better. I'm thinking I'm just going to do some hooks and eyes as the front closure, since this has a leather-looking bodice over top anyway. I also need to figure out exactly where to stitch the shoulder seams, which are currently just pin-basted closed.


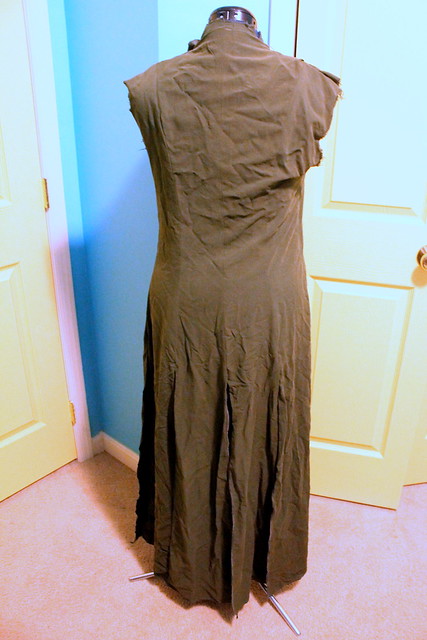
IMG_1321Here's the back, and a lot more splits. I'm also trying to figure out how to hem these. Since I'm trying to fake suede with a bedsheet, it will probably look the best if I blind hem it by hand. But then, a really huge part of me is wondering if I want to spend all of that time hemming all of those split seams for a costume that I'm more likely than not only going to wear once. It's not like this is my wedding dress, you know?


IMG_1323


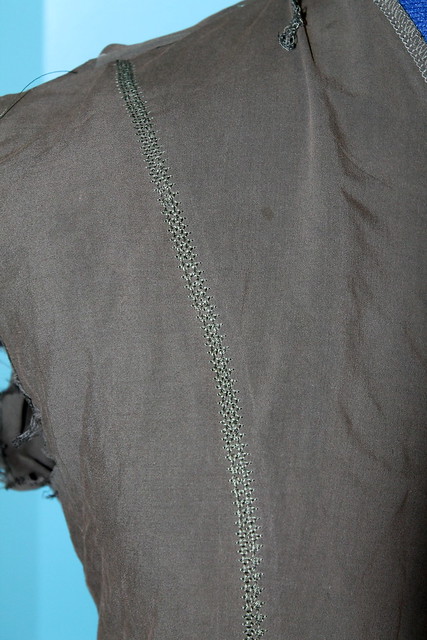
In the meantime, one of my projects lately has been this detailing over the seams. I still have several more to do this initial stitching, which is just one of the decorative stitches that Bernadette has, slightly overlapping the seams. (The added perk is that this will strengthen the seams a bit, since the last round through the washer to try to get rid of the dye smell made several of them tear at the bottom. It's a good thing that this thing turned out huge, because all of those tears are now mended and  will be confined to the hems.)

I'm also going to do one more pass on either side of them once the initial embroidery is done, as a satin stitch with the shinier machine embroidery thread.  Basically, I'm trying to replicate this look:


Honestly, considering their material vs. mine, I think it's pretty close!

I really need to get my butt in gear and try to finish this coat up. I had to pause because I was running out of thread, but I bought more. I still also need make a bodice, gauntlets, leggings, and fake weaponry. I was going to make some faux boot tops, but since I ended up replacing my old brown boots recently, I think the ones I bought will be close enough.  Oh, and did I mention that I need to make about 3 other costumes for this event? And all those other clothes I want to make? But I have a plan to make as many of these costume components real-world wearable as possible. In fact, one is already on my capsule wardrobe list, and the other will fit right in, if I can find the right fabric!

February 27, 2014

Sew Grateful Week, days 3 & 4

I'm lumping these together again-- partially because I had to really think about the resources, and partially because I was a little more focused on having a solid sewing day yesterday-- my birthday gift to myself! :) (It was yesterday, and yes, I got spoiled-- I got lots of lovely messages on various social media from friends and family, two gift cards to Joann's that should cover notions for my fabric stashbusting endeavors for awhile, a set of pretty interchangeable knitting needles, and Doug gave me an appointment for a massage at a local spa. My shoulders are almost always tense, probably mostly due to my choice of musical instrument, so I'm really looking forward to that!)

Day 3: Sharing Resources Day

Since I don't have any new tutorials or groundbreaking technique tips at the moment, I thought I'd share two resources I've found for places to get sewing supplies that you wouldn't necessarily think of. I'm highly reliant on internet shopping for my crafty needs, so I've had to get creative sometimes!

#1: Dharma Trading Company. They're probably most commonly known as a one-stop shop for all of your dye needs. So obviously, if you want to play with dyeing some fabric, this is a great place to get your colors! But they also have a really nice selection of natural fiber fabrics by the yard, including cotton, hemp blends, bamboo, and silk. Most of it is in a natural color, obviously, since it's meant to be dyed. What I've most often bought from here is the silk, because the prices are really good compared to places like Fabric.com and Mood--all of my lining and underlining fabrics for my wedding dress were purchased from here, except the nude organza to underlay the lace on the sheer part of the bodice, and this is the first place I'd look to get silk organza for tailoring-type projects and interfacings.

#2: KnitPicks. Yes, the place I already linked to for those knitting needles. You might already know about this if you're one of those sewcialists who also knits, but I was surprised to learn recently that they sell buttons! I shouldn't be... I mean, cardigans. But I was recently looking for a larger quantity of buttons for my current project, Joann's didn't have enough of anything in stock, I did some poking around on Etsy, fell in love with a certain style of button that the seller only had one of, and then the Google rabbit hole led me to here. They're not necessarily an inexpensive source, and the majority was a brand that's pretty common at Joann's, but it's probably fairly comparable to paying full price at a fabric store. More importantly, I was able to get 16 buttons that matched. (I'm super-excited about the ones I found, but am going to wait for the finished project post to show those off.)

Day 4: Sewing Project Day
I'll have to go with an in-progress post here. As you know from recent posts, my current project is the Sewaholic Robson Coat. I'm grateful to Tasia for coming up with such a cute jacket design, and to the Sewcialists for the #bluefebruary sewalong--even though it's highly unlikely at this point that I'll finish this one while it's still February, given that it ends, um, tomorrow, it was great incentive to get this started at a time where I'm likely to be done by the time it actually gets to spring jacket weather!
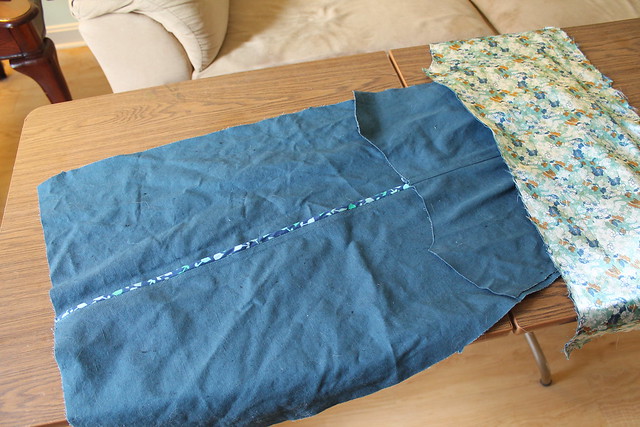
IMG_1171I did some very minor tweaks to my muslin that worked out really nicely, so I got the whole thing cut out on Tuesday and started sewing the real thing yesterday. I don't have a lot to show for it yet, mostly because I'm trying to take my time and do a really nice job.So this picture pretty much encompasses what I did get done so far, aside from already needing to iron that sewn piece again! I underlined the sleeve pieces with a silky print from my stash, leftover from this jacket, basting it together by hand. I already had the strips cut and sewn together, but I had to buy a bias tape maker and it didn't come in until Tuesday, so I had to press about 12 yards of bias tape. I also spent some time fiddling with the idea of a bound buttonhole, and I'm glad I tested this first, because I don't think it will work for this particular project. (The buttons are on the small side, so I don't have much room to maneuver.) So I really only have one seam and two pocket flaps done, and the inside pocket pieces basted onto the front pieces.
IMG_1170
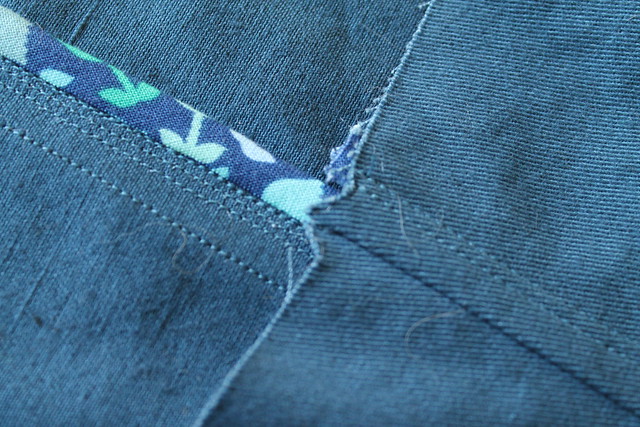
A closer-up view of that seam. I'm basically having to sew all of these seams five times-- once for the actual seam, twice more to enclose the edges with that bias binding, and twice more for topstitching. I think the double topstitching will look really nice, though. The reason I'm doing the two rows close together like that is because I probably should have bought a wider bias tape maker, because I'm just barely getting the raw edge caught with the edgestitching, and the topstitching row further from the seam will help to further secure the binding.

If I can keep the topstitching this neat, and get the wrinkles pressed out a little better--I have a feeling my bottle of Best Press is going to be my best friend here--I think this will look really nice when it's all together!

One more Sew Grateful note-- there's still plenty of time to enter the fabric giveaway! 

January 30, 2014

of shapes and stitching (in-progress sewing and Wardrobe Architect, Week #3)

I don't really have anything new to show sewing-wise, as I'm currently in the throes of assembly line sewing. (Which is actually working out pretty well, but "throes" is just fun to say.) And since this week's Wardrobe Architect worksheet was pretty short and straightforward, I figured I'd just do a little roundup of in-progress sewing and that.

Denim Thurlow welt pocketsPictures first. I'm currently making the two denim versions of the Thurlows, and therefore am doing a few more jeans-like details. Namely, I topstitched the darts. And I'm also topstitching around the welt pockets, which has the bonus of reinforcing the stitching. (The brown pair is coming undone already, because I've washed and worn it so much!)


Thurlow pocketsAlso, pockets! The cherry print is particularly fun, I think. It's a shame I didn't have enough of that for the waistband facing, too--that will have to be plain black. But I did have just enough to squeeze these and the welt pockets out. As for that purple-y hand-dyed stuff, I had more than enough for the pockets and facings for both this pair and the future grey pair. Plus a ton left over. I may have to resort to using it for things like wearable pajama muslins or something...

As for the Wardrobe Architect project, this week's assignment was thinking about garment shapes. Which was really nothing too ground-breaking for me, but I figured I'd share some results anyway.

I seemed to end up in the middle of a lot of things-- I like most things either somewhat fitted or somewhat loose, but not too tight or especially too loose. Some more garment-specific results:
  •  Skirts: I'm most comfortable in skirts that are either knee- or maxi-length, A-line or with some other kind of flare (but not too full, as that always makes me feel like my hips look huge), and with either a hip-hugger waistline, or occasionally a more natural waistline. I'm still getting used to the latter, which is probably a result of being a teenager in the 90s when everything was cut lower and I just got used to it. I don't like high-waisted things, mainly for the practical reason of they feel restrictive when I'm playing my flute and need to breathe deeply. Also, I don't tuck shirts in too often anyway. I'm also not very comfortable in shorter skirts, though I'm more comfortable when my legs are covered by tights or something.
  • Dresses: I'm most comfortable when things are either somewhat fitted or somewhat loose, though I tend to lean more towards fitted. Too tight and I feel self-conscious, too loose and I feel like I'm wearing a sack. Length and skirt fullness preferences are pretty similar to my skirt answers, though I'm more likely to wear a fuller skirt here since the dress can provide more obvious waist definition than one can often get with separates. I'm also more likely to go for a higher or natural waistline here, or none at all if it's a princess-seam type dress. No dropped waists, since 20s-style silhouettes were not meant for curvier ladies!
  • Pants: My waistline preferences are similar to my skirt preferences. I prefer somewhat fitted to loose (hello, Thurlow marathon!), though I do have the one pair of skinny jeans and was pleasantly surprised by how much I liked the look on me. I'm more comfortable in full-length pants as opposed to shorts, though when I do wear shorts, I prefer them to be around mid-thigh length.
  • On top: somewhat fitted is my main preference, though I'll also go for very fitted or somewhat loose, depending on what I'm wearing on the bottom. Length preference is above the hip to tunic-length, as opposed to cropped. I'm more likely to bend these rules when it comes to layering pieces like cardigans and jackets. 
There were also a few more detail questions about necklines and sleeves.
Favorites: V-necks, cowl necks, or scoop necks; sleeveless, above-elbow length or long sleeves (depending on the season).
Also like:  Boatneck, Square, Sweetheart necklines-- I'll wear these, and have made things that I like that feature these necklines. Three-quarter sleeves and short sleeves fall under this category as well--I have lots of things that are these lengths, and like them, but I think the other three sleeve lengths are perhaps slightly more flattering.
Neutral: Spaghetti strap and halter necklines. This is more under the category of it's not that I don't like them, it's just harder to wear a bra, so I have to take extra considerations (like the bra I built into my Lonsdale dress specifically for this reason.) To be honest, most of my spaghetti strap tops are actually camisoles, and only worn as layering pieces.
Dislike: Off-the-shoulder and strapless. The former is just super-annoying, both due to arm position when playing flute, and the feeling of having to adjust it from falling down all day. I always feel like strapless is going to fall down on me, too, and the only thing I own of that category is the red dress I took with me on the honeymoon. And only because it fit me so perfectly at the time that it couldn't fall down. I certainly wouldn't plan to make something strapless. Unless it was something like a strapless corset top that I was specifically planning to wear over another top. (I wouldn't put that past myself.)

So, like I said, none of this is really any surprise to me. Or probably to you, if you looked through my collection of finished objects that I've shown on here. But it was still a useful exercise.