
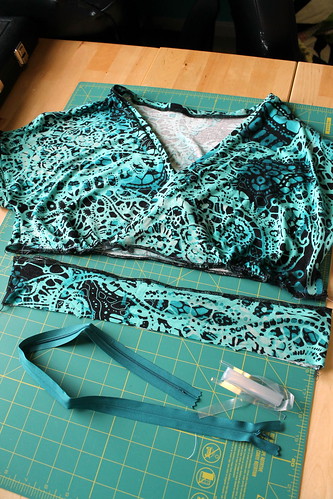
 You'll need:
- A knit dress pattern with a seam under the bust. I'm also intending to wear this during the remainder of my third trimester, so I'm using the top of the Cake Tiramisu dress with the midriff band and skirt of the out-of-print Simplicity 3678, since I already adapted that skirt pattern both for extra belly room and a maxi length. But if you're making this just to wear for nursing and have an idea of what size to do the waistband, the Tiramisu or Red Velvet dress would be a great option as is.
- An invisible zipper that's long enough to fit across your ribs from one side seam to the other. (A few extra inches probably won't hurt. Mine was a 22" length, and I ended up chopping off somewhere around 2" at the end.)
- Clear elastic
- I used both an invisible zipper foot and a regular zipper foot to do this portion of the construction.
1. Sew the bodice pieces, including side seams. Depending on the pattern you choose, you may need to alter the order of construction. (Normally, the sleeve and side seams of the Tiramisu are sewn all at once after the front and back of the dress are constructed flat, but I went ahead and finished the sleeves/sewed the side seams together before taking this picture, since constructing the side seams around the zipper would be much more difficult than the other way around. It may take a little more effort to get the side seams to match up between pieces this way. For my current fitting needs, the big advantage to this was that I was able to put on the mostly-finished bodice and adjust the gathering and the overlap of the neckline to the larger bust size that I'm currently working with.Which meant that I was able to use my already-sized pattern from before I was pregnant as-is.)
2. Sew the midriff/waistband pieces together at the sides, or skirt pieces if your pattern does not have an extra band. Depending on the length of your dress, you might be able to do the waist and skirt pieces together. I'm only working with the midriff band for mine, since I'm doing a long skirt and don't want the weight of it to distort things as I sew. (Plus it's a lot easier to take pictures that way!)
3. Finish the lower edge of the bodice and the top edge of the waistband/skirt. I know knits don't unravel, but it does add some stability to the edge. And since we're working with stretchy fabric and a non-stretchy zipper, that is never a bad thing.
To add the zipper:
 1. Sew one long side of the zipper across the bottom of the bodice, as you normally would for the right side of a vertically-inserted invisible zipper. I started the teeth at the side seam on the left side, because I'm right-handed, but you could easily flip this around if you're left-handed. I also brought some of the extra length past the right side seam and into the back, just to give myself a little more give for opening. I probably could have done this for the left seam as well to make the whole thing more centered, but I really don't want to have to be reaching behind me with one hand while trying to wrangle a squirming baby with the other! Better to leave the zipper pull where I can more easily see it.
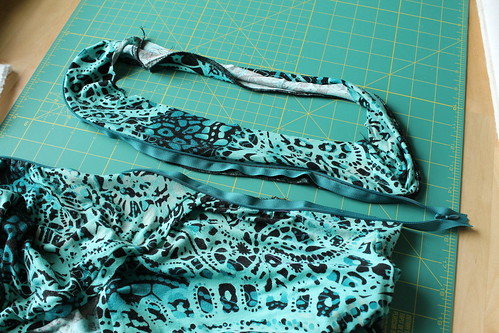 2. Baste the other side of the zipper onto the waistband, being careful to align the top edge of the teeth with the correct side seam. Close the zipper, check to make sure both seams are lining up on either side of the zipper, and adjust if necessary. Once you're satisfied with how the sides are lining up, stitch over the basting line. When opened, the two pieces will look kind of like this.
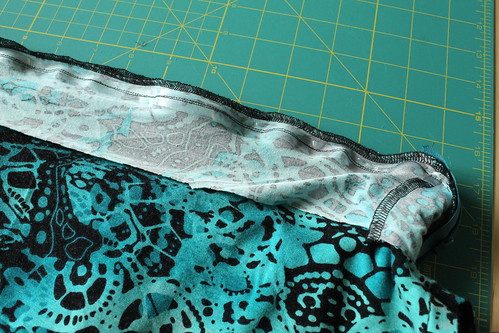 3. Sew the back of the bodice and the back of the waistband together. I added clear elastic here, both to help support the weight of the maxi-skirt and to allow it to bounce back if I need to stretch the dress to get it on over my chest later. (I had to do two rows of stitching here--to get the seam closed as much as possible, I used my zipper foot on a longer stitch length. But my machine doesn't have a stretch stitch, and I can't zig-zag with my zipper foot, so I added a second row of a narrow zig-zag close by, just in case some of the straight stitches pop. I know it looks a little ripply when it's flat on the table, but the other dress is like that too, and it's not really noticeable when wearing.)
4. Shorten zipper if necessary, and press back seams up towards bodice.
5. Continue on with the dress from here-- I still need to add the skirt pieces and hem it, but that's it!
 When the zipper is closed, it looks like a normal seam, except for that pull tab...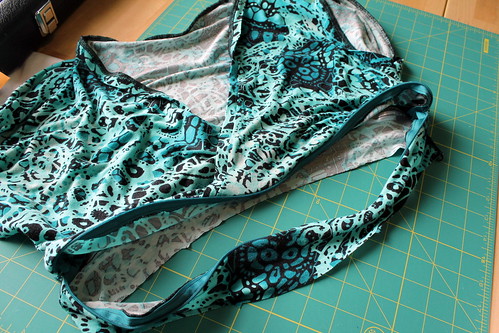
...and then once you open it, easy breastfeeding access without having to stretch out your neckline!
Hopefully that was clear enough--let me know if I need to clarify anything! And for those of you who are moms that sew, I'd love to hear if you have any other nursing hacks you like to add into your clothes.


