Showing posts with label bag. Show all posts

September 1, 2015

August round-up, and a stashbusting update

How is it September already? This summer's been kind of a sleep-deprived blur for me, I guess for obvious reasons. But it's still weird to think that soon I'm going to be having to start layering up for colder weather.

Before I get into this post, I just wanted to say thanks to everyone who commented on my last post! It was really interesting and encouraging to hear your thoughts on creativity when interpreting vs. designing/composing.

So, all factors considered, this was actually a pretty productive month for me as far as sewing goes! And I do have a couple of projects that I haven't shown on here yet. I did finish up a second Rae skirt yesterday, but I haven't had a chance to photograph it yet, so I'll save that for a later post. But aside from that, and the first Rae skirt and the flamingo skirt, here's what I've been up to:
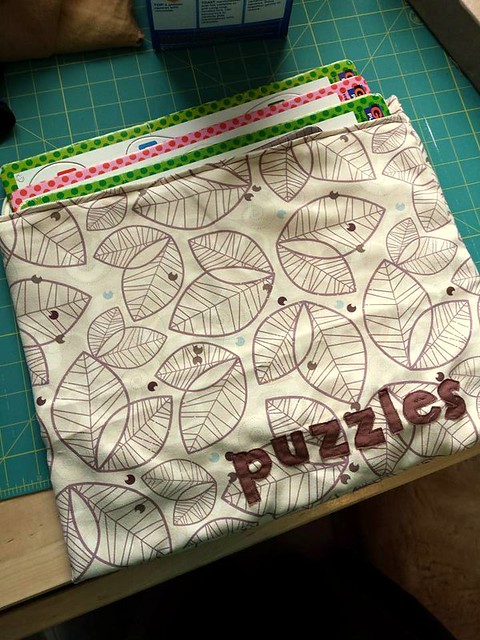
puzzle bagMy in-laws have been bringing a lot of stuff over lately. They recently came for lunch with three boxes of kids' books and a few toys that they picked up at a yard sale for $1/box. I didn't keep everything--there were a lot of things like coloring books that were already colored, and they ended up taking the girlier stuff for when our niece is over there. But there were some excellent book finds, too. Somehow, several puzzles ended up in the bottom of the basket of things I kept. Since Hobbit is still a few years too young for even these simple ones, I made a bag to keep everything together until he's old enough. It only took one naptime, I recycled a zipper and effectively used up the largest piece left over from the diaper bag, and my label worked. So I'm happy with this spontaneous project.
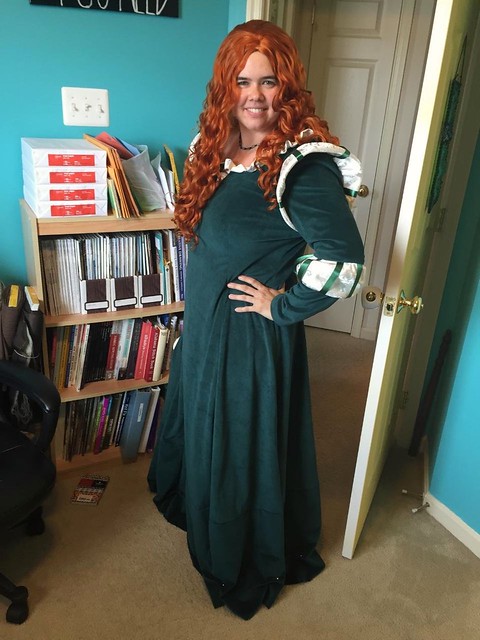
Merida costume

The other thing I spent a good chunk of the month on was a costume for my best friend, who is going to DragonCon again this year. She gave me permission to post this photo. She wanted to do a Disney princess this year, and chose Merida. We actually started this back in the winter, with a plan that I'd work through it with her so she could learn a little sewing along the way. But life and mostly my pregnancy meant that there was still a good chunk to do with the deadline approaching, so I finished it. The pattern is McCall  , and while she bought the main green fabric and trims, I happily donated part of my stash to the cause--the sleeve lining bits and the white brocade was my contribution. (Now if I could just figure out what to do with the other polyester brocades that have been hanging around!) I'm happy that, although I can't go with her this time, and I'm ok with that because the baby needs me here, some of my sewing will still be there.

Stash used: Not counting the skirt I finished yesterday, mostly because it was half a refashion and I have no idea how much I used on top of that, this leaves me with a total of 8 yards used up, and 6 that were straight out of the stash. I counted the flamingos, even though I broke habit and used it almost immediately.

Stash added: I bought 2 1/2 yards of chambray with a gift card that had been sitting around, because I felt that I needed a denim skirt for the fall. Then I made the happy discovery that my TARDIS skirt really is bigger on the inside, and I can squeeze myself into it again! So now I need to figure out what to use it for, since there's a LOT of options. A shirt? A dress? A shirtdress? Augh! And then remember what I said about my in-laws? Someone they knew, I think one of Doug's aunts, was getting rid of fabric, so they brought it here. Again, I didn't keep everything, because I don't have much use for upholstery fabric. But the potentially useable stuff still totaled 18 1/2 yards! Yikes!
Toucans

The best find in there, hands-down, was this. It's large scale and crazy bright and I must use it. But not until I start next summer's clothes, I'm sure. I have more pressing wardrobe needs. And Sarah is hosting my favorite annual sewalong again, so of course I want in!

Since we're starting the last third of the year, I thought this would be a good time to give an overall stashbusting update. I started off the year with about 375 yards of fabric, and according to my records, I've used close to 79! (Thank you, diapers.) The best news to me, though, is that even with the additions, my current tally runs around 351 yards.  So as of now, I have about 24 yards less than I started with. I still feel like I have a ridiculous amount of fabric, especially now that I just ended up with over 20 extra yards in a month. But every project gets me one piece closer to my goal of a manageable-to-store, better-curated stash.

(Quick question-- is anyone else having trouble with Blogger's layout of photos lately? I really hate that it keeps separating the text and photos like this, but I've triple-checked that photo alignment option, so I don't know what else to do!)

March 14, 2015

mama's got a brand new bag

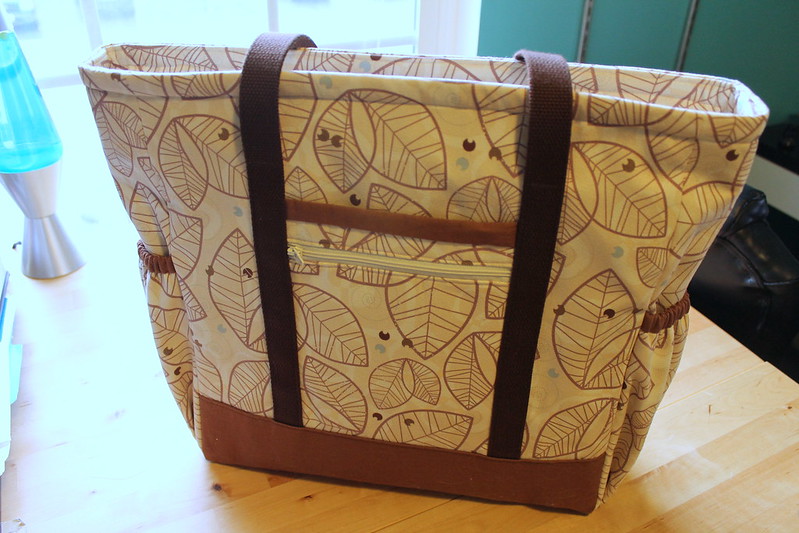
Diaper bag
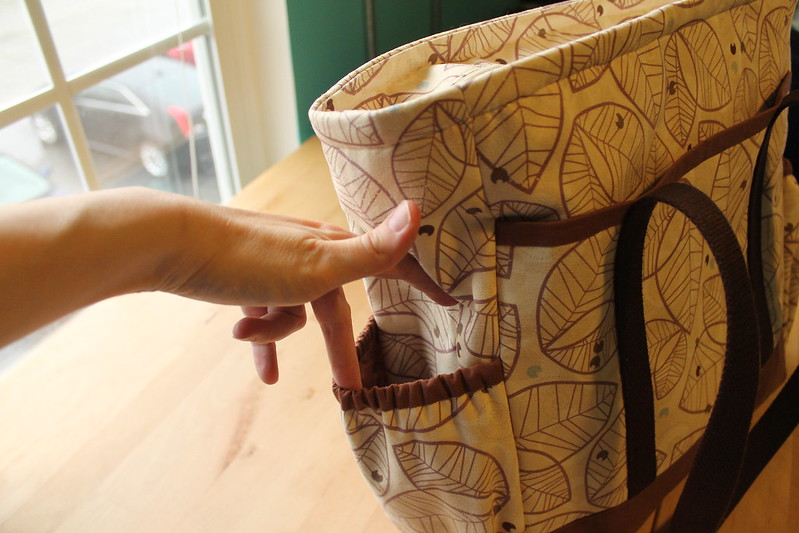
I'll admit, this wasn't the most fun sewing project for me. It started and ended with some issues that really put a damper on my enthusiasm. But I just couldn't bring myself to buy or register for a diaper bag when I knew I had the perfect fabric for one at home already! I've had this leaf-print suedecloth in my stash for a few years now. It was one of the pieces that I got as a Christmas present from my mom parents, and while I like the graphics, the colors in the fabric really didn't go with much of anything in my wardrobe. So I was completely stumped about what to do with it until this pregnancy happened. I guess it was just waiting to be a bag all along! So I've been plotting this one for a couple of months, even before I knew Hobbit is a boy, because the colors made me think it's gender-neutral enough to work either way.

side pocket
The pattern is the Professional Tote by The Creative Thimble. I'd asked my mom, who makes bags on a much more regular basis than I do, if she had any suggestions, and this was the one she came up with. I like that it's loaded with pockets! There's the zippered one plus a slide-in one shown on the first picture, a big magnetically snapped one on the opposite side, and two elastic ones on either smaller side that will be great for holding bottles and such.

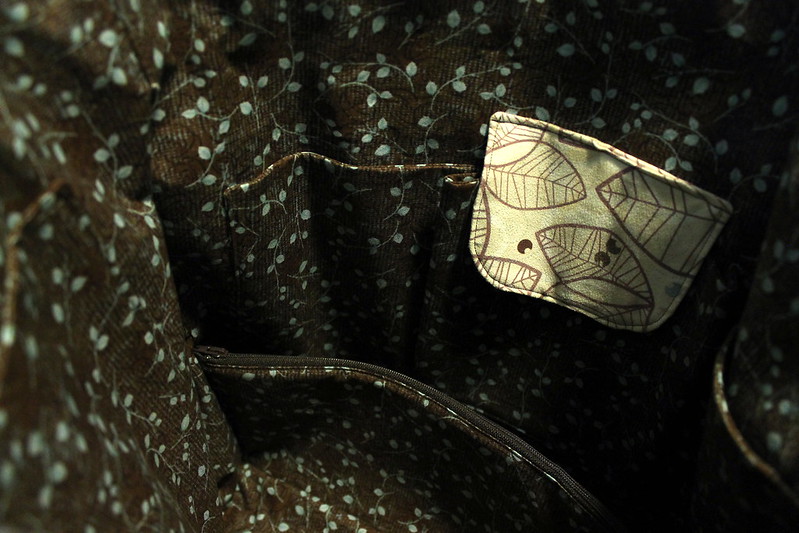
lining
Inside, there's also a velcroed pleated pocket with a slide-in pocket on each side (the flap with the outside fabric covers the velcro one), a zippered divider pocket, and a big one that covers almost an  entire side of the lining. This lining part was where I really got stumped on the directions--the patch/pleated pockets were fine, I had no trouble figuring out the bottom of the bag, but I think I did something seriously wrong with the zipper pocket. Based on the measurements the pattern gave later, it looks like it was supposed to be something like 5" taller! But I could not make any sense of that particular part, went with what actually worked, and ended up with a divider that's maybe 4" tall, tops. By this point of the bag, I'd already spent something like an hour on this one pocket, and I was really starting to get antsy to finish so I can make some clothes again, so I didn't bother redoing it.

(Seriously--I'm kind of worried about the clothes. My belly has outgrown the first refashioned pair of pants to the point where it hurts to wear them, my other two pairs of refashioned pants are corduroy, and I only have one skirt that's appropriate to wear for teaching--the other is denim and too short for me to comfortably wear without leggings underneath. So I'm literally running out of things to wear for work! But it's hard to justify shopping, or even too much sewing, when I only have a little over one trimester to go.)

Aside from that pocket, as I said, I did have some issues. Though they weren't all the bag's fault. The first day I started sewing on this, my machine was having some weird issue where the stitches weren't staying in the fabric to just one side of the zipper foot--and of course that outside zipper pocket was the first thing to be sewn! Thankfully, that resolved itself after I turned the machine off and started again another day, and Bernadette has been working fine ever since. I also had a lot of trouble keeping track of what fabric was supposed to be for what piece, ended up having to re-cut a couple of things in the solid brown, and have some random rectangles left over as a result. I'm blaming pregnancy brain for that one. Getting the interfacing to stay stuck to the suedecloth in particular was also a pain, as was actually navigating sewing several stiff layers of fabric that just did not want to go around my machine. I suspect that probably would have worked better if I'd used all quilt cotton, since the suedecloth is a little thicker/more slippery than that. I finished up last night with the top zippered part, and ended up having to rip out and redo so much of it--I started by having the zipper pull face the lining instead by accident, and then the zipper somehow got twisted, so I had to rip out and redo the other side as well! But it's done, and I'm happy with the results overall, so I can move on without much disappointment.

Stashbusting totals: I used about 2 1/4 yards of fabric from my own stash (1 1/2 of the suedecloth, and about 3/4 yard of the solid brown--which I either forgot to put in my stash list or I wrote down the wrong yardage initially, because it was listed as 1/2 yard to begin with!), plus my mom donated the quilt cotton from her stash for the lining, because it went so well. She also let me use her heavy-duty bag interfacing. I did have to buy the webbing for the straps and the two light tan zippers, but I was able to pull the third zipper (a dark brown, on the inside) from my stash as well. 

I do have about half a yard of the suedecloth left, as well as some plain PUL that I had to buy last-minute to reinforce the closure sections of some of the diapers that I'm still working on. So I'm going to use the bulk of it up to make some kind of roll-up or fold-up changing mat that I can keep in the bag, since the suedecloth is nice and washable. But I think I can afford to take the time to make something a little more wearable first, right?

September 5, 2014

a traveling companion bag

Last bit of Dragon-Con related sewing, I promise!

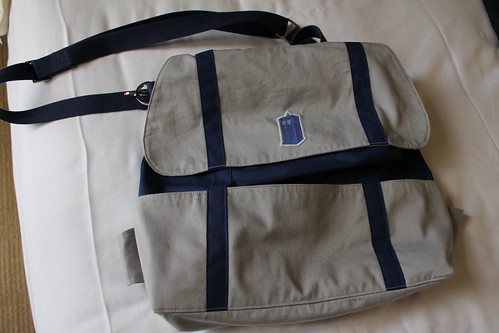
IMG_1575The one thing I finished up just before the Con that I didn't say much about earlier was a new bag--I wanted something that I could use for both day trips and airplanes, and this one worked out beautifully. This is the Cooper bag from Colette Patterns, and I pretty much mashed together the messenger bag and backpack versions. My original thought was to make the backpack straps so they could zip into the back, but at the end of the day, it was far more simple to just make a removable messenger bag strap, so that's what I did.

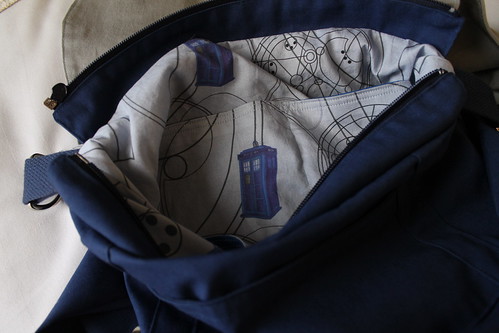
IMG_1578Under normal circumstances, I probably would have passed on solid grey and navy. But my planning revolved largely around this Spoonflower print of TARDIS (Tardises? Tardii? How do you even pluralize that, Whovians?) and Gallifreyan writing that Doug gave me last Christmas. Since it was the quilting cotton, I figured it would be best utilized as a bag lining. As for the outside, it's leftover grey twill from my Thurlow pants, and some stiff poplin-esque fabric that my mom destashed on me. I didn't manage to completely use up any of these fabrics, which particularly surprises me with the grey since it was already leftovers, but it's a start.

And yeah, I stuck a TARDIS on the outside. Because I could. And also because since I have this habit of taking a little plastic TARDIS with me on trips and sticking it in random places, I figured it was fitting. 

The one non-pattern addition I made was the separating zipper--I figured if I was planning to carry this around for day trips and such, I'd feel more comfortable if I had more than a flap and a couple of magnetic snaps standing between me and potential pickpockets. My mom, who is quite experienced at making bags, was kind enough to sew this one along with me and help me figure out the best way to do the zipper, since she added one to hers as well.

IMG_1576And here's the back! The only thing that somewhat annoys me about this bag is that the straps tend to flop out past the sides when I'm carrying this messenger-style, but it's not annoying enough to undo the straps and try to come up with something different. I was also pleased to learn when carrying it around this past weekend that the webbing straps were surprisingly comfortable, though I'm not sure they would have been if I'd been wearing anything sleeveless.

All in all, I think this bag will be quite useful, and now that I know how it works, I'd definitely use the pattern again. Maybe Doug will actually let me sew one for him sometime?

August 26, 2014

Sneak peeks and foiled plans


Does anyone else feel like the summer just got away from them? How the heck is it the end of August?

I've been quiet on the blog front, but I've actually been sewing quite a bit, and now have a backlog of about 3 larger projects and some accessories to write about, all DragonCon related in some way or another. So for the most part, I figure that by this point, it's better to just wait and show them off in the context of their respective costumes. I shouldn't have any trouble getting some photographs there! But I have been posting little bits here and there on Instagram, so I figured I'd share a few previews.

 #1: I refashioned a shirt for an Amy Pond costume (from Doctor Who). The shirt I found was almost perfect in its plaid pattern, but I had to pick off this embroidery. Amy's way too proud to be Scottish to walk around with a US Polo tag on her shirt.


#2: I made a bag to carry around, too, because I've been wanting to make myself a bag to use for carrying on airplanes and day trips with Doug anyway. Also, I had TARDIS fabric, thanks to Doug's Christmas present to me last year, and wanted to make sure it got used! This is just the flap and a piece of the lining, but hopefully I can get a few decent pics of the bag while I'm there.


#3: One costume I haven't been able to show any pieces of yet is my minion costume (from Despicable Me). These overall shorts are bloody awful and completely unflattering on me, but they were also the only ones I could find at the local thrift shops that weren't made for toddlers. And I was NOT going to take the time to sew overalls from scratch. But I did create this patch for the front.


And for my foiled plan: I was actually pretty much done with major costume stuff by last week, so I decided to see if I could squeeze out a project that would work for both the Sewcialists' Tribute Month and The Monthly Stitch's birthday "cake" month. My plan was to convert the Cake Patterns Red Velvet into a tunic top that I could wear with my skinny jeans. I still think the idea has merit, but after I traced the pattern pieces out, I discovered that the knit I intended for the bodice is too narrow, by a lot if I wanted to have any chance of matching the stripes. So I guess I'll have to use this piece for something more sleeveless. That idea's been put on the shelf for now, though I may revisit it with some of my knit stash when I feel less crunched for time.

For now, I'm in the middle of knocking out a Sorbetto that I'd had on my original summer sewing list anyway, so I can add that to my list of clothes to take to Paris. (I need to get on that!) And I also need to start working on my next big project pretty much right away, because a winter coat could take awhile, especially given that I'll be away a good chunk of September. But DragonCon is only two days away now, and so I need to finish packing! After work, anyway.


February 11, 2014

Thurlows so nice, I made them twice

Twice more would probably be more accurate. But I finally got to test out my plan to sew these assembly-line style. I still have one more pair cut out to sew, but the serger thread has to be different for it to look best, so I waited. Navy blue and charcoal, though? Black served absolutely fine for both.

Navy Denim ThurlowsSince I've already showed two pairs of these, there isn't too terribly much to say. (Other than I need to work on my tripod camera positioning, because this angle makes me look kind of stumpy!) I did make a few minor detail changes to make them more jeans-style, since both of these are made from a lightweight denim. There's topstitching on the waistband, the darts, and around the welt pockets. I added a bar tack on the fly and some topstitching to just after the front pockets after wearing the charcoal pair for a day, because a stress point was already showing! (I also reinforced the stitching in the crotch and thigh areas for the same reason.) I did not, however, make the belt loops for these two pairs-- I didn't even cut them out this time, since by the time I got to that step for the other two pairs, I was pretty much mentally done and just wanted to hem them and be finished.

I am happy that this navy denim pair can count for the #bluefebruary sewalong!


Charcoal Denim ThurlowsAnd here's the charcoal pair. Do I look a little smug here? (That wasn't intentional. I also need to work on my posing. Sadly, this was the best of the lot.) Even though you're probably tired of me talking about making pants, I think these will both be great additions to my wardrobe that will go with tons of stuff. I had to give myself a break from pants yesterday and made a quick knit project instead (to be blogged soon), but I think I'm ready to continue with the last pair now. And then take a bit of a break from pants...but it won't be forever, because I need some jeans! (Especially since my one pair of skinny jeans accidentally ended up in the dryer this weekend and now I can't get them on anymore. So sad. On the plus side, now I know what to do with the leftover stretchy denim from the TARDIS skirt...)tablet case- outside


One bonus project-- I actually finished this in January, but couldn't show it until now, since it was part of Doug's birthday present. He's been talking about wanting a Microsoft Surface tablet for months, so I teamed up with both sets of our parents to get him one. It came with a thin keyboard-style case, but I thought an extra case would also be helpful to keep things from jamming between the keyboard and the screen. So I used a scrap of the charcoal denim to make this envelope-style case, basically just winging it on the measurements by folding the fabric around the actual tablet.

tablet case- inside
The inside fabric was a fortuitous find-- I went to Goodwill with my bestie recently to try to find some preliminary costume materials for some stuff we're hoping to do later this year. While poking around the home decor section, I found this bedsheet that's all the various hockey teams in the NHL. Doug is a huge hockey fan, so I snatched that up and smuggled it home! I only needed a small scrap for this bag, but made sure to center one of his two favorite teams so that it was showing--the one that would require me to cut into the least amount of fabric, of course! I still have quite a bit of this left, though I'm not counting it as adding to the stash, but I'm sure I can use it up for some big blocky project like making pillows for the basement, aka his "man cave".

And now for totals:

Pattern: Sewaholic Thurlows (plus improvised pattern for tablet pouch)

Amount of time it took to make: About two weeks, plus some breaks to make the pouch while Doug wasn't home, so that averages to a little less than a week per pair. Not too shabby.

Fabric used: lightweight denims from Fabric.com

Amount of fabric used: approx. 3.5 yards (about 1.25 yds of main fabric/.5 yd lining per pair) - there's approximately 1.75 yards of each main fabric remaining, though not the full width of the fabric. (Any ideas?)

Stashed since: 2012

Current stash total: Counting the 6 yards I just bought at Mood, about 336 yards. Well, it's still some progress.

January 7, 2014

First finished project of 2014

One of the gifts that my husband spoiled me with for Christmas was a new Kindle Fire! I'd already had an original black-and-white Kindle, and plan to keep using it for things like taking to the beach, since the non-LCD screen will be better for reading in bright daylight. But I'm having a lot of fun with my new toy so far, and needed to come up with something to protect it, quickly!

Kindle case- standingThis was pretty simple to put together. I used this tutorial, and it worked like a charm. I already had all of the materials on hand--the cardboard was from an old, unused binder, the elastic was just lying around, and the fabric is leftover from the apron I made for a friend last year. I could have done a more involved case with padding and zippers and whatnot, but what really drew me to this one is that I can stand it up. Since some of the books I have on there are cookbooks that I downloaded for free from Amazon (I have a habit of hoarding whatever looks interesting on the top 100 free books of the day), I like the idea of being able to stand this on the counter while I cook (and make it less likely that I'll splatter food on it.) I've also since learned that this works pretty well for reading while knitting, which is what I tend to do when Doug is watching hockey or something.


Kindle case- openFor Stash Diet purposes, I can't really count this. All of the fabric was in my scrap bin, I didn't use either scrap up, and even though I am insane enough to measure out yardage, I'm not insane enough to measure my scraps! But this was a great little scrap project, and came together really quickly. I cut the cardboard out one night, cut the fabric another, and sewed this up super-quick on Friday afternoon. Altogether, it maybe took an hour and a half from start to finish. (Today is just the first day I've had decent light while I've been home to take pictures.)


Kindle case- closedAnd look! I basically matched the pattern without even trying! I love when that happens.

It was nice to start the year with a quick project. I have my next two projects cut out, and have already started on one--I'm making my next pair of Thurlows, and cut out a little something else to use up the leftover fabric. So hopefully they won't take too terribly long, now that I have the fitting for both things down.

So what are you working on for your first project of the new year?

November 7, 2013

Red Velvet, Green Velvet

I'm still plugging away at my first project for the Doctor Who Sewalong, and am hoping to have it finished and ready to show by this weekend. But I took a break on Tuesday to whip this little bag up.
Untitled
It only seems to want to go sideways. Probably what I get for doing a phone photo. But this is the Red Velvet mini-clutch by Cake Patterns, in green velvet! Which kind of makes me laugh.


UntitledThis one's sitting a little better, at least. It's hard to see in there, but the inside is a white brocade. I was able to make this entirely from scraps that I had on hand, aside from needing to purchase a zipper. And aside from the hour or so it took me to figure out how on earth those scissor pleats were supposed to work (I could only mark the dots with thread, because I didn't want to mess up the velvet), it came together very quickly-- I had this cut out and stitched up in one evening.

I'm not keeping this bag. A friend from church is fundraising to adopt a little girl from China with a heart condition, and she put a shoutout on her Instagram recently to ask for donations, so I told her I'd make a little something for her. So this is part of the Christmas-themed bundle she's doing, out of three bundles total. Hopefully the winner will like it! Thanks in particular to Steph, who graciously granted permission for me to make this bag for the giveaway when I asked her about it on Twitter. Now that I know how it works, this won't be the last one I make. I'm already plotting at least one for a Christmas gift!

Speaking of giveaways, there's still plenty of time to enter to win a recent issue of KnitScene. There's already been several entries, so thanks to everyone who's commented so far! It's been fun to see what's caught your eye.

March 7, 2012

A 2-for-1 quickie post

Answering a few questions via the comments on my last post::

Christina-- I used this tutorial to make the outlines for the croquis, though with Oona's modifications of using Photoshop instead since that's what I had. (I found the tutorial via her blog.) Hope that helps!

Hana-- my bust is pretty full. I think it's more that my waist is kind of surprisingly small in comparison to my hips, and I've learned over the years that if I wear things that aren't fitted or cinched in one way or the other, it just gets completely lost. Thus the reason that most empire-waist stuff just doesn't seem to do it for me, unless it does the fit-and-flare thing underneath.

Thanks for the other comments, ladies!

After spending basically 2 months sewing nothing but complicated, fully-lined jackets, not to mention the shrug that I'm still knitting, I just wanted to make something simple and fast. So I've actually managed to knock out two projects over the course of two days, which is what I'm sharing today.
The first project wasn't one that I found on my Pinterest, but I did have it saved there, so that counts as Pinterest being useful, right? Anyway, I found this tutorial for a simple roll-up knitting needle case on Design*Sponge, and figured it would be perfect for my small collection of non-circular needles. I slightly adapted it a bit-- instead of canvas, I used this thick textured cotton stuff that my mom had leftover from some project of hers, and instead of the twill tape, I made double-fold bias tape from a fat quarter I'd had sitting in my scrap bin from ages.

Making bias tape is a pain, even with that little tool thingy. It wouldn't be, except that anywhere I'd seamed it together, it wouldn't go through. But I'm seriously considering taking some more of those scraps and turning it into bias tape, just to give me a way to use some of it up. It's so handy. And I can't close the lid on my scrap bin. But I digress.

When I said small collection, I wasn't joking. I did leave one pack of my double-pointed out, but that's because I accidentally bought a second pack of size 11s after I forgot that I already had one. Thus the need to see what I have. You can tell that I prefer to use the circulars whenever possible, can't you?

I actually did something smart, and decided to stitch the bias tape on with one of the machine's decorative stitches. Bias tape is really a pain to line up, and I figured that this particular stitch would catch the edge on both sides, no problem. It worked like a charm, and I didn't mind this particular project having more of that "homemade" look, since the channels for the needles weren't exactly going to be in matching thread, either. I knocked this one out in its entirety on Friday night, including making the bias tape (aside from pre-cutting the strips during my cutout binge day I had last week), while helping my friend Nicole figure out the best way to take in a vintage dress that she was working on, and introducing her to Downton Abbey.  And I'm quite happy with the results, especially since I tend to procrastinate a lot on that more utilitarian sewing!


The second project, which I cut out later last week, was the newest Sewaholic pattern--the Renfrew top! I decided to go for the 3/4 cowlneck, with this knit print that I was given for Christmas about 2 years ago. (Please ignore the sideways picture-- apparently I forgot to save it after turning it in Picasa, and I didn't want to bother with uploading it again.)

This fabric print is kind of interesting-- when I look at it close-up, the somewhat Celtic knot-like is what stands out to me more. When I look at it from further away, the X's stand out more. And closeup, the X's look more like V's. It's like an optical illusion!


And here's my finished top! As seen with my corset-laced pants, because it's always fun to find something new to wear with those, and the weather is warm enough today that I'm feeling good about breaking out the linen pants after their winter hiatus. I think the stripe-ish bits lined up pretty well, overall. And this pattern sewed together like a dream-- I got it stitched together in its entirety within the few hours I had to sew on Monday, and that was with going back over nearly every seam with my sewing machine after serging it. (As per my Check The Technique, I did work on playing with the tension on here. It looks great on one side, but not so much on the other side, and everything I've done to fix it so far looks terrible on both sides. So I didn't trust it to not pull apart. I did learn, however, that if I serge it first, machine-sewing it doesn't make the fabric ripple. So I guess that's something.

Anyway, back to the pattern. As I said, it was super-quick to sew together, and I'm really happy with the fit. On a hunch, I actually did some grading before I cut it, from the size 8 for the chest and hips down to the size 4 for the waist, and it worked great! I didn't have to take it in at all. The length is perfect to be able to raise my arms without my stomach showing, which is a must when you play an instrument that pretty much requires that movement at all times. And I wasn't sure how the neckline would cut, thus the cowl neck for this version, but it seems like it wouldn't be too low-cut at all. So I'm absolutely certain that I'll be going back to this pattern again--it's pretty much the perfect basic knit top! Thanks, Tasia!

The one thing I would have changed was the cowl-- I love the look of it, but I had to piece one side of it together due to the way I had to lay it out with the stripes. Before I sewed it on, I went back and forth multiple times as to which way I should flip it in hopes that the un-seamed side would end up on the outside. And I guessed wrong. So there is a seam running down the front of the cowl, though I don't think it's very visible unless you're really close-up. I didn't want to re-do it and risk stretching the neckline out irreparably (ah, the joys of ripping out serger thread), and think this particular print needed the cowl to balance out the grid-like nature of it. So I just left it.

2 more things:
1. With this top, and factoring in those couple of fabrics that I got for my birthday, that takes my stash down to about 216 yards. This is down 57 yards from where I started at the beginning of last year, which I don't think is bad at all! The count will be even lower soon, since I already have 3 pieces chopped up for the next couple of projects, but I have that information written down elsewhere so I'm not counting it yet.

2. Sarah at Rhinestones and Telephones did an interesting post yesterday where she did more of a monthly roundup/goals for her sewing, and kindly said that I could borrow the concept. I'm definitely one who gets too many ideas for things I want to make, and therefore I stress myself out. So I'm hoping to use this as a way to focus a little more, and maybe even work in some of those mending and utilitarian projects that I've been meaning to do for ages. I can pretty much sum up February and January with the browncoat-fest post that I already did, so instead, I'm just going to share my goals for the rest of March. (Since the top I'm wearing today was goal #1.)

#2: Finish knitting that shrug, since I need it by the 31st. I'm getting close-- about 30ish rows left on the sleeve, then blocking, then seaming and adding the final ribbing around the back and neck. I can do this!

#3: Reconstruct a skirt that I took apart late last week. That will be this afternoon's project, at least in part.

#4: Get the next step of my mini-knitalong going. It's only about 30 rows, I can do this too!

#4: Sew that blue corduroy jacket that I cut out last week. I may be able to start this later this week, depending on how said reconstruction goes.

#5: If I get 2 and 4 done and still have some time left, I have a short-sleeved top in my Ravelry queue that I'd like to get the swatching done up for. I'm hoping this one will be fairly simple, since for once in my life, the yarn was one that was both wool-free and still affordable, and therefore I'm actually using what the pattern calls for. So I guess this will be the big test to see just how ridiculously tight my knitting tension is...

I'm trying not to go too overboard and stress myself out, since I'll be getting back to a more normal work schedule probably next week, and will have less time. So hopefully this is a realistic list!

October 20, 2011

a bag for a friend

I finally got a decent amount of sewing time in yesterday. It had been awhile, since the last week has been mostly making preparations/driving around for/recovering from another whirlwind weekend trip. This one was much further away and not the sort that I could bring anything crafty with me, either. Fortunately, since I'd already gotten all of the quilting in last week and found about an hour to assemble the strap on Tuesday night, this bag came together really quickly. (Which is good, because I'm getting really anxious to make some progress on my Fall Essentials list again!)

So this is the bag I made for Jolene. It's out of the same pattern as my "Autumn in Asia" bag, though a little bigger since I accidentally skipped the part about trimming the overall size down after quilting the fabric...oops. Picking out the fabric was a bit of a fun process--she told me what sort of colors and prints she likes, I took a bunch of pictures on my phone of every print I thought might fit those ideals while I was at Joann's one day, and showed them to her the next time I saw her at church. So the main fabric of this bag is the one she liked best, and then I chose the red and green to match. (She'd specifically mentioned a red interior with this fabric, and I think the overal brownish tone helps to keep it from looking too Christmas-y!)

Here's the back, with a patch pocket....


...and an inside shot.

So that's that. I'm perfectly happy to go back to selfish sewing for awhile, and have already traced out the Burda pattern for the teal skirt. I also attempted to draft a lining pattern for it, so we'll see how that goes. Pattern drafting is definitely not my strong point!

I've also been plugging away a bit at the chart section of the Cadence sweater. I think I'm about a third of the way through. So far so good, though I haven't gotten to the decreases yet.

And I've been thinking that it might be fun to start showing my me-made items in real life more often, since I tend to lose the willpower for daily outfit photos really quick during the Me-Made or Self-Stitched challenge months. But I still love the concept behind them. So since it gives a more accurate sense of the yarn colors anyway, here's a shot of my Counterpoint Hat from the weekend:
All along, I'd envisioned having this done in time for this particular road trip, since I was planning on taking a more scenic route home via Skyline Drive in Shenandoah National Park. I didn't have time to go through as much of the park since I'd hoped since I got there later than expected and the sun was going down. When I entered the park, I was just wearing it for fun, but by the time I got to here, I was glad that I had a hat. It was getting kind of windy and making it much colder!

October 6, 2011

Moving on...

The dress is fixed! I hope. I ended up doing the elastic thing, since I figured the dress is ruched enough that it would somewhat blend in. So I used the facing to make a casing, sewed one folded-under-and-stitched end of the elastic to the zipper (less likely to pull than the knit fabric)...

...tacked it again at the end of the facing, and then just to give it a little extra support, cut the elastic across the front and secured that in the middle where the knot is. I figure it should be stretchy enough that having what basically amounts to a chest stay (as opposed to waist) shouldn't be uncomfortable to wear. The sides do seem to fit me much better now, so here's hoping that's the end of the green dress saga!

So, other than this little repair job, I haven't sewn a thing in a week. Except for this.

This is a piece of plastic canvas edged in bias tape. Otherwise known as the brim for my "Counterpoint Hat."The pattern specifically called for plastic canvas, and I happened to have some on hand from trying to get my earrings somewhat organized. But I didn't want little plastic nubs poking through the yarn or into my head.

Though I haven't been sewing, I have been knitting some. So here's the updates on that:

1. Like I said, I'm done knitting the hat. I just don't have pictures yet since it's kind of wet from my attempt to block it yesterday. Not sure the blocking quite solved the issue of the stitches looking stretched next to the cables, but I was able to stretch it out to fit my apparently big head a little better. Once I add the brim, that's done.

2. My yarn estimation skills are lacking. I had over an entire skein of that yarn left over! So I'm making a scarf just for the heck of it. It's a bit hard to see the pattern, but it's got kind of a dragon-scale look to it. The pattern is called Guardian's Tail. It's got something like a 10-row repeat, and it's complicated enough to keep me from getting bored. I think this is about 50 rows in, so this is going to take awhile! Especially since my plan is to basically knit until I run out of yarn.

And I've made some progress on the scarf I'm making for Shantelle to use up the yarn from her handwarmers--this is pretty much all from keeping my hands busy while we have mini Project Runway marathons. I did use up the first half-ball that was left. Can you see what I did three stripes in from the right, though? The end of the second ball was the right color to add it on, and I couldn't find the other end, so I just went with it. And it's now reversing the colors! Which I kind of like. I'm afraid this isn't going to end up being a very long scarf, probably more of a neckwarmer than anything else. So I'm going to try to do some kind of keyhole to slide the other end of the scarf through. Hopefully I can figure out how to do that.

I'm getting kind of antsy to start sewing again. Next up on my list is a bag I'm making for my friend Jolene. (She is rather generously paying me to make it for her.) I'm hoping to get that cut out today. I'm also making a slight amendment in my FESA plan. Instead of the straight skirt I'd planned for my teal suedecloth, I decided that would be better off as some kind of A-line. So after digging around in my pattern stash yesterday, I came up with this. I think it'll look nice with the patches and topstitching with the somewhat textured fabric, and will keep a solid color more interesting for me. I also found a second skirt in a different Burda that will actually be perfect for the red twill--I wanted a more or less pencil skirt with some kind of pleat or godet in the back, and that pretty much does it for me. With lining and everything! I'll need to draft a lining for the teal, but I think it'll be fairly simple. But if I want to have any hope of getting on that soon, I'd better get to work!

July 3, 2011

It's a bag-stravaganza!

I know, I know, cheesy title. But I did finish two bags within the last two days-- one on Friday, and spent the majority of yesterday sewing the other.

Bag #1, which I finished on Friday, is a case of sorts for the yarn swift I picked up awhile back. No more cardboard packing tube! This was made entirely from pieces of scraps--mostly free samples that I was given once, about 12x12"-ish pieces, but if that white fabric with the sunflowers looks familiar, that's because it's leftovers from the Sunflower skirt. The black floral fabric is also clothing leftovers, from a thrifted dress-to-top refashion I did prior to the blog.

As for the lining, that's a piece of my old closet curtains. It's splotchy because it was hand-dyed and batiked by yours truly to simulate stars. (The fabric was originally on the bedroom ceiling, because I wanted a starry ceiling and hadn't been allowed to paint it.)

The swift fits pretty nicely in there. Now I just need to come up with something for the ball winder...


And here's bag #2. There's this game that some friends introduced me to several years ago called Munchkin-- kind of a parody card version of those Dungeons & Dragons-type games.And all of the weapons and armor you get have these funny names like "Boots of Butt-Kicking", etc. I think I'm going to have to call this one my "Bag of Extreme Stash-busting"-- would you believe that this one bag used up almost 4 yards of fabric? 3 3/4, to be precise.  First of all, there's the denim/brocade outer bit (the fabric was already stitched into these stripes, I'm not that crazy. At least not this time.) And then I used a pretty nice chunk of some random lavender twill that I was given for free, substituting for the canvas that was called for to interface the bag. And then on top of that, the bag itself is padded, which used up the majority of some grey fleece. And I also lined it, so that fully used up some silky polyester stuff I picked up for some patchwork-type skirt that I never actually got around to making.

(Said silky polyester stuff.) I tried to take a picture of the inside pocket-- it's kind of interesting, since it's a zipped patch pocket that just hangs from the facing. But I couldn't get a very good shot of it once it was all constructed.

This bag was for the laptop that I got recently, which you can kind of see peeking out. I didn't want to reinvent the wheel, so I used Simplicity 4391 (I'd picked it up awhile back to fill out a 5 for $5 sale purchase), with a few tweaks. Namely enlarging the bag, though I did take the flap from the regular messenger bag, and change the velcro to buckles and webbing.

And I did add an extra pocket onto the back, to hold the little cooling pad thing I got with it.

It was really nice to just knock out a project quickly-and have an entire day to sew! I'm pleased with the results overall, even though the bag itself is quite weighty. And no wonder, considering all the fabric that went into it!

(Incidentally, this bag gets me down to about 255 yards of stash--technically a little less since I cut out the pants today, but I haven't added that in yet. So I'm down almost 20 yards from where I started this year!)

June 25, 2011

quiet time

I feel like it's been pretty quiet on here lately. The truth is, there's not really that much for me to report this week. I did get the bag for my laptop cut out, and I've done some preparatory hand-sewing, which I'll explain later. For the last two days, I intended to start sewing it, but things keep getting in the way--yesterday, it took me so long to get through some necessary chores that it was kind of late to start by the time I got done, and today my brother and sis-in-law ended up coming over because the water at their place wasn't working.

Today, I ended up knitting instead, since aside from grilling up a delicious dinner, my hang-out time with my siblings pretty much consisted of a mini-marathon of a tv series, and my sis was crocheting as we watched anyway. I actually made some pretty decent progress on the tank top. The only problem is, I ended up having to rip out all but three rows of what I knit today--my first time making a split for a neckline/using a stitch holder, and while I followed the pattern directions, the number of stitches called for ended up making the pattern end at a weird place right next to the neckline. So I had to rip out a couple of inches to take it back to the beginning of that so I could pick up one more stitch and give it a bit more stability. *sigh* Kind of frustrating, but I guess it's all part of the learning process, right? And since it has an odd number of stitches, this will make it a bit more centered (originally, the eventual right side had 3 stitches more than the left part, which is what I was working on.

Things will continue to stay quiet around here for a bit. I'm going on a brief vacation at the beginning of the week, and between packing, having to work tomorrow, and various prior social/musical/church-related activities, I really doubt I'm going to get any crafting in unless it's just re-knitting a row or two. Hopefully later next week, I'll have time to pick something up again-- I miss sewing!

March 23, 2011

outsourced.

I did finish a wrap on Monday, and am going to post it. But I'm planning on doing a tutorial, so that will come later. But here's what else has been going on.

#1: The dress is done!
So here's the entire thing (though I know the sheer part is a little hard to see, since it's the same color as Donna.). I did end up having to shorten the straps about 3", but aside from that, it's pretty much as is.

And here's a view of the back.

#2: My mom and I ended up making a bit of a deal. Since I made her dress, she made me a new spring/summer bag! (Which works out well for me, because I probably wouldn't have gotten to it till July or something, and she's way better at making bags than me. So in this case, I'm perfectly fine with outsourcing!) Most of the fabric was from my stash, too, which was nice for my efforts to use it up!)

She also added this nifty pocket to the back, which is just the perfect size for my habit of carrying a book with me at all times!

#3: Speaking of the stashbusting, here's the update: I started off with about 273 yards. So far, between the wrap I just made on Monday, and a dress I've cut out but haven't started sewing yet, it looks like I'm down to 260 1/2 yards. (Including adding some back in for the linen I got for the Anthropologie pants.)

#4: Still knitting that wrap. On ball #2 of yarn. Otherwise, it looks pretty much the same as the last picture.

#5: On a totally unrelated note, I'm 98% decided on letting go of the Etsy shop. (The other 2% is feeling like maybe I'm giving up too soon.) The thing is, I haven't had time to work on it in about a month. And the things I do have up there just aren't getting noticed. Most of the views I have up there are from my own edits. I came to the realization today that this isn't a good time for me to be doing this, because I just can't put in the effort that I'd need to in order to promote this. There's too much going on in my life right now--I'm going to be doing some job-hunting very soon, and I need to figure out what direction I'm going to be taking with that. And whether I can actually keep teaching music, as a result.

So there's a lot of changes coming my way. And I'm not sure what my free time is going to look like after everything gets sorted out. Making things is still a must, but I need it to be my hobby, not a second (or third, or fourth) job. My goal with the jewelry was to raise some money to donate to a Haiti relief organization that some friends founded, and thanks to the craft fair, I did that. I'd thought it might be an ongoing thing, but it seems that wasn't meant to be the case right now. So I'm ready to simplify things again, and I'm at peace with that. As for the leftover jewelry, I think I'm going to pull a couple of things for me, and then give some of it away to friends. (Maybe I'll even do a giveaway or two here, if people are interested...it's been awhile since I've done one of those!) I don't need to keep it all, especially since I made some things similar to what I already had, and I'll feel better about it if I know that it's being used and enjoyed.

I'm not sorry I tried it. It was a good learning experience. And maybe someday I'll try doing a little crafty business on the side again. Just not now. (Besides, then I don't have to try and keep up with writing a second crafty blog!)

March 5, 2011

Me-made March, days 1-4 (and other progress)

Skipping my outfit for today so far, because at the moment it's more or less an exact repeat of Self-Stitched September's day 10, minus the shoes since I'm just bumming at home for the moment. And also minus the dry hair...I will have to change later because I have a memorial service that I need to go to tonight, so maybe I'll take a picture of that. But here's days 1-4.

I did this as a collage in Picasa with numbers, but the numbers seem to not be showing up. Silly program. So this is going from top to bottom, then left to right.

Day 1: The me-made element is my Eva jacket. Otherwise, new-purchased pants/shoes/jewelry, thrifted top.

Day 2: Featuring my military-style corduroy jacket. Otherwise, new-purchased top and pants. (And shoes, though you can't see them. Also, I kind of wish I'd worn grey pants instead, because I'm not too thrilled with this on camera.)

Day 3: Featuring the "Winter Beauty" top that I recently made, thrifted jeans, me-made earrings that you can't really see, and new-purchased shoes.

Day 4: Featuring the "Lucky Bamboo" shirt-- actually, the first time I've worn it during this colder season. (I'll explain in a moment.) Also new purchased cami and jeans (the latter which I'm very strongly tempted to dissect and re-sew, because I love the back pockets but they're uncomfortably big on me), and me-made jewelry which pre-dated the blog.

So about that last shirt....it's been in a pile that I meant to put in the refashion pile all winter. Since I made the pattern myself, more or less, it ended up kind of big on me and I have to pull a good chunk of the actual shirt through the slit for the wrap ties in order to get it to lie flat up top. So I've been thinking about deconstructing that part and taking it in. But between that LBD that took forever and the serger problems I've been having over the last several months, it hasn't happened. Nor did putting it in the actual pile, I'm sorry to say. So I rediscovered it when I was cleaning my room on Wednesday and figured why not, I'd just wear it, because it's still really comfortable. And since I now wrap the ties all the way around like a belt, it's really not that noticeable that I'm taking a quarter of the inner wrap with it. I hope..

It's sad, but I'm already kind of dragging my feet about the daily photos. That, and feeling kind of bored with my options, since I've already been wearing most of them all winter. Which really doesn't bode well, since it's only day 5. But hopefully it'll warm up soon and I'll be more excited about it again.

But enough about that, let's get to some craftiness! I've got 2 things in progress at the moment:
First off, my quickie sewing project that of course is taking much longer than expected. I'm using leftovers from that flowery peasant-type top I made last summer to make a case for a 15-pack of circular knitting needles that I recently bought off of Etsy. This is as far as I've gotten so far, because I'm going about this completely intuitively and probably not in the most intelligent manner. So I have to add binding to one more "page" (doing it book-style), add fabric to hide the batting that is currently the "cover", and add some kind of closure.


.Secondly, I ended up starting the beret. Which is really black, but we all know how badly that photographs. I think greying it out with the flash shows the current progress much better anyway. I'm about 20 rows in, and will probably need to do at least 10 or 15 more before I start the actual beret top. I'm not sure, since it's measured in inches instead of rows. I was originally hoping to get that done before next weekend so I could just focus on the wrap, but I'm thinking that might not happen now. It's been one of those weeks where all sorts of wrenches got thrown into plans and things took longer than expected--not in a bad way, but in a way that hasn't left me with as much time to work on these sorts of things as I'd hoped. But there it is.

On the plus side, look at the pretty knitting bag that my mom made for me!
It's big enough to hold all of the yarn I have so far, as well as all of the needles and the folder I've put my printed-out patterns in and stuff. So this will make it a lot easier to pack for the crafty weekend!